How to enable / disable the Indexer Backoff feature in Windows
By default, Windows uses the index (index) when searching to give you faster search results. The search index includes only selected placements. These locations can be filtered according to the type (extension), properties and file content you want to index.
Indexer backoff feature in Windows
The index uses the Windows Search service and runs as a Searchindexer.exe process in the background. The index will rebuild automatically and update changes made to the included placements since the last index rebuild to increase the accuracy of the search results.
By default, the indexer backoff feature will slow down while rebuilding the index, if there is user activity, and will automatically resume at maximum speed when no user activity is detected.
If the indexer backoff feature is disabled, indexing will continue at maximum speed, even during high system performance.
Beginning with Windows 10 build 19592, Windows Search Platform (Indexer) has been updated with improved logic, helping to find a better time to do file indexing and avoid more indexing when you're on your computer. An improvement was also made to significantly limit the number of times the service indexes files for content with no impact on the search experience and to give you a better experience on Windows.
This guide will show you how to enable or disable the indexer backoff feature that is used to slow down indexing during user activity in Windows 7, Windows 8, and Windows 10.
Enable / disable the Indexer Backoff feature in Local Group Policy Editor
Note : Local Group Policy Editor is only available in Windows 10 Pro, Enterprise, and Education editions.
Step 1. Open Local Group Policy Editor.
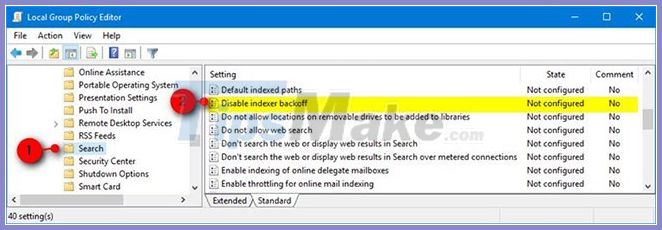
Step 2. In the left panel of Local Group Policy Editor , navigate to the location below.
Computer ConfigurationAdministrative TemplatesWindows ComponentsSearch 
Step 3. On the right side of Search in Local Group Policy Editor , double-click the Disable indexer backoff policy to edit it.
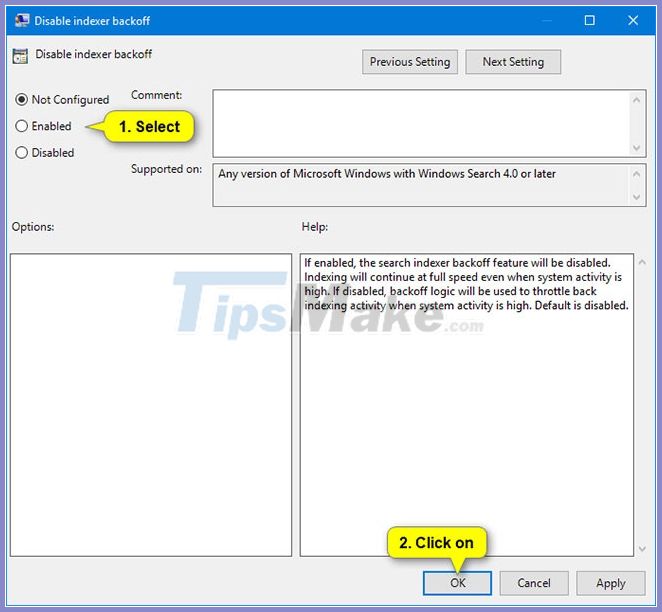
Step 4. Do step 5 (on) or step 6 (off) below, depending on what you want to do.
Step 5. To enable Indexer Backoff, select Not Configured or Disabled , click OK and go to step 7 below.
Not Configured is the default setting.
Step 6. To disable Indexer Backoff, select Enabled , click OK and go to step 7 below.

Step 7. When done, you can close the Local Group Policy Editor if you want.