Table of Contents
This guide explains how to disable DHCP in Windows 10, with clear steps, practical tips, and important checks before you begin.
Whether or not the device uses DHCP is a per-connection setting. In other words, if you disable DHCP for your wired connection, all wireless connections will continue to use DHCP until you do so.
Disable DHCP for a connection in Windows
To disable DHCP for connection in Windows you follow the steps listed below:
Step 1. Press the Win + X keys, then select Settings.
Step 2. Click on Network & Internet item.
Step 3. Click the network connection (wired or wireless) (such as Ethernet) that you want to configure, and then click the Properties button .

Step 4. In the connection details section, you will see the IP settings section. Click the Edit button which you will find there.
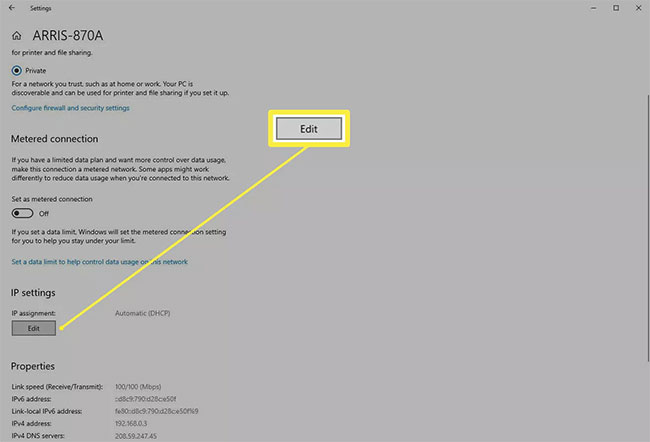
Step 5. In the Edit IP settings dialog box, the connection will most likely be configured as Automatic. Click the drop-down menu and change it to Manual.

Step 6. You should see two display toggle switches, one for IPv4 and one for IPv6. You can enable either or both, the procedure is the same for each option. For example will click the switch for IPv4.
Step 7. A series of new fields will appear. You will need to fill in these fields, including at least the IP address (which is of course the one you want the machine to have), the Subnet prefix length (this describes the class of the network, try 24 here and if that doesn't work. dynamic, change to 16 ), Gateway (your router device address, most likely 192.168.0.1) and Preferred DNS (you can use the DNS provided by your ISP or try Google's DNS if you don't can be found: 8.8.8.8 ).
8. Click Save to make the changes.
Note : You can also set the same setting for the network connection from Control Panel> Networking and Sharing Center> Change adapter settings . Select the desired connection and click the Change settings of this connection button .
Then click the Internet Protocol Version 4 (TCP / IPv4) option (but don't uncheck the checkbox) and click the Properties button . This will give you a dialog box similar to the one you saw in Settings , in the "old" Windows style. Note that you can set IPv6 in the same way.
Re-enable DHCP in Windows
While disabling DHCP can be a bit tricky, re-enabling it is much easier.
Step 1. Go back to Settings> Network & Internet , and click the Properties button for the network connection.
Step 2. Click the Edit button in the IP settings section for the connection.
Step 3. The Edit IP settings dialog box will contain your previous configurations. Click the drop-down menu at the top of the dialog box and switch it from Manual back to Automatic.
FAQ
What should I know about Disable DHCP in Windows 10?
Focus on the key features, requirements, limitations, and practical use cases explained in this guide.
How do I get the best results with Disable DHCP in Windows 10?
Follow the recommended steps, use current software or information, confirm compatibility, and review settings before major changes.
Are there any risks or limitations?
Potential limitations depend on compatibility, data quality, cost, privacy, support, and how the product or method is used.
Related Articles
 Steps to Fix 'Unable to Contact Your DHCP Server' Error on5 minutes read
 What Is Dhcp Error? How to Overcome It?6 minutes read
 Address: Set up Dhcp Server in Windows 20037 minutes read
 How to Install, Configure, and Test Windows Server 2012 R2 Single8 minutes read
 What Is DHCP or Dynamic Host Configuration Protocol?12 minutes read
 Use Group Policy Filtering to Create a Nap Dhcp Enforcement11 minutes read
Reader Comments 0
Sign in with email or Google to join the discussion.