Table of Contents
This practical guide walks through how to enable / disable hibernate mode in Windows 10, explains the main requirements, and highlights common issues that may appear along the way.
In the past, this mode had a slight impact on performance, it would take longer to start the computer and continue working. But with today's modern solid state drives - SSDs, shutting down and starting up with Hibernate hibernation is very flexible, as fast as Sleep mode, so there are almost no downsides.
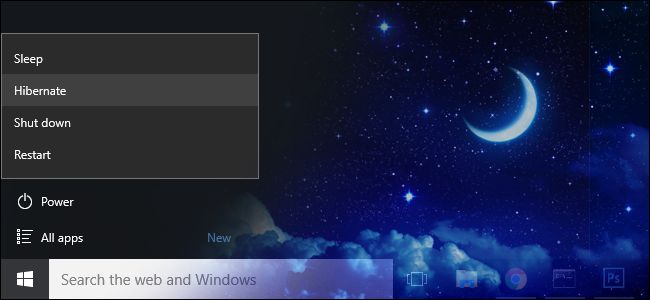
With this mode, your computer can completely shut down while keeping the open applications and programs the next time you boot. All data will be quickly transferred from the hard drive to RAM in seconds, making the job much smoother and saving much more time.
If you do not understand what Hibernate is, Review this guide: Difference between Sleep and Hibernate in Windows.
How to enable Hibernate mode on Windows 8 and 10
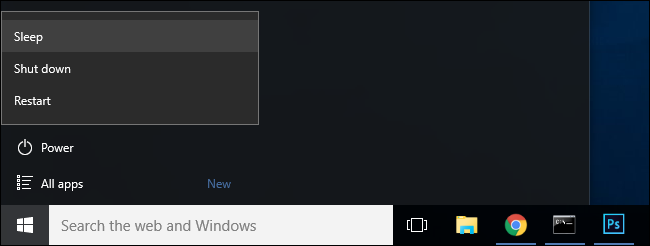
Hibernate hibernation option is disabled by default in Windows 8 and 10 , but fortunately enabling it is easy.
Step 1: In Windows 8, you can press the shortcut Windows + Ito open the Settings menu , then select Control Panel and select 'Power Options'.
For Windows 10 press as well Windows + I, but instead select System then select Power and Sleep from the left navigation panel and finally click Additional power settings.
However I have a quick way that can be applied to both versions of Windows, just press the key combination WIN + R to pull up the Run dialog then type ' powercfg.cpl ' and hit enter.

This command is a direct shortcut to the Power Options settings menu . From here on out, the steps are exactly the same on both operating systems.
Step 2: Choose ' Choose what the power buttons down ' from the left navigation panel.
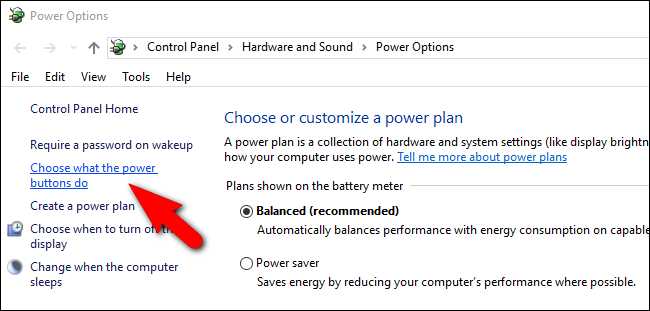
Step 3: At the top of the window, click on ' Change settings that are currently unavailable '.

Step 4: Scroll to the bottom of the window and check ' Hibernate: Show in Power menu ' then click the Save changes button .
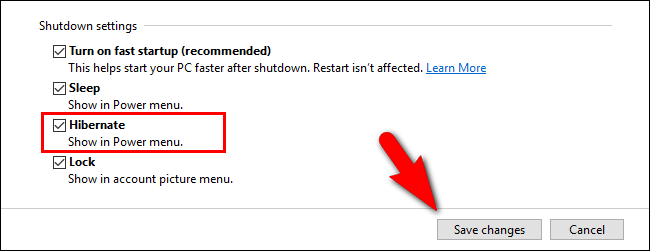
Finally, close the Power Options panel . This change takes effect immediately Then, you don't need to restart your computer.
Note: To turn off this mode, just uncheck Hibernate and tap Save changes again.
Now when you press the Power button in the Start menu , we will see the Hibernate option under Sleep. Left click on it then Windows will move the applications running on RAM and hard drive, shut down completely and wait for you to restart the computer -> display exactly open applications and programs.

The tutorial on how to enable / disable Hibernate mode on Windows 10 here is the end. I believe that when using this mode, the process of working on your Windows computer will save a considerable amount of time. If your friends are also using Windows, do not hesitate to share how to enable and use this hibernation with them.
Key Takeaways
Use the information above as a practical reference for how to enable / disable hibernate mode in Windows 10. Review each step carefully, confirm any requirements, and choose the option that best fits your situation.
FAQ
What does this guide explain about Enable / Disable Hibernate Mode in Windows 10?
It explains the main concepts, practical considerations, and useful steps related to enable / disable hibernate mode in Windows 10 without requiring advanced knowledge.
Who can benefit from learning about Enable / Disable Hibernate Mode in Windows 10?
This information is useful for readers who want a clear overview, practical guidance, and reliable steps related to enable / disable hibernate mode in Windows 10.
What should I check before applying this information?
Review the requirements, confirm that your device, software, or situation matches the instructions, and back up important data before making major changes.
Related Articles
 Turn off, turn on Hibernate mode in Windows 75 minutes read
 How to turn Hibernate hibernation on Windows 105 minutes read
 How to enable Hibernate mode on Windows 114 minutes read
 Is Hibernate harmful to PC?6 minutes read
 To enable or disable Sleep mode in Windows 105 minutes read
 Reactivate 'hibernate' - Hibernate on Windows 8.13 minutes read
Reader Comments 0
Sign in with email or Google to join the discussion.