How to enable Dark Mode in Ubuntu 20.04 LTS
If you have ever used dark mode on a mobile phone, then you will be surprised to learn that it is also available on Linux computers. In this tutorial, TipsMake.com will show you how to enable Dark Mode on a full Ubuntu Linux system.
Table of Contents
Basically, Dark Mode will change the color scheme of programs and UI to dark color and make it appear less light while also easier on the eyes. Enabling Dark Mode on your system not only reduces eye strain, but also extends battery life.
Condition
- Ubuntu 20.04 system
- User with sudo privilege
Note:
- The procedure discussed in this article has been tested on Ubuntu 20.04 LTS.
- To launch Command Line Terminal, press Ctrl + Alt + T.
Enable Dark Mode in Ubuntu
Follow the steps below to enable Dark Mode in Ubuntu:
Step 1: Launch Settings
First, you'll need to launch the Settings app in the system. You can do so by going to the top right corner of the screen and clicking on the system menu. Then, from the menu that appears, click Settings.
Another way to open the Settings utility is to right-click on the Desktop and from the context menu that appears select Settings.
Step 2: Turn on Dark Mode
From the left sidebar in the Settings app, choose the Appearance tab. Here, you will find 3 different themes in the Window colors section. Ubuntu has a standard theme enabled by default.
Now, to enable Dark Mode on the system, select 'Dark' as shown in the following screenshot. The changes will be applied immediately, and you'll see that nearly all of the default apps, including the Settings window and Nautilus File Manager, are currently in a dark background.
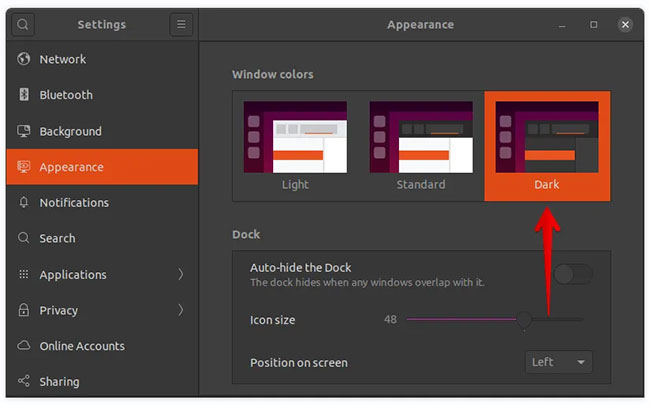
Select 'Dark'
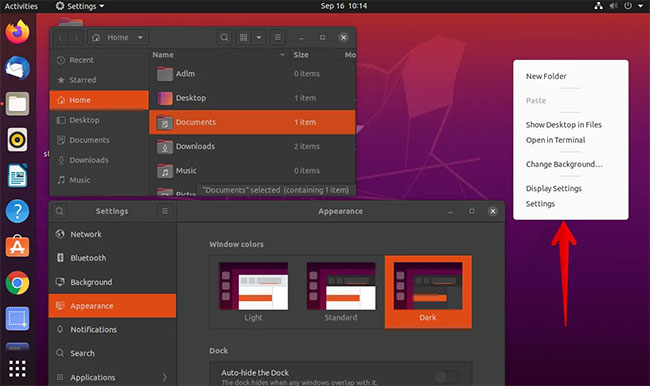
However, you will notice that the dark theme has not yet been applied to the shell, such as in the right-click context menu and notification area, the system menu and the application menu (in the top panel).
In the following screen shot, you can see that the File Manager and Settings apps are in dark background while the context menu is in light mode.
Turn on completely dark background
In the next section, I will see how to enable Dark Mode in the rest of the UI shell areas. In this way, you can achieve a completely dark background in your system.
Follow the steps below to enable completely dark background on Ubuntu:
Step 1: Install the Gnome shell extensions
You will need Gnome shell extensions that allow you to enable dark theme for shell. Use the following command in Terminal to install the Gnome shell extensions:
$ sudo apt install gnome-shell-extensions
Step 2: Install Gnome Tweaks utility
Then install the Gnome Tweaks utility with the following command:
$ sudo apt install gnome-tweaks
Step 3: Turn on User Themes extensions
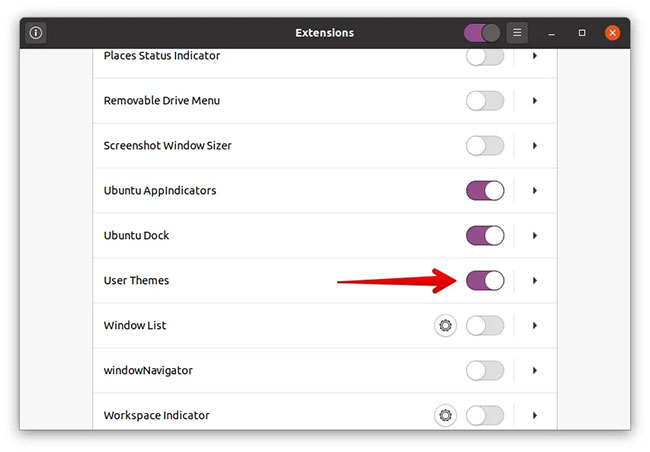
Now, open the Gnome Extensions app on your system. To do so, press the super key and type extensions in the search bar. When the icon for the Extensions application appears as you can see in the following screenshot, click it to open it.
In the Extensions application, slide the toggle button next to User Themes to the On position.
Now, log out of the system and log in again or just press Alt + F2 then press r to restart Gnome shell.
Step 4: Change Shell theme
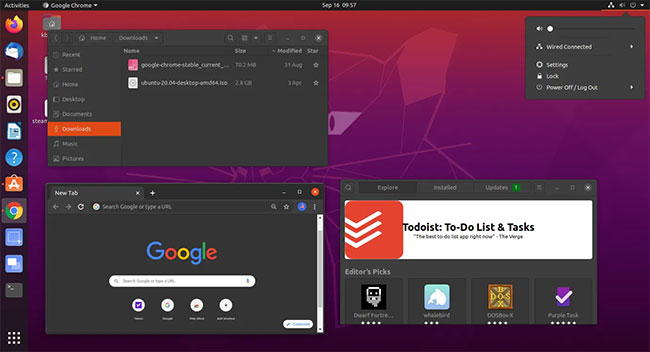
Now, open the Gnome Tweaks widget and from the left sidebar select the Appearance tab. Then choose Yaru-dark from the drop-down options next to Shell.
The changes will be applied immediately, and you will see the dark theme applied to all remaining areas, including the right-click context menu, notification area, system menu, and apps menu.
Turn off Dark Mode
If you are bored with the dark theme, you can disable it from the Gnome Tweaks utility.
1. Open the Gnome Tweaks widget and from the left sidebar, select the Appearance tab.
2. Then choose the Default theme from the drop-down options next to Applications and Shell.

Now the dark background mode will be disabled and the default light mode will be applied to the system.
Was this article helpful?
Your feedback helps us improve.
Related Articles
 How to enable Dark Mode in Notepad on Windows 10/116 minutes read
 How to enable Dark Mode for Gmail3 minutes read
 How to enable Dark Mode for File Explorer, open dark mode2 minutes read
 How to enable Dark Mode in IDM4 minutes read
 How to enable dark mode in Microsoft Office on Android2 minutes read
 How to activate Dark Mode on Windows 10?3 minutes read
Reader Comments 0
Sign in with email or Google to join the discussion.