How to Draw a Cartoon Chicken with MS Paint
Chickens are cute farm animals that are always popular. Drawing chickens on a piece of paper is easy but like most people, you might want to draw it over on the computer instead. You may find drawing chickens on MS Paint a bit vexing but,...
Table of Contents
Method 1 of 3:
Using the Brush Tool
-
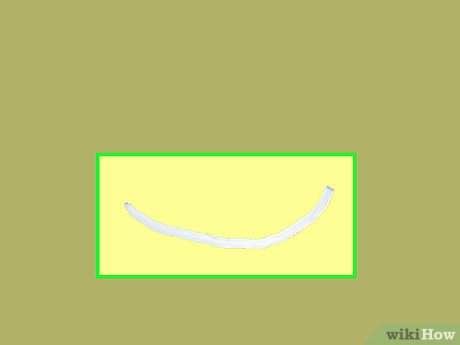 Draw a simple curved line.
- Draw wide curved line for the chicken's torso.
- MS Paint offers different brush tools. I used the watercolor tool to avoid making it look flat.
- You can use white or brown depending on what you want.
- Don't forget to set the shapes to Fill>'SOLID' and to set the secondary and primary colors properly.
-
 Add the tail and work your way to the body.
 -
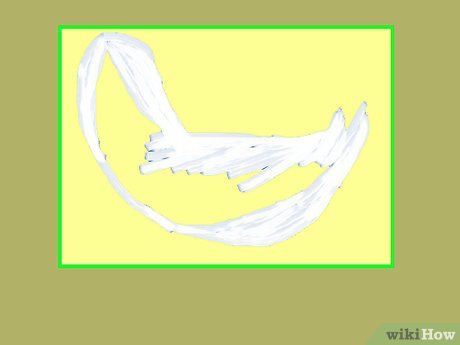 Using simple strokes add the tail and just brush towards the center to build up the chicken's body, as well as the head.
- To do this, add an upside-down U for the head.
- With simple and short strokes, work your way from the U to the body.
-
 Fill the chicken's body using short strokes.
- Adjust the chicken's body as you see fit.
-
 Draw the comb and wattle.
- Use a red brush this time.
-
 Draw the beak and eyes.
- Use an orange brush color for the beak and black for the eyes.
-
 Add the wings.
- For the wings, draw short strokes using a gray brush first. Do this to add some depth into the wings.
- Then, add some white highlights.
Method 2 of 3:
Using the Shape Tool
-
 Draw a rectangle.
- This will be your chicken's body base.
-
 Add a big oval to the body.
 -
 Using a darker color, draw a long horizontal oval for the head.
- This will be for the shading. If you're using white for the chicken's feather, use gray or light blue for the shadow.
- I used brown for the primary color and dark brown to the secondary color.
-
 Add the same oval only this time, use the original color.
- This will make it add more depth to the drawing.
-
 Using the dark color, heart shape draw the tail.
 -
 Like the head, overlap the tail with the same shape but using the original color.
 -
 Draw the wings.
- For the wings, make a heart shape similar to the tail. Use the shadow color for this step.
- Using the rotate tool, make rotate so that the pointed part of the heart points towards the head.
-
 Using the original feather color, add a smaller heart.
- Rotate it the same way you did for the previous step.
-
 Add another set of overlapping hearts to add more feathers to the wings.
 -
 Start adding the comb and wattle.
- This time, use dark red.
- For the wattle, I used a single heart flipped horizontally.
- For the comb, I used 3 hearts. I added 2 short hearts side-by-side and a tall heart in the middle.
-
 Repeat previous step using red color.
- Adjust the size of the red wattles and comb so that some dark red streaks are visible
-
 Add eyes and beak.
- For the eyes, I drew some circles with the shape tool with my colors on Black and white.
- For the beak, I used the diamond shape on the shape tool. I used a darker shade of orange.
-
 Add the upper beak and legs.
- Using the triangle with the color set to yellow, I added the upper beak.
- I used the rectangle tool.
-
 Add the feet.
- Using the rectangle tool, I added two claws for the feet.
-
 Add more feathers.
- I used the thought bubble shape tool to add some feathers on the chicken's body.
- Flip it horizontally so that the circles are pointing upwards.
- Use the shadow color when doing this.
-
 Add the same figure.
- This time, using the original feather color.
Method 3 of 3:
General Method
-
 Open Microsoft paint.
 -
 Click on the color yellow and make a filled-in circle. This will be your chicken's head.
 -
 Make a larger oval below and to the right of the circle
 -
 Using the brush tool, make a neck for your chicken. Refer to the picture to see what it should look like.
 -
 Using the polygon tool, make a sideways kite shape for a beak.(Or you can use the line tool)
 -
 For an eye, make a small black circle in the middle of the head.
 -
 Click on the line tool and select the thickest line. Make two lines coming down from the body. Add feet by drawing three shorter lines fanning out from each leg.
 -
 Draw a yellow tail with the brush tool, as shown in the picture. Fill it in with the paint bucket.
 -
 Using the light orange color, draw a wing. You can also use the light orange color to outline your chicken.
Was this article helpful?
Your feedback helps us improve.
Related Articles
 Instructions on how to use Paint to draw and edit images on the computer11 minutes read
 How to Draw a Panda Using Microsoft Paint3 minutes read
 How to boil delicious and beautiful chicken, no crack4 minutes read
 Is chicken breast really better than chicken thighs?5 minutes read
 How to draw AI paintings with Windows Paint completely free5 minutes read
Reader Comments 0
Sign in with email or Google to join the discussion.