How to List Installed Drivers in Windows (PowerShell CMD)
If you need to know which drivers are installed in your system, then here is a simple PowerShell command that lists drivers installed in Windows.
Table of Contents
The importance of drivers in Windows
In Windows, you need drivers for everything. In fact, finding and installing drivers has become a major problem in previous versions of Windows. However, in Windows 10, the system can automatically install all the necessary drivers, as long as they are connected to the Internet.
Of course, you'll also need to manually install important drivers like the graphics drivers to make sure they're up to date and compatible. After installing the driver, you can get details about the installed driver from Device Manager . Actually, you can also uninstall, restore or update the driver from Device Manager .
While you can get driver details such as version number, vendor, boot control, installation date, etc. from Device Manager , you must manually select each device and open its properties. it to see those details. However, with a simple PowerShell command, you can get the complete list of Windows drivers on one screen.
I will show you how to list all the drivers installed in Windows using PowerShell command.
The PowerShell command lists the installed drivers
Since you are dealing with drivers, admin privileges are required for a complete list of installed Windows drivers. Just follow the steps as follows.
Step 1. First, open PowerShell as admin.

Step 2. In the PowerShell window, execute the command below by copying and pasting.
Quick tip : After copying the command, right-click in the PowerShell window to paste.
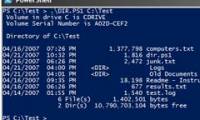
Get-WindowsDriver -Online -AllStep 3. Immediately after you execute the command, the relevant cmdlet will scan your system and list all installed drivers, as well as their details.

Step 4. Once you have the driver list, you can copy it to a text file for access anytime you want without having to execute cumbersome commands. To do that, select the full list with your mouse and right click to copy. Next, create a new text file and press the Ctrl+ keyboard shortcut Vto paste the copied list. Press Ctrl+ Sto save the text file.

Another way is to use the following command to automatically save the PowerShell output to a text file. Modify the file path according to your needs.
Get-WindowsDriver -Online -All | Out-File -FilePath D:driverlist.txt

Step 6. Now you can close the PowerShell window either by clicking on the X icon or by entering a command exit.
It's simple to get the list of installed drivers in Windows with a simple PowerShell command.
Hope you are succesful.
Was this article helpful?
Your feedback helps us improve.
Related Articles
 How to Install Audio Drivers on Windows XP3 minutes read
 How to install PowerShell 7.0 in Windows 10/8/72 minutes read
 12 Most Useful PowerShell Commands for Windows7 minutes read
 About PowerShell15 minutes read
 What is Windows PowerShell? How to use Windows PowerShell4 minutes read
 Instructions on how to use PowerShell in Windows Server 20124 minutes read
Reader Comments 0
Sign in with email or Google to join the discussion.