Table of Contents
This updated guide examines How to Add // Remove Xps Viewer Application in Windows 10 and organizes the essential facts, background, and practical takeaways in clear American English.
Microsoft is changing the way you get the XPS Viewer. In Windows 10 version 1709 and earlier, the application is included in the installation image. If you have XPS Viewer and updated to Windows 10 version 1803, no action is required. You will still have the XPS Viewer.
However, if you install Windows 10 version 1803 on a new device (or as a 'clean' installation), you may need to install XPS Viewer. If you already have XPS Viewer in Windows 10 version 1709, but manually deleted it before updating, you will need to reinstall it manually.
This guide will show you how to add (install) or delete (uninstall) the XPS Viewer application to all users in Windows 10.
Note : You must be logged in as an administrator to add or delete XPS Viewer.
Add or delete XPS Viewer in Optional features
1. Open Settings and click on Apps icon .
2. Click Apps & features on the left and click the Optional features link on the right.
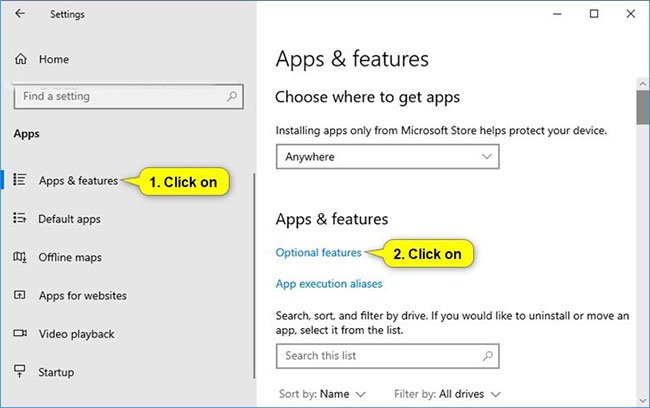
3. Perform step 4 (to add) or step 5 (to delete) below.
4. To add XPS Viewer:
- Click Add a feature .
- Scroll down, check XPS Viewer, click Install and go to step 6 below.
5. To delete XPS Viewer:
Scroll down, click on XPS Viewer, then select Uninstall and go to step 6 below.
6. You can now close Settings if desired.
Add or delete XPS Viewer in the Command Prompt
1. Open Command Prompt with admin rights.
2. Perform step 3 (to add) or step 4 (to delete) below.
3. To add XPS Viewer:
Copy and paste the below command into the Command Prompt as admin, pressEnterand go to step 5 below.
DISM /Online /Add-Capability /CapabilityName:XPS. Viewer~~~~0.0.1.0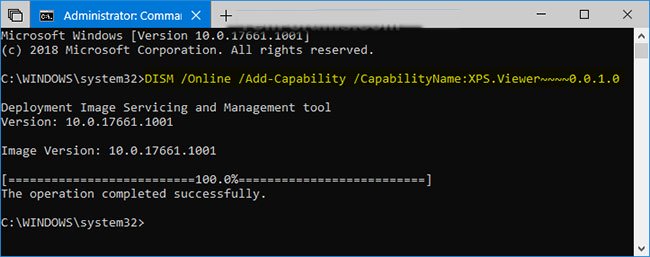
4. To delete XPS Viewer:
Copy and paste the below command into the Command Prompt as admin, pressEnterand go to step 5 below.
DISM /Online /Remove-Capability /CapabilityName:XPS. Viewer~~~~0.0.1.05. You can now close the Command Prompt with the admin rights enabled if you like.
FAQ
What is How to Add // Remove Xps Viewer Application in Windows 10 about?
It provides a structured overview of windows 10. XPS Viewer, explains the main context, and highlights practical takeaways for readers.
Why does this topic matter?
Understanding the main concepts helps readers evaluate the issue, avoid common mistakes, and make better-informed decisions.
How should readers use this information?
Use the guidance as a practical starting point, confirm details that may have changed, and follow current product, safety, or security recommendations.
Related Articles
 How to Access Event Viewer in Windows 103 minutes read
 Steps to Use Event Viewer in Windows 106 minutes read
 Get Back Windows Photo Viewer on Windows 10 to Help You See8 minutes read
 Download Pdf-xchange Viewer 2.5.322.106 minutes read
 Best Photo Viewer Software on Windows 109 minutes read
 How to Set Windows Photo Viewer as Default in Windows 115 minutes read
Reader Comments 0
Sign in with email or Google to join the discussion.