How to create simple invoices in Excel
Invoicing in Excel is not difficult. Follow the instructions below to create an invoice and be ready to send it to the receiving customer.
Table of Contents
Whether you are a freelancer working for many companies or a business that plans to extend credit limits to customers, you will need an invoice. Invoicing in Excel is not difficult. Follow the instructions below to create an invoice and be ready to send it to the receiving customer.
- Summary of expensive shortcuts in Microsoft Excel
- These are the most basic functions in Excel that you need to understand
- 10 ways to recover corrupted Excel files
Use invoice templates in Excel
Creating an invoice in Excel is relatively simple. You just need to create a few tables, set up some rules, add information and that's it. In addition, there are many websites online that provide free invoice forms created by accountants. You can use these forms or even based on that form and create your own invoice form.
Excel also provides a bill template library for users to use. To access these templates, open Excel and click the File tab.

Here select New and type Invoice in the search bar.

Press Enter and you will see invoice forms.

Find the invoice form you like.
Create simple invoices in Excel
To create a simple invoice in Excel, you first need to know some of the required information in the invoice. For simplicity, we will only use the information we need to receive payment. Here is the basic information:
- Seller information:
-
- Name
- Address
- phone number
- Buyer information
-
- Company name
- Address
- Date of invoice
- Some bills
- Description of goods (service or product sold)
- Commodity price (of each product or service)
- total payment amount
- Payment methods
First, open an empty Excel sheet. Remove the grid lines to create an empty Excel sheet. To remove gridlines, go to the View tab and uncheck Gridlines in the Show section.

Now adjust the column and row sizes to add space for long information like description of goods. To change the row or column size, click on the drag.
By default, the rows are set to a height of 20 pixels and a width of 64 pixels. Here is an example of the width and height you can refer to.
Items:
- Row 1: 45 pixels
Columns:
- Column A: 385 pixels
- Column B: 175 pixels
- Column C: 125 pixels
Row 1 will have your name and from Invoice . In order for the recipient to see this information immediately, you should increase the font size for this information.
Column A contains most of the important information in the invoice, including information on buyers, sellers, description of goods, payment methods. Column B contains the specific date of the listed goods, the date of the invoice, the price of each item and the total value. This information is not long, so it does not require much space.
After adjusting the column and row sizes, we will fill in the invoice information. In column A, row 1, enter your name. You should leave the font a bit bigger (18pt) and bold to highlight it.

In column B, row 1, type Invoice so that viewers can see clearly what this document is. You should set the font size to about 38pt and capitalize, for lighter colors if desired.

In column A, rows 4, 5 and 6, enter your address and phone number.

In column B, rows 4 and 5, type DATE and INVOICE , highlight and align right. Columns C 4 and 5 are used to enter the date and invoice number.

Finally, enter the Bill to (the super buyer) in column A, row 8. Below the row 9, 10, 11 is the buyer information.

Now we need to set up a table to list the goods sold, fulfillment date (the date begins when the goods are entered into the warehouse until the buyer receives the product), the amount of each item.
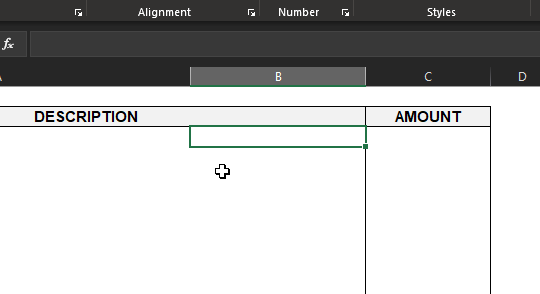
First, merge columns A and B in row 14 as the title for the listed items (column A, row 15-30) and fulfillment date (column B, row 15-30). After you have merged columns A and B in row 14, create a frame for the column by going to the Font section of the Home tab, selecting the outline icon and choosing the desired border type. Here we will use All Borders .

Do the same for cell C14. You can color the cells if you want by selecting the cells you want to color, select the arrow next to the Fill Color icon in the Font section of the Home tab and select the color from the drop-down menu.

In the first colored cell, enter DESCRIPTION (Description of goods) and center it, highlight. For cell C14, type AMOUNT and make the center, bold.

You need to make sure the table has enough space to list the goods sold. In this example we will use 16 rows. Then, go to the bottom of the table and draw the bottom border for the first two boxes in the row.

Now highlight the boxes C15-29 and the left and right borders for these cells.

Now, select cell C30 and the contour left, right and bottom. Finally, we will add Total Sum to the table. Highlight cell C31 and draw the border around the entire cell. You can apply color if you want and remember to put TOTAL in the box next to it.

We basically completed the goods description, now add some rules and formulas to calculate.
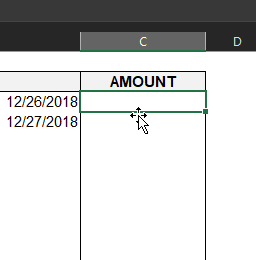
As we have set above, column B row 15-30 is the fulfillment date. Select these boxes, click Format Number in the Number section of the Home tab.

After selecting, a drop-down menu will appear, select the Short Date option. Now if you enter the example number 12/26 in these cells, it will automatically reformat.
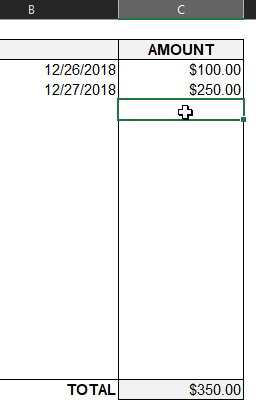
Similarly, if you highlight cells C15-30, these are cells into money, select the Currency option and enter the amount in these boxes, it will be formatted in currency.
To automatically calculate the total amount, select the sum cell (in this example, C31) and enter the following formula:
= SUM (C15: C30)

Now if you enter (or delete) any number in the cells into separate amounts, it will automatically fill in the totals cell.
- How to use the SUM function to calculate totals in Excel
Continue, enter the Method of Payment in A34.

This information should be placed between buyers and sellers. The usual payment methods are cash, check and bank transfer. Now complete the invoice, do not forget to thank your customers.

So we have completed a simple bill. I wish you all success!
Was this article helpful?
Your feedback helps us improve.
Related Articles
 How to Create Invoices in Excel8 minutes read
 How to create an invoice in Google Docs3 minutes read
 How dangerous are bills really to your health?5 minutes read
 How to create bullet list in Excel11 minutes read
 Instructions on how to create input forms in Excel extremely fast and simple4 minutes read
 Create a calendar in Excel7 minutes read
Reader Comments 0
Sign in with email or Google to join the discussion.