How to create a USB to install MacOS Sierra for Macbook successfully
On Macbook, you can create a USB to install MacOS Sierra like on Windows, but the steps are a bit more complicated.
Let's learn with Taimienphi how to create a USB to install MacOS Sierra for Macbook through a third-party application, which is diskmakerx software.
In addition to upgrading MacOS Sierra, in this article we will use a tool called diskmakerx to help us do this and now let's learn with TipsMake how to create a USB to install MacOS Sierra for Macbook .
Instructions for creating a USB to install MacOS Sierra for Macbook
Tools needed to create a MacOS Sierra USB installer
- A USB with at least 8 GB of free space.
- Diskmakerx software, you can download Diskmaker X for Mac here.
Note: You cannot create a macOS Sierra USB installer on regular Windows.
Step 1: After downloading diskmakerx, we proceed to install this application by clicking on it.
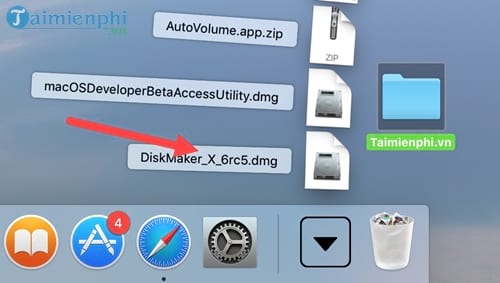
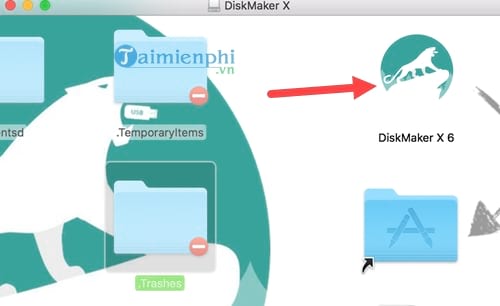
Step 2: Then double click on diskmakerx 6 to launch this application.
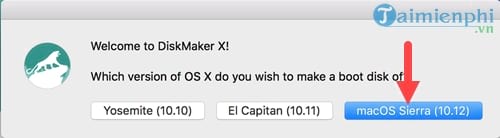
Step 3: When the system asks you which operating system you want to install, select MacOS Sierra.
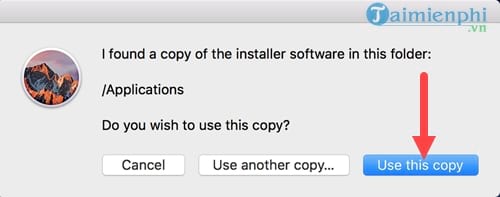
Step 4: Next, click on Use this copy .
Step 5: Then select An 8 GB USB thumb drive so the system knows you have a USB that meets the criteria.
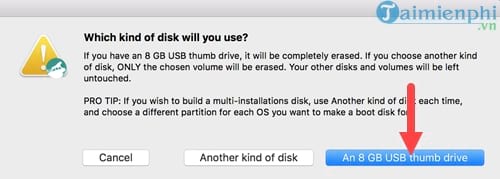
Step 6: Then select the USB you want to create a USB to install MacOS Sierra.

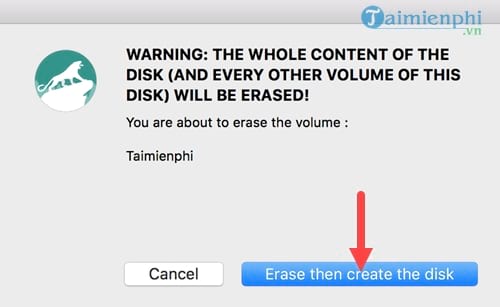
Step 7: Finally, click Continue to let the system continue with other questions.
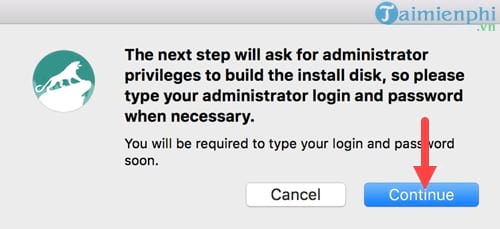
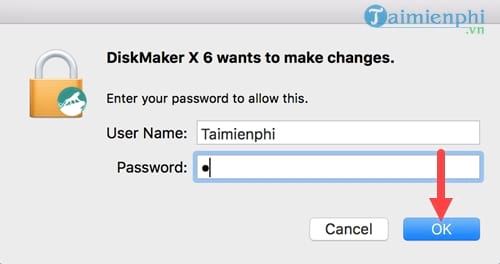
Step 8: If your device has a password, you must confirm it before formatting the USB.
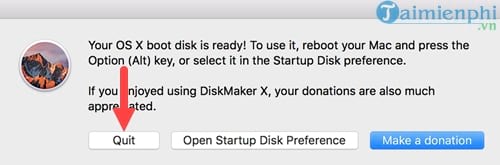
After this process, you will have to wait quite a while, and after creating the USB to install MacOS Sierra, there will be a notification as shown below.
Step 9: Restart Macbook and click the Options (Alt) button continuously, then you will see a notification to install MacOS Sierra, we have completed creating a USB to install MacOS Sierra for Macbook.
With the above instructions, we have learned another trick to install MacOS Sierra, create a USB to install MacOS Sierra for Macbook , hopefully the article will help you understand more about how to use this operating system.
In addition, if you are using Windows and want to install Win 10, why not try creating a USB to install Win 10, creating a USB to install Win 10 or other operating system versions is currently very popular to use because it saves a lot of other costs. Good luck!
- How to create a MacOS Sierra installed USB drive 10.12
- How to change the default macOS Sierra wallpaper
- Synchronize files and folders on Desktop and Document on macOS Sierra with iCloud
- How to fix common errors when upgrading to macOS Sierra
- Instructions on how to install macOS Sierra (clean install) 10.12 on Mac
- Free space on macOS Sierra with Optimize Storage
- How to customize message notifications on macOS Sierra
- How to turn off the Gatekeeper on macOS Sierra install the application outside the App Store
- How to change the shortcut to use Siri on macOS Sierra
- How to disable iTunes automatically launch on macOS Sierra
- How to Open Applications With Root Privileges on a Mac
- How to create Hackintosh USB with Clover Bootloader
- How to Toggle WiFi on and Off with a Keyboard Shortcut on Mac
- How to fix 'Dyld: Library not Loaded' error on macOS
- How to Add a PowerPoint to iMovie
- How to Open an EMZ File on PC or Mac
- How to Create Credits in iMovie
- How to Bypass Parental Controls on a Mac
- How to Use Telnet on Mac OS X
- Making Linux look like macOS with these easy tweaks!
-
 A simple, detailed, and safe guide to installing Windows on a laptop, perfect for beginners.
-
[Guide] How to fix USB port errors on a laptop
-
How to create a multi-purpose Hiren's BootCD USB for computer rescue.
-
How to create a bootable USB drive using Grub4dos to install and fix operating system errors.
-
How to test the read and write speed of a USB drive.
-
What is USB 3.0? Does your computer support USB 3.0?
 A simple, detailed, and safe guide to installing Windows on a laptop, perfect for beginners.
![[Guide] How to fix USB port errors on a laptop](https://tipsmake.com/data8/thumbs_80x80/[guide]-how-to-fix-usb-port-errors-on-a-laptop_thumbs_80x80_Ka8tiOYLf.png) [Guide] How to fix USB port errors on a laptop
[Guide] How to fix USB port errors on a laptop How to create a multi-purpose Hiren's BootCD USB for computer rescue.
 How to create a bootable USB drive using Grub4dos to install and fix operating system errors.
 How to test the read and write speed of a USB drive.
 What is USB 3.0? Does your computer support USB 3.0?