How to create a bootable macOS Big Sur installation drive
Apple has a new version of the macOS operating system, called Big Sur, generation 11.0. In this article, tipsmake.com will show you how to create a bootable macOS Big Sur installation drive.
Table of Contents
The macOS Big Sur installation software must be over 12GB, so you still add an extra USB drive to hold enough data. This drive can be a USB flash drive, hard drive or SSD.
If you have a Mac 2015 or later with 3 USB-C / Thunderbolt 3 ports, you'll need a USB to USB-C adapter. The lead allows you to connect to devices with a USB-A hard drive.
You need to and reformat the hard drive into Mac OS Extended (Journaled). This can be done in the Mac's Disk Utility application, found in the Applications / Utilities folder.

Download and install macOS Big Sur software
Big Sur is available on the Apple App Store. Click the Get button in the upper right corner, the Software Update section will open. Select Download . The download may take some time.
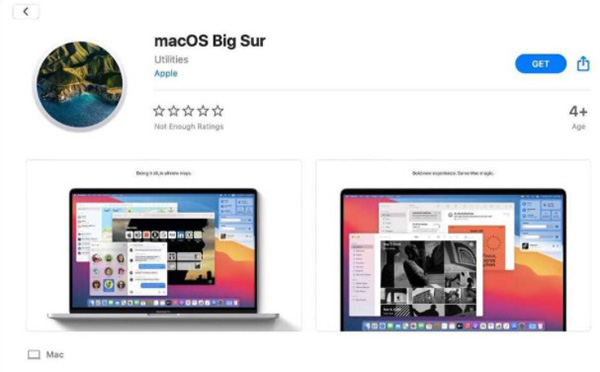
Once the download is open and the installer is open, don't select Continue . Off the installer by pressing Command - Q . Then, go to your Applications folder and find an app called 'Install macOS Big Sur' . This app must be present to create an installable drive.
Use Terminal to create a macOS Big Sur installation drive
If you've never used Terminal, here are detailed instructions:
Step 1. Connect the external hard drive to the Mac.
Step 2. Open Terminal (/Applications/Utilities/Terminal.app) .
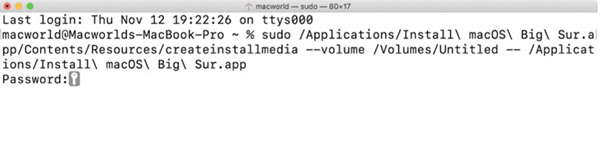
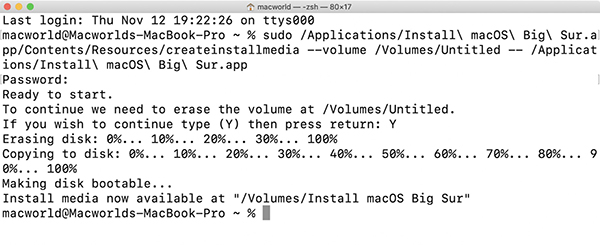
Step 3. Copy the following command:
sudo /Applications/Install macOS Big Sur.app/Contents/Resources/createinstallmedia --volume /Volumes/Untitled -- /Applications/Install macOS Big Sur.app
Step 4. Go back to Terminal and paste this command in the window. Remember to rename 'Untitled' to the name of your hard drive. Press Return .
Step 5. Terminal may ask for the machine password. Enter your password and press Return .
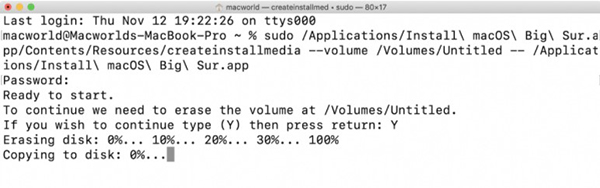
Step 6. The terminal will warn you that your external hard drive needs to be erased. To continue, type Y into the window and press Return .
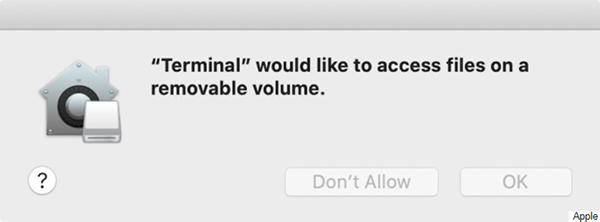
Step 7. An alert pops up asking for access to the terminal's hard drive. Click OK .
Step 8. Terminal then erase the hard drive and copy the installation file over. This will take a few minutes.
Step 9. Once done, the Terminal screen will display a message saying your drive is ready to be used.
Update the installation drive
Step 1. Connect the external hard drive to the Mac.
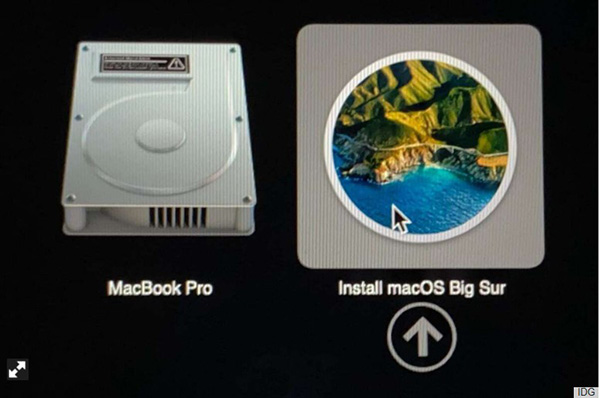
Step 2. Start Mac. Hold down the Option key when the Mac starts running.
Step 3. Then, your Mac will display Startup Manager , select your external hard drive and press Return .
Step 4. Click the Update button , the update process will take some time.
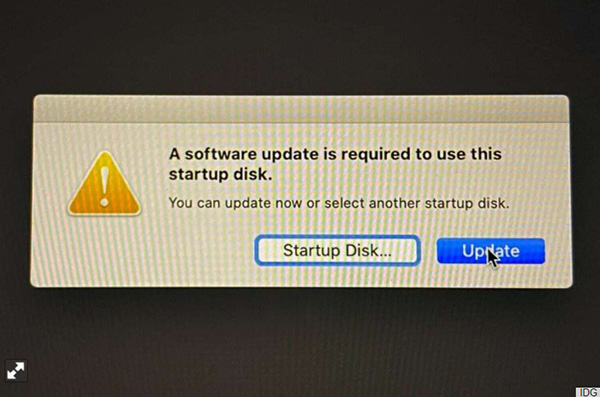
In case the update fails, click Try Again .
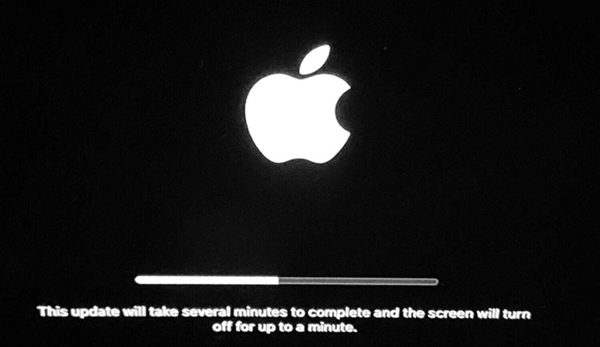
Step 5. After that, the Mac will reboot.
Change security settings
Maybe your Mac is installed to not allow users to use the drive installed from outside. Here's how to change the settings:
Step 1. Reboot the device and hold Command - R during the boot process. This will run Recovery Mode .
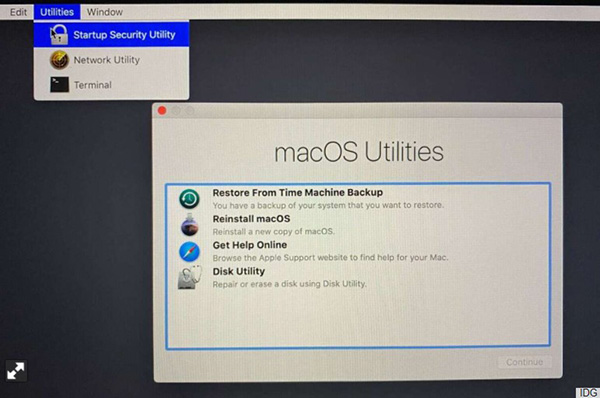
Step 2. The macOS Utilities window will appear. Click on the Utilities menu and select Startup Security Utility .
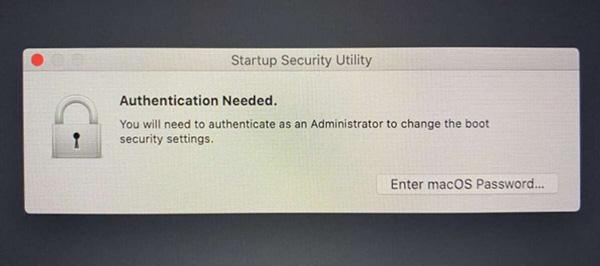
Step 3. The Authentication Needed window appears, you need to confirm the admin rights (via username and password).
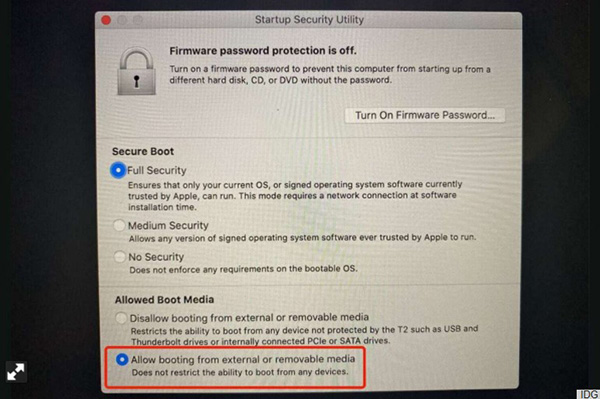
Step 4. Select 'Allow booting from external or removable media' then close the window.
How to boot an operating system from an external hard drive
Step 1. Connect the external hard drive to your Mac, start it up and hold down the Option key .
Step 2. The Startup Manager window appears and select the external hard drive.
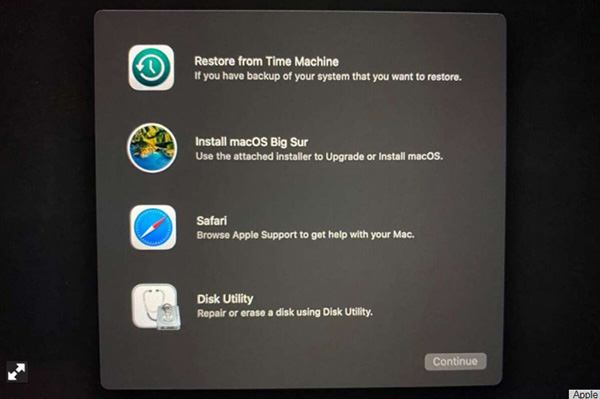
Step 3. The Mac will boot up in Recovery Mode . You will see a window with 4 options. If you want to install Big Sur and keep the data, select Install macOS Big Sur . If you want to delete all the data, go to Disk Utility to reformat the internal hard drive first and then install macOS Big Sur. Click Continue .
Was this article helpful?
Your feedback helps us improve.
Related Articles
 How to Create a Windows 7/Vista Bootable USB Drive6 minutes read
 How to quickly create a UEFI bootable USB using Rufus3 minutes read
 4 tools to create USB boot install Windows 104 minutes read
 How to create a Hiren's BootCD bootable USB drive for Windows rescue.3 minutes read
 Detailed guide on creating a multi-purpose bootable USB drive.3 minutes read
 How to create a bootable USB drive for installing Windows 10 with UEFI and LEGACY support.5 minutes read
Reader Comments 0
Sign in with email or Google to join the discussion.