Table of Contents
To transfer local music from a Windows PC, import the files into Apple Music and sync them with Apple Devices. On a Mac, import the tracks into Music and use Finder. Apple Music subscribers can instead use Sync Library to make the library available across signed-in devices.
Choose one library method before starting. When Sync Library is enabled, manual USB music syncing may be unavailable because the cloud library manages the device's Music content.
Windows: Apple Music and Apple Devices
1. Import local music
- Open the Apple Music app.
- Select the Sidebar Actions button, then choose Import.
- Select a supported audio file or folder and click Open.
- Play several tracks in Apple Music to confirm that the files are readable and correctly tagged.
2. Sync the iPhone or iPad
- Connect the device, unlock it, and tap Trust if prompted.
- Open Apple Devices and select the device in the sidebar.
- Select Music and enable music syncing.
- Choose the entire library or selected artists, albums, genres, and playlists.
- Review the selection, then click Apply or Sync.
Apple's current Windows music syncing guide confirms that Apple Music must be installed for this workflow.
Mac: Music and Finder
- Open the Music app and choose File > Import, or drag supported audio files into the Music window.
- Connect the iPhone or iPad and select it in the Finder sidebar.
- Open the Music tab and select Sync music onto [device].
- Choose all music or selected content, then click Apply.
Keep the source files in a stable folder. Moving or deleting an audio file after importing it can leave a library entry that no longer points to playable media.
Cloud alternative: Sync Library
An Apple Music subscription can make the music library available on devices signed in to the same Apple Account. In Apple Music on Windows, open Settings > General and enable Sync Library. On iPhone or iPad, open Settings > Music and enable the same option.
Wait for the cloud library status to finish updating before looking for the tracks on the phone. Sync Library is not a substitute for a backup, and not every local file is guaranteed to match or upload successfully.
Legacy iTunes method
The following screenshots show an older iTunes interface. Current Windows users should prefer Apple Music and Apple Devices, but the sequence remains useful for a PC that genuinely still uses legacy iTunes.
1. Connect and trust the device
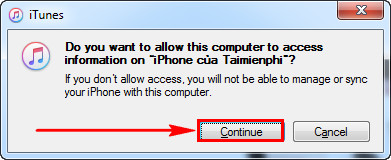
Connect the iPhone or iPad and click Continue when iTunes asks to access it.
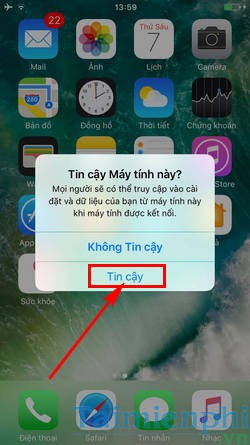
Unlock the device and tap Trust. Do this only on a computer you control.
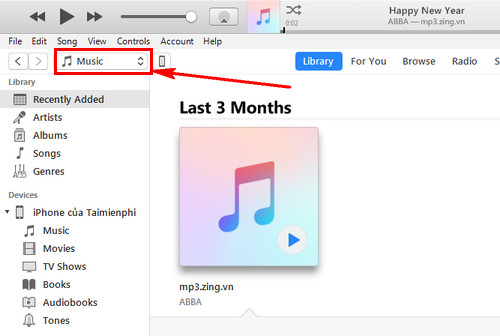
2. Open the Music library
Select Music from the media menu.
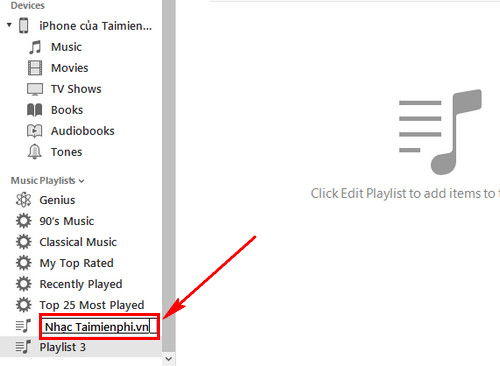
3. Create an optional playlist
Choose File > New > Playlist if you want to sync a defined group of songs. A playlist is helpful but not required for every transfer.
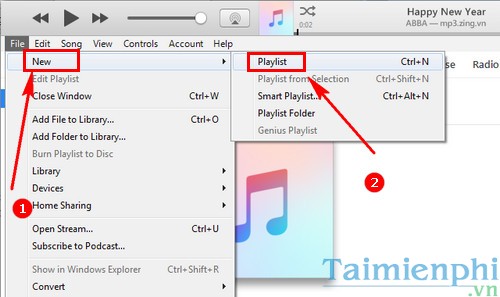
Give the playlist a clear name.
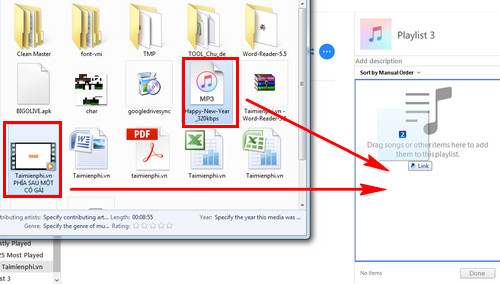
4. Import the songs
Drag supported audio files into the library or playlist, or choose File > Add File to Library. Importing does not remove the original computer files.
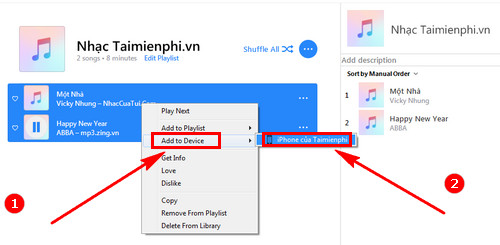
5. Add or sync the music
The old manual-management workflow allowed selected tracks to be sent with Add to Device. A more predictable method is to select the device, open Music, enable Sync Music, choose the playlist or albums, and click Apply.
If a song will not transfer
- Confirm that it plays in Apple Music or iTunes on the computer.
- Use an unprotected MP3, AAC, ALAC, WAV, or other supported format.
- Check whether Sync Library is enabled and choose either cloud or manual library management.
- Verify available device storage.
- Inspect the sync summary for a message about an unsupported or unavailable file.
- Do not remove digital rights management from content you are not authorized to copy.
If storage is the limiting factor, this guide to reducing audio file size explains the quality trade-offs. For the older interface, see how to use iTunes for beginners.
Related Articles
 How to Copy Music to iPhone, iPad from Computer?8 minutes read
 How to Transfer Music from a Computer to iPhone or iPad10 minutes read
 Itunes: How to Transfer Music from Your PC to the Ipad6 minutes read
 How to Copy Music to iPhone Without Itunes8 minutes read
 How to Move Music from Computer to iPhone7 minutes read
 How to Convert Videos from Computer to iPhone with Itunes5 minutes read
Reader Comments 0
Sign in with email or Google to join the discussion.