Table of Contents
This guide explains how to move Music from Computer to iPhone, with clear steps, practical tips, and important checks before you begin.
Moving Music Manually with iTunes
-
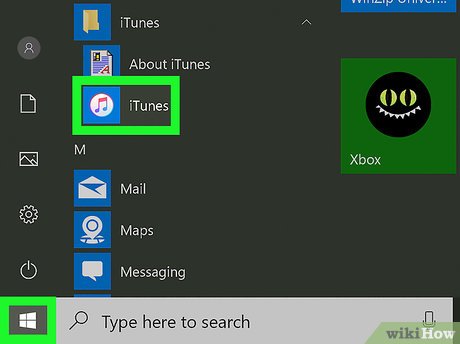 Open iTunes on your computer. You'll find this in your Start Menu or Applications folder. With this method, you can move music from your computer to iPhone without syncing, so you will not lose songs that are on your iPhone but not on your computer.
- If you don't have iTunes on your computer, you can download it from https://www. apple. com/itunes/download/. Mac machines should have iTunes already installed.
-
 Connect your iPhone to your computer. You'll want to use the USB cable that came with your phone. One end of the cable connects to your phone and the other end plugs into your computer.[1]XResearch source
 -
 Click the cell-phone icon in the upper left of iTunes. iTunes will change to show you what's on your phone.
 -
 Click Summary. You'll see this in the list under your iPhone's name and icon.
 -
 Click to check the box next to 'Manually manage music and videos. ' This will disable automatic syncing, so you can add or delete music from your iPhone.
 -
 Click the back arrow above your iPhone's name and icon. This will navigate you back to your music lists.
 -
 Navigate to the song/artist you want to move to your iPhone. You can navigate through your iTunes based on Artist, Genre, Songs, and Albums.
- Music must be added to your iTunes library on your computer before you can transfer it to your iPhone.
Moving Music Automatically with iTunes
-
 Open iTunes on your computer. You'll find this in your Start Menu or Applications folder. Using this method, your iPhone will sync with your computer, and you will lose songs that are located on your iPhone but not on your computer.
- If you don't have iTunes on your computer, you can download it from https://www. apple. com/itunes/download/. Mac machines should have iTunes already installed.
-
 Connect your iPhone to your computer. You'll want to use the USB cable that came with your phone. One end of the cable connects to your phone and the other end plugs into your computer.[2]XResearch source
 -
 Click the cell-phone icon in the upper left of iTunes. iTunes will change to show you what's on your phone.
 -
 Click Music. You'll see this in the list under your iPhone's name and icon.
 -
 Click to select the box next to 'Sync Music. ' A box will pop up warning you that all the songs on your iPhone will be replaced with the songs in this iTunes library.
 -
 Click Remove and Sync. All the music on your iPhone will be replaced with the music in your iTunes library.
- You can continue with the defaults that sync your entire library or you can select to sync only selected playlists, artists, albums, and genres. This will give you the ability to control what is transferred between your computer and iPhone.
-
 Click Sync or Apply. This may take a few minutes.
Syncing Over Wi-Fi
-
 Open iTunes on your computer and mobile device. Using this method, your iPhone will sync with your computer each time they are on the same Wi-Fi network, and you will lose songs that are located on your iPhone but not on your computer.
 -
 Make sure your phone's and computer's iTunes accounts are the same. On an iPhone, open Settings, then tap on your name and photo. The email listed is your Apple ID.
- On your computer, go to the iTunes Store, and your Apple ID will be under the 'Apple ID Account' header.
-
 Make sure your phone and computer are on the same Wi-Fi network. Your phone will only sync with your computer when it's on the same Wi-Fi network.
 -
 Connect your iPhone to your computer. You'll want to use the USB cable that came with your phone. One end of the cable connects to your phone and the other end plugs into your computer.[3]XResearch source
 -
 Click the cell-phone icon in the upper left of iTunes. iTunes will change to show you what's on your phone.
 -
 Click Summary. You'll see this in the list under your iPhone's name and icon.
 -
 Click to select 'Sync with this iPhone over Wi-Fi'. Every time your phone and computer are on the same Wi-Fi network, the phone is plugged in, and your computer has iTunes open, they will sync.[4]XResearch source
 -
 Click Apply. Now your iPhone's iTunes music library will sync with your computer's iTunes music library every time they share a Wi-Fi network, your iPhone is plugged in to charge, and iTunes is open on your computer.
FAQ
What should I know about Move Music from Computer to iPhone?
Focus on the key features, requirements, limitations, and practical use cases explained in this guide.
How do I get the best results with Move Music from Computer to iPhone?
Follow the recommended steps, use current software or information, confirm compatibility, and review settings before major changes.
Are there any risks or limitations?
Potential limitations depend on compatibility, data quality, cost, privacy, support, and how the product or method is used.
Related Articles
 How to Copy Music from an Iphone to a Mac5 minutes read
 How to Play Music in iPhone on Mac4 minutes read
 How to Copy, Transfer, and Move Music from Your PC to Your iPhone or iPad Using iTunes4 minutes read
 How to Add Music to iPhone: Step-by-Step Guide10 minutes read
 How to Transfer Music from Iphone to PC13 minutes read
 How to Transfer Music from an Old Ipod to a Computer or Iphone7 minutes read
Reader Comments 0
Sign in with email or Google to join the discussion.