Table of Contents
This updated guide explains how to Email Audio Files through clear steps, practical examples, and important checks that help prevent common errors.
Method 1 of 4:
Attaching an Audio File Directly
-
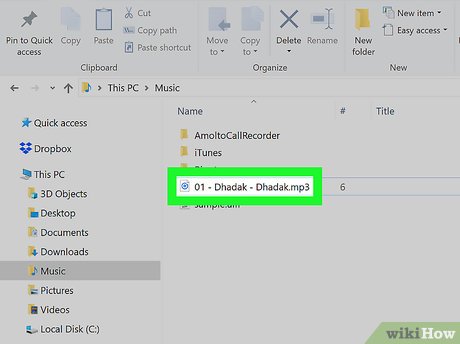 Locate your audio file. You can do this by typing its name into Finder (Mac) or the Start search bar (PC). If it's on your desktop, simply look for the file's name.
 -
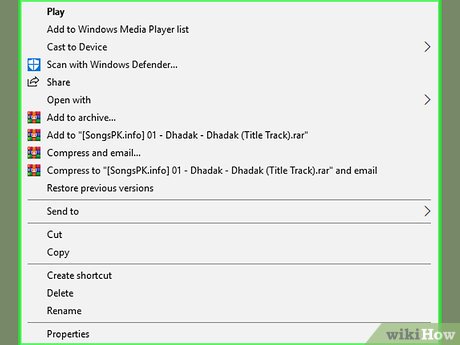 Two-finger click (Mac) or right-click (PC) the file. This will invoke a drop-down menu.
 -
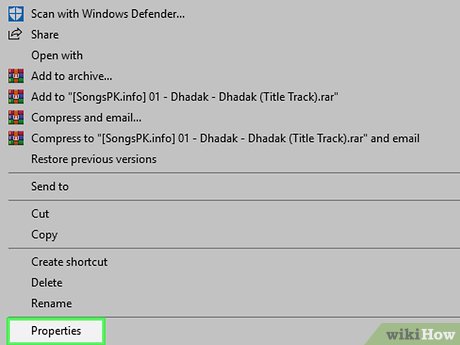 Click Get Info (Mac) or Properties (PC). Doing so will bring up a list of the file's attributes, including its total size in bytes.
 -
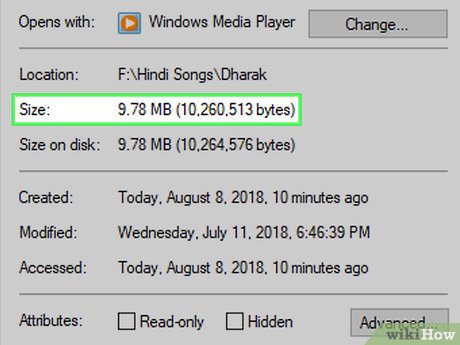 Look for the file's size. It will be to the right of the "Size" heading on both Mac and PC platforms, though you may first need to click General on Mac to view the "Size" heading. Most email providers have a size restriction for files:
- Gmail - 25 megabytes
- iCloud Mail - 20 megabytes
- Outlook - 34 megabytes
- Yahoo - 25 megabytes
-
 Determine whether or not your file can be sent directly. If your audio file is larger than the maximum size allowed by your preferred email provider, you'll need to use one of the other methods described in this article.
 -
 Open your preferred email service on a computer. Some popular email providers include the following:
- Gmail - Go to https://www. mail. google. com/. You may first need to log in.
- iCloud Mail - Go to https://www. icloud. com/#mail. You may first need to log in and then click Mail .
- Outlook - Go to https://outlook. live. com/owa/. You may first need to log in.
- Yahoo - Go to https://www. mail. yahoo. com/. You may first need to log in and then click the Mail icon in the top-right corner of the page.
-
 Create a new email. To do so:
- On Gmail , click COMPOSE in the top-left side of your inbox.
- On iCloud Mail , click the pencil-and-square icon near the top of the page.
- On Outlook , click +New above your list of emails in the inbox.
- On Yahoo , click Compose in the top-left side of your inbox.
-
 Add a recipient and a subject. To do this, simply type your recipient's email address or name (if they're in your contacts) into the "To" field in the new email window, then type in a subject in the "Subject" field below it.
- The subject isn't necessary to send the email, but it will help explain the context of the email.
-
 Click and drag the audio file into your email window. Doing so will place it in your email as an attachment once you release the mouse.
- You can also click the paperclip icon and then select your audio file in the resulting pop-up window.
-
 Click Send. Your email will be delivered to your recipient, at which point they will be able to download the audio file by opening the email and clicking the "Download" button or link.
Method 2 of 4:
Using Google Drive
-
 Go to the Google Drive website. It's located at https://www. drive. google. com/.
- If you aren't signed into your Google account, you'll need to click Go to Google Drive and enter your email address and password before continuing.
-
 Click NEW. This blue button is in the top-left side of the Google Drive window.
 -
 Click File upload. It's near the top of the NEW drop-down menu.
 -
 Select your audio file and click Open. You may need to first select the audio file's location from the list of folders in the left-hand pane in this window.
- You can also click and drag your audio file into the Google Drive window.
-
 Wait for your file to finish uploading, then click it. This will select the file.
 -
 Click the "Share" button. It's a person-shaped icon with a "+" next to it in the top-right side of the Google Drive window. Clicking this will bring up a window with a field for email addresses.
 -
 Type in an email address and press Tab ↹. This should be the email address of the person with whom you wish to share your file.
 -
 Click Send. Doing so will send a link to the audio file to your selected contact(s); upon clicking Open below the linked audio file in the email, recipients will be taken to the audio file's page, at which point they can click the downward-facing arrow in the top-right corner of the page to download it.
- You can also enter a note in the field below the email area before clicking Send .
Method 3 of 4:
Using OneDrive
-
 Go to the Outlook OneDrive site. It's located at https://www. onedrive. com/.
- If you aren't signed into OneDrive, you'll have to enter your Outlook email address and password before continuing.
-
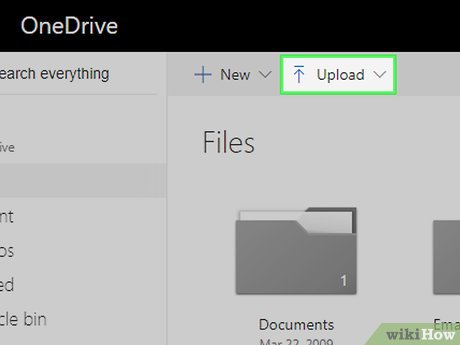 Click Upload. This tab is near the top of the OneDrive window. Doing so will prompt a pop-up window to appear.
- If you have any selected files, you won't see this tab. Click your browser's "Refresh" button (the circular arrow in the top-left side of most browsers and the right side of the URL bar in Safari) to de-select any files.
-
 Select your audio file and click Open. You may need to first select the audio file's location from the list of folders in the left-hand pane in this window.
- You can also click and drag your audio file into the OneDrive window.
-
 Wait for your audio file to finish uploading. The amount of time this will take varies depending on the file size and your Internet speed.
 -
 Click your audio file's top-right corner. This will select it.
 -
 Click Share. It's in the top-left side of the OneDrive tool bar that's at the top of the page.
 -
 Click Email when prompted. Doing so will open a window with a field for email addresses.
 -
 Type in an email address and press Tab ↹. This should be the email address of the person with whom you wish to share your file.
 -
 Click Share. Doing so will send a link to the audio file to your selected contact(s); once they open the email, your recipient(s) can click View in OneDrive to listen to the track.
Method 4 of 4:
Using ICloud Drive
-
 Go to the iCloud website. It's at https://www. icloud. com/.
- If you aren't signed into iCloud, you'll need to enter your Apple ID email address and password to continue.
-
 Click iCloud Drive. It's a white app with a blue cloud located in the top row of options.
 -
 Click the cloud with an upward-facing arrow icon. This icon is at the top of the iCloud Drive window.
 -
 Select your audio file and click Open. You may need to first select the audio file's location from the list of folders in the left-hand pane in this window.
- You can also click and drag your audio file into the iCloud Drive window.
-
 Wait for your audio file to upload, then open it. You'll do this by double-clicking it. Since iCloud Drive doesn't have a "Share" option like the other cloud services, you'll have to manually copy your audio file's URL and send it to a friend.
 -
 Click the audio file's URL. It's the long string of numbers and letters in the address bar at the top of your browser's window. Clicking the URL will select it.
 -
 Two-finger click (Mac) or right-click (PC) the selected URL. Doing so will invoke a drop-down menu.
 -
 Click Copy. This will copy your selected URL.
 -
 Open your preferred email service. Since you aren't sharing the URL from within iCloud Drive, you can paste the URL into any email from any provider.
 -
 Open a new email window. This process will vary based on your email provider; for example, you'll click COMPOSE on Gmail and Yahoo, but New for Outlook.
 -
 Add a recipient and a subject. To do this, simply type your recipient's email address or name (if they're in your contacts) into the "To" field in the new email window, then type in a subject in the "Subject" field below it.
- The subject isn't necessary to send the email, but it will help explain the context of the email.
-
 Two-finger click (Mac) or right-click (PC) the email's message window. This is where you'll paste your URL.
 -
 Click Paste. Doing so will paste your copied URL into the email's body.
 -
 Click Send to send your email. Your recipient will be able to click the URL to view the file, at which point they can click the downward-facing arrow on the right side of the file's audio control bar in order to save it to their computer.
FAQ
What is the easiest way to Email Audio Files?
Start with the requirements in this guide, then follow each step in order. Check the result after every major change so problems are easier to identify.
Can beginners follow these instructions?
Yes. The process is organized into practical steps, and you can repeat any step before moving forward.
What should I check if the method does not work?
Confirm your software or device version, permissions, settings, file format, and internet connection when the task depends on online services.
Related Articles
 How to Send Photos and Audio Recordings via Email with Vono5 minutes read
 How to Join and Split Audio Files Without Installing Any Software5 minutes read
 Using MP3 Splitter & Joiner to Merge Audio Files6 minutes read
 9 Ways to Attach Large Files to Emails11 minutes read
 Instructions for Cutting Audio Files with Mp3splt Software6 minutes read
 How to Convert Document Files to Speech with Gemini6 minutes read
Reader Comments 0
Sign in with email or Google to join the discussion.