How to Compress Large Files
Compressing files in modern operating systems is usually pretty simple, but things can get more complex when the files are large. If the files are too big, you won't be able to use your operating system's built-in compression software....
Table of Contents
Method 1 of 6:
Using 7-Zip for Windows
- Download and install 7-Zip. 7-Zip is a free file compression program you can use to compress large files and folders. Use the following steps to download and install 7-Zip:
- Go to https://www.7-zip.org/.html in a web browser.
- Click Download next to the latest version of 7-Zip.
- Open the .exe file inside your web browser or "Downloads" folder.
- Click Install.
EXPERT TIPLuigi Oppido is the Owner and Operator of Pleasure Point Computers in Santa Cruz, California. Luigi has over 25 years of experience in general computer repair, data recovery, virus removal, and upgrades.
Luigi Oppido
Computer Repair Technician & Owner, Pleasure Point Computers Luigi Oppido
Computer Repair Technician & Owner, Pleasure Point ComputersDid You Know? Compressing a file is ideal when you want to make a file smaller or if you need to compress multiple files into a single packet. For instance, if you need to email a 12mb file but your limit is 10mb, you can compress it down to 7mb. Then, the other person can decompress the file to open it.
- Right-click a file or folder you want to compress. This displays a pop-up menu next to the file or folder.
- Nearly all files can be compressed, but some files can only be compressed by a small amount.
- Click 7-Zip. It's in the menu that pops up when you right-click a file. 7-Zip must be installed for this option to be available.
- Click Add to Archive. This opens a menu for compressing the file.
- Select Ultra next to "Compression Level." Use the drop-down menu next to "Compression Level" to select the highest level (Ultra).
- Set "Directory Size" to a value that is 10 times lower than your memory. A larger dictionary means better compression, but the memory requirements are ten times the dictionary size. If your computer has 8 GB of RAM, you would select the number closest to 800 MB as your directory size.
- If your computer has lots of RAM, other computers may not be able to extract the file. Select a lower directory size if other computers need access to the file.
- Select Solid next to "Solid Block Size." This compresses the file as solid data blocks. This normally improves the compression ratio.
- Select the option to split the file into smaller files (optional). If a file is particularly large, you have the option to split the file into smaller files. For example, you could take a 12 GB folder and split it into three smaller files that could each fit onto a DVD. Use the drop-down menu below "Split to volumes, bytes" to select how big you want each split file to be.
- You will need all the split files to extract the files. Make sure you do not delete or lose any of the split files.
- Click Ok. It's at the bottom of 7-Zip. This compresses the file using the settings you specified.
Method 2 of 6:
Using WinRAR for Windows
- Download and install WinRAR. Use the following steps to download and install WinRAR:
- Go to https://www.win-rar.com/download.html in a web browser.
- Click Download WinRAR.
- Click Download WinRAR.
- Open the WinRAR ".exe" file.
- Click Install.
- Click Ok.
- Click Done.
- Right-click a file or folder you want to compress. This displays a pop-up menu next to the file or folder.
- Nearly all files can be compressed, but some files can only be compressed by a small amount.
- Click Add to archive next to the WinRAR icon. It's in the menu that appears when you right-click a file or folder. The WinRAR icon resembles a stack of books.
- Select Best below "Compression Method." It's the drop-down menu below "Compression Method." This method provides the highest compression ratio.
- Set "Directory Size" to a value that is 10 times lower than your memory. A larger dictionary means better compression, but the memory requirements are ten times the dictionary size. If your computer has 8 GB of RAM, you would select the number closest to 800 MB as your directory size. Use the drop-down menu below "Directory Size to select your directory size.
- If your computer has lots of RAM, other computers may not be able to extract the file. Select a lower directory size if other computers need access to the file.
- Select the option to split the file into smaller files (optional). If a file is particularly large, you have the option to split the file into smaller files. For example, you could take a 12 GB folder and split it into three smaller files that could each fit onto a DVD. Use the drop-down menu below "Split to volumes, size" to select how big you want each split file to be.
- You will need all the split files to extract the files. Make sure you do not delete or lose any of the split files.
- Click Ok. It's in the lower right corner. This compresses your file.
Method 3 of 6:
Using Archive Utility for Mac
- Click the magnifying glass icon. It's in the upper-right corner of the Mac desktop. This opens the Spotlight search bar.

- Type Archive Utility.app in the search bar and press ⏎ Return. This opens the Archive Utility application. It is a built-in Archive app that comes with macOS. It doesn't have as many options as programs for Windows, but it can be used to compress large files.
- Click File. It's in the menu bar at the top of the screen.
- Click Create Archive. It's the first option in the "File" menu.
- Select a file(s) or folder and click Archive. This compresses the file in gzip (.cpgz) format. This file format provides a higher compression rate than a standard zip file, however, they cannot be opened in Windows systems.
- If you prefer a standard zip file, right-click a file in the Finder and select Compress.
Method 4 of 6:
Compressing Large Video Files
-
 Download Avidemux. This is a free, open-source video editor that allows you to easily compress and convert your video files. It is available for Windows, Mac, and Linux. Use the following steps to download Avidemux:
- Go to http://fixounet.free.fr/avidemux/download.html in a web browser.
- Click FOSSHUB next to your operating system.
- Click the download link for your operating system.
- Open the downloaded file in your web browser or Downloads folder.
- Follow the instructions to complete the installation.
-
 Launch Avidemux. Avidemux has an icon that resembles a director's clapboard. Click the icon in the Windows Start menu, or the Applications folder on Mac to open Avidemux.
- Videos are large chunks of data that don't compress well when added to an archive using the method above. Instead, you'll want to re-encode it using Avidemux, which will lower the file size considerably at the cost of some quality.
- Movie files that you've downloaded from online sources may already be compressed. Further compression can lead to a virtually unwatchable final product, or may not result in significant size changes.
- It is not possible to uncompress a compressed video. You should always save the compressed version as a separate file so that you don't lose the original.
- Open a video file in Avidemux. Use the following steps to load a video in Avidemux. It may take a few minutes to load a video
- Click File.
- Click Open.
- Select a video file on your computer and click 'Open.
-
 Select Mpeg4 AVC (x264) from the "Video Output" drop-down menu. This is the most compatible format for your converted video.
 -
 Select AAC FDK "Audio Output" drop-down menu. This will compress the audio track of the video to keep the size down.
 -
 Select MP4 Mixer in the "Output Format" drop-down menu. This will ensure that the video plays on the most devices possible.
 -
 Click the Configure button in the "Video Output" section. It's the first option below "Video Output."
 - Select Video Size (Two Pass) from the drop-down menu. It's in the "Rate Control" section at the bottom.
-
 Enter the target size for the converted video. Avidemux will adjust its settings to get as close to your target size as possible, but it may end up slightly over or slightly under the target size.
- Note that setting the target size significantly smaller than the original size will result in a drastic decrease in quality.
-
 Click the "Save Video" button. It's the icon that resembles a disk in the upper-left corner. You will be prompted to enter a name for the video, and then the conversion and compression process will begin. Depending on the length of the video and the quality settings, this could take quite some time to complete.[1]
Method 5 of 6:
Compressing Large Images
-
 Understand what can be compressed. Most images that you download online are already compressed. The file formats .jpg, .gif, and .png are all forms of compression, and further compression will lead to a sharp decrease in quality. Compression for images is most useful if you are working with images directly from a digital camera or .bmp files.
- It is not possible to uncompress a compressed image. You should always save the compressed version as a separate file so that you don't lose the original.
-
 Understand the difference between "lossless" and "lossy" compression. There are essentially two types of compression for images: "lossless" and "lossy". Lossless compression is for cases where you need an exact replication of the original and is typically used for drawings, diagrams, and medical imaging. Lossy compression is for cases where a drop in quality won't be noticed as much and is most commonly used for photographs.
- .gif, .tiff, and .png are all lossless formats.
- .jpg is the most common lossy format for images.
-
 Open an image editor of your choice. Nearly all image editors support compression by allowing you to save the image as a different file format. When you choose a compressed format, you'll be given options to determine how much compression to use.
- Photoshop, GIMP, and even Paint allow you to save image files as compressed formats. Virtually any image editing program will work, though some will give you more quality options than others.
- Photoshop is the most popular image editor, but if you don't have a subscription, you can download and install GIMP for free. It has a lot of the same features as Photoshop.
- Open an image the image editor. Each image editor is a little different, but generally, the way you open a file is usually similar. Use the following steps to open an image in your image editor.
- Click File in the menu bar.
- Click Open.
- Select an image.
- Click open.
-
 Open the Export menu. This will allow you to save a copy of the original image using a new format.Use the following steps to open the Export menu:
- Click File.
- Click Save As (Photoshop, Paint) or Export As (GIMP).
-
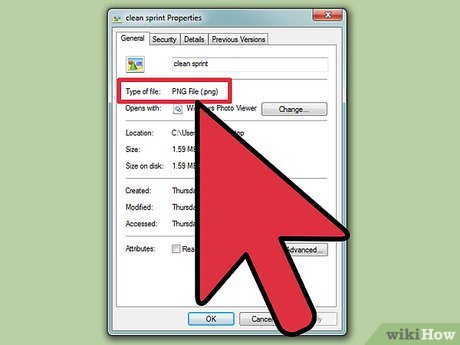
 Select your desired format. On Paint, simply click your desired image format. On Photoshop, select your desired image format using the drop-down menu next to "Format". On GIMP, click the menu that says Select File by Type and select your desired image format. The format you choose has a lot to do with the nature of the image.[2]
- If you're compressing a photograph, select .jpg as your format.
- If you're compressing an image with less than 256 colors, select .gif as your format.
- If you're compressing a screenshot, a drawing or comic, or any other non-natural image, select .png.
- If you're compressing an image with layers that you want to preserve, select the .tiff format (note that .tiff format isn't necessarily considered compression).[3]
- Click Save (Photoshop) or Export (GIMP). This saves your image in the new format.
-
 Set your quality options (if possible) and click Ok. Image editors like Photoshop and GIMP will ask you to select your quality and compression settings after clicking the "Export/Save" button. You can typically use a slider to adjust the compression or quality.
- Increasing compression (decreasing quality) will result in a much smaller file size, but will add a lot of artifacts and change the color of the image. You may need to play with the options to find a good tradeoff between quality and size.
Method 6 of 6:
Compressing Large Audio Files
-
 Understand what can be compressed. Most audio files that you download from the internet, such as .mp3 or .aac files, are already compressed. Further compression of these types of files will typically result in a poor-sounding file. Compression is best suited for uncompressed formats such as .wav or .aiff.
 -
 Download Audacity. This is a free, open-source audio editing program that is available for Windows, Mac, and Linux. Use the following steps to download Audacity.
- Go to https://www.audacityteam.org/download/ in a web browser.
- Click the install link for your operating system.
- Click the download link for the Audacity installer.
- Click the download link for your operating system on the download site.
- Open the downloaded file in your web browser or Applications folder and follow the instructions to complete the installation.
- Open Audacity. It has an icon that resembles an orange wave file with blue headphones. Click the icon in your Windows Start menu or Applications folder to open Audacity.
-
 Open the audio file you want to compress. Use the following steps to an audio file:
- Click File.
- Click Open.
- Select an audio file.
- Click Open.
-
 Make the file mono (optional). This isn't recommended for music or anything with essential stereo effects, but for spoken voice or other recordings that don't require high-fidelity, switching to mono (single-track) can make the file significantly smaller. Use the following steps to convert a stereo file to mono:
- Click the ▼ next to the file's name in the project area.
- Select "Split to Mono" from the menu.
-
 Open the "Export Audio" window. This will open a window allowing you to set where you want the file to be saved, as well as the format you want to use.
- Click File.
- Click Export.
- Click Export Audio.
-
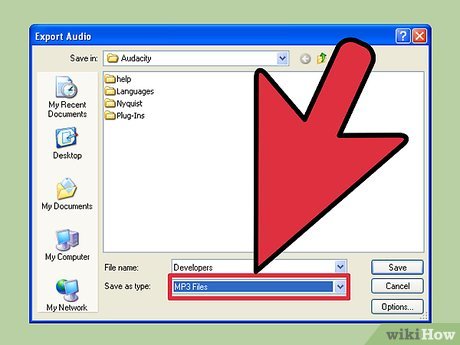 Select your compressed format. All of the formats listed in the "Save as type" menu are a form of compression, except .wav and .aiff. The format you choose depends on your requirements. The best options for compression are as follows:
- ".mp3" is the most common format for music, as it allows for good compression without too much noticeable quality loss. it is also compatible with virtually any device.
- ".flac" is a lossless form of compression. It is good if you intend to playback the audio through a high-quality sound system, but it is not compatible with many devices. .flac will also not lead to a drastic reduction in file size.
- ".ogg" creates better sound quality than MP3 at similar file sizes, but it's not compatible with as many devices.[4]
- Select the audio quality. The way you select the audio quality is different depending on the file type you choose. Lower quality will provide a greater rate of compression, but at a cost of sound quality.
- MP3: Use the drop-down menu next to "Quality" to select the sound quality. "Medium" and "Standard" will provide a decent rate of compression with average audio quality. "Extreme" and "Insane" will provide less compression with high sound quality.
- OGG/M4A(ACC): Drag the slider bar to the left to increase the rate of compression, but lower the sound quality. Drag it to the right to decrease, the rate of compression while increasing the sound quality.
- All other file types: Use the drop-down menu below "Bit Rate" or "Bit Depth" to select the sound quality/rate of compression. Lower bit rate/bit depth will provide a higher rate of compression at a cost of lower sound quality.
- Change the file name (Optional but recommended). You don't want to accidentally overwrite the original file. To avoid doing this, just change the file's name next to "File name:".
- Click Save and then click Ok. This exports the audio file in a new compressed audio format.
Was this article helpful?
Your feedback helps us improve.
Related Articles
 The way to Compress large files is very easy20 minutes read
 How to reduce PDF file size online6 minutes read
 How to compress and decompress files of all formats on your computer4 minutes read
 How to compress and decompress files on iPhone2 minutes read
 How to reduce PDF file size by software6 minutes read
 How to compress and decompress files with WinRar?3 minutes read
Reader Comments 0
Sign in with email or Google to join the discussion.