How to change DNS Server on Windows 11
By default, your computer will automatically get your Internet service provider (ISP) DNS information. However, sometimes, the default DNS server may not work properly, blocking access to certain websites.
Table of Contents
At that time, changing the DNS server is a good thing to do. This also provides the following benefits:
- Fix DNS errors.
- Increase the response time between the computer and the DNS Server.
- Ability to access blocked Web sites.
- Protect your information and computers from some form of cyber attack.
How to change DNS server in Windows 11 is not complicated. Find out below.
Change DNS server on Windows 11
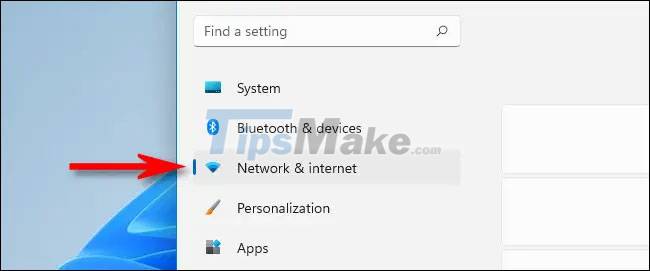
First, open the Settings app by pressing the Windows + i key combination . You can also right-click the Start button on the taskbar and select Settings in the menu that appears.

In the Settings interface that opens, click ' Network & Internet ' in the list on the right.
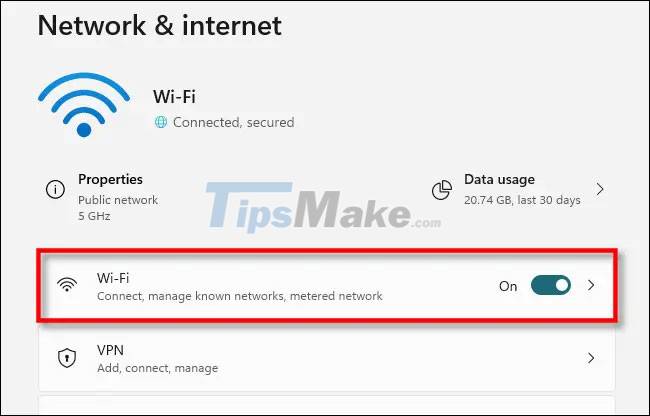
On the Network & Internet settings screen that appears, find the name of the internet connection for which you want to change the DNS server in the list (such as ' Wi-Fi ' or ' Ethernet '), and click it.
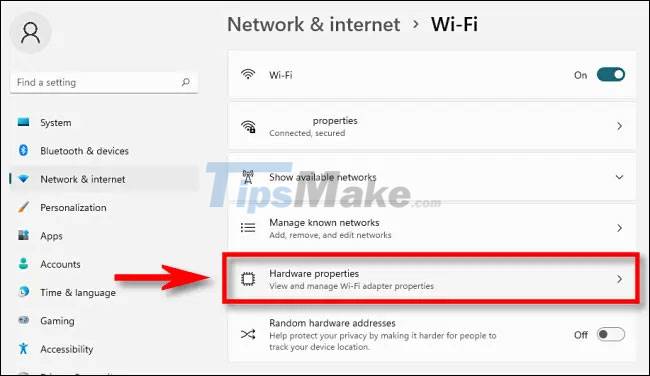
On the properties page for the corresponding network connection that appears, select Hardware Properties .
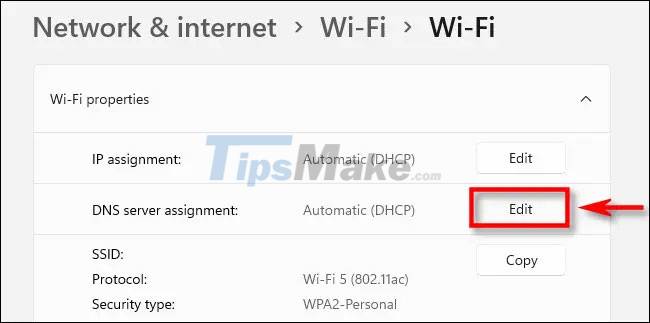
Next, find the DNS Server Assignment entry and click the Edit button next to it.
The Edit DNS Settings window will appear. You use the drop-down menu, select the Manual option . Then enable IPv4 or IPv6 depending on the type of IP connection you want to modify. Most connections still use IPv4 by default, but some ISPs also require IPv6.
Under the IPv4 or IPv6 heading, enter the primary DNS server address in the ' Preferred DNS ' box (such as ' 8.8.8.8 ' and ' 8.8.4.4 ' for Google's free DNS service). Below that, enter the secondary DNS server address in the ' Alternate DNS ' box.
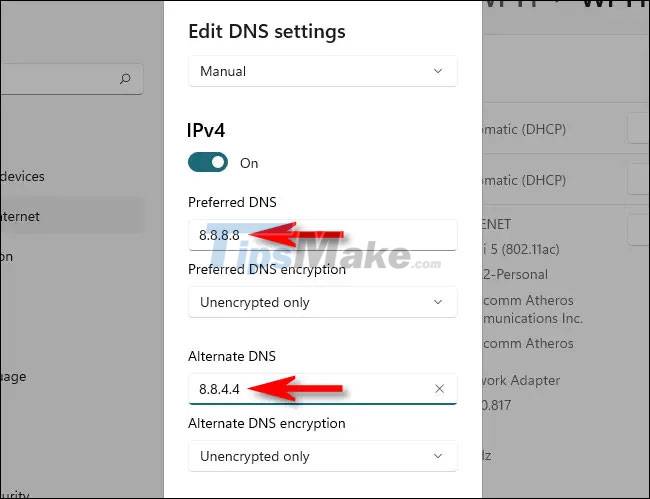
If you want to use DNS over HTTPS, which encrypts your DNS requests for improved privacy and security, set both 'Preferred DNS Encryption ' and ' Alternate DNS Encryption ' options to ' Encrypted Only (DNS over HTTPS) ' using the drop-down menu below the DNS address entered in the last step. Repeat this for IPv4 or IPv6 as needed.
( Note: As of November 2021, DNS over HTTPS only works with a limited number of DNS services in Windows 11. Make sure the DNS server you are using supports DNS over HTTPS before enabling DNS encryption) .

If you don't know if your new DNS server supports encryption, you can set DNS encryption to ' Unencrypted Only '. When you're done, click ' Save ' and the window will close.
On the Wi-Fi or Ethernet hardware properties page, you should see the DNS servers you just entered listed with the encryption status next to them.
Close the Settings app and everything is done. From now on, all internet traffic going through the network adapter you modified will use the new DNS servers. If necessary, you can repeat these steps with an alternate network adapter (such as Ethernet if you've already set up a DNS address for Wi-Fi).

Note: If you experience network problems after changing your DNS settings, double-check that you entered the correct address.
Incorrectly entered DNS address will result in inaccessible DNS server and broken internet connection status.
If the address has been entered correctly but you are still having problems, try disabling the 'IPv6' switch in the DNS servers list. If you configure an IPv6 DNS server on a computer that does not have an IPv6 connection, this can also cause connection problems.
Was this article helpful?
Your feedback helps us improve.
Related Articles
 How to change DNS server on the most popular routers15 minutes read
 Instructions to change DNS Server on Windows, Mac, iOS and Android9 minutes read
 3 'legitimate' reasons to change DNS Server13 minutes read
 Change League of Legends VNG server, switch LOL VNG server5 minutes read
 How to change DNS server on Chromebook4 minutes read
 How to change DNS server on Raspberry Pi6 minutes read
Reader Comments 0
Sign in with email or Google to join the discussion.