How to automatically delete Pagefile.sys on shutdown in Windows 10
Pagefile.sys is a sub file that arises while using the computer. It acts as a virtual RAM to store programs that are not being used, thereby helping to reduce the pressure on RAM. The pagefile.sys size is usually close to the size of the RAM you equip, so it can take up a lot of space..
To free up more hard drive space, deleting Pagefile.sys is also a possible method, and you can also set it to automatically delete every time you shutdown.
To set this up, you will need to make changes in the Registry. So follow the instructions carefully, sometimes you make a small step wrong can also make Windows work incorrectly.
Step 1: Open the Registry editor by pressing Windows + R key combination . Then you enter the code dialog " regedit ".

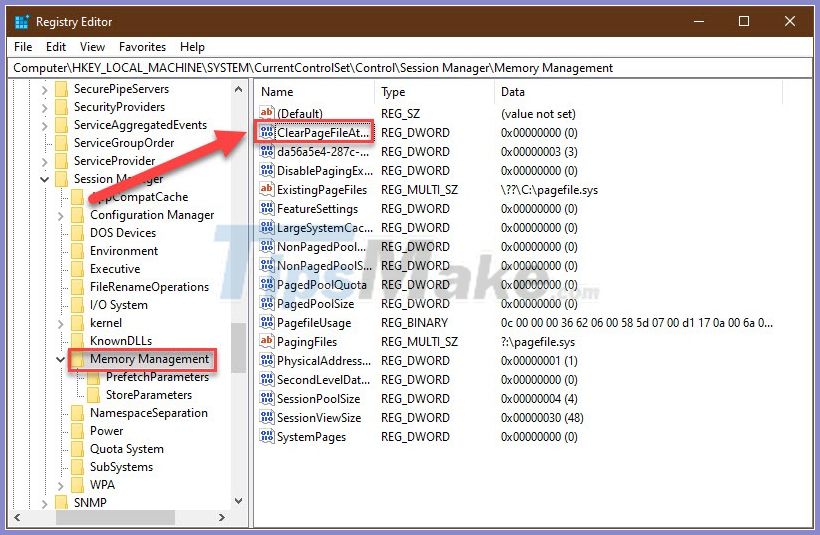
Step 2: In Registry Manager, go to: ComputerHKEY_LOCAL_MACHINESYSTEMCurrentControlSetControlSession ManagerMemory Management
You copy the line above and paste it into the address box, then Enter is okay.

Step 3: In the " Memory Management " folder , double-click on the " ClearPageFileAtShutDown " key .
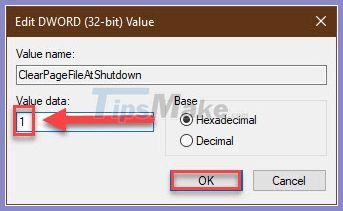
Step 4: In the Value data box , enter " 1" . Then OK .
At the end you restart the computer and the settings will be applied. From there, every time you shut down the computer, pagefile.sys will be deleted. But rest assured, it will be re-created every time.
If this article is helpful to you, please continue to follow Tipsmake.com to learn more Windows 10 tutorials!