Table of Contents
This guide explains how to add a Bookmark in Microsoft Word, with clear steps, practical tips, and important checks before you begin.
Adding a Bookmark
-
 Select the place in the text you wish to bookmark. You can either highlight a block of text or click to place your cursor at the start of a paragraph.
 -
 Access the Bookmark feature. This displays the Bookmark dialog box.
- In Word 2003, select "Bookmark" from the Insert menu.
- In Word 2007 and 2010, select "Bookmark" from the Links group in the Insert menu ribbon.
-
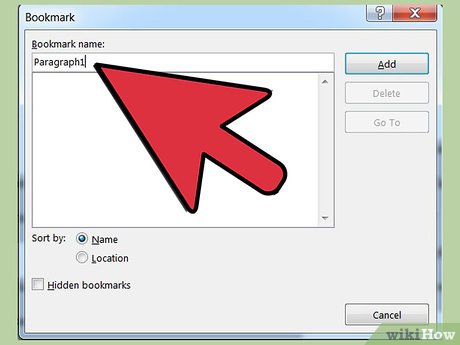 Name the bookmark. Bookmark names have to begin with a letter, but they may contain numbers. Spaces aren't allowed, but you can separate words with an underscore (_), as in "Heading_1."
 -
 Click the "Add" button. This creates your bookmark.
Show Bookmark Brackets in Text
-
 Display the Word Options dialog box. The method for doing this differs according to your version of Word.
- In Word 2003, select "Options" from the Tools menu, then click the View tab.
- In Word 2007, click the "Microsoft Office" button in the upper left to display the File menu, then click "Word Options."
- In Word 2010, click the File tab and select "Options" from the File menu on the left side of the File page.
-
 Select "Advanced. "
 -
 Scroll down to the "Show document content" section.
 -
 Check the "Show bookmarks" box. Click "OK" to close the Word Options dialog. Any text within the bookmarked section will be surrounded by brackets; if there is no text within the bookmark, it instead appears as an I-beam. Neither the brackets nor the I-beam print.
- Text within a bookmark can be edited the same as text outside the bookmark. If you cut or copy a portion of the bookmarked text to a new location, the moved text is not bookmarked. If you add to the text within the bookmark brackets, the new text becomes part of the bookmarked text; if you delete part of the text inside the bookmark brackets, the bookmark remains with the remaining text. If you cut and paste an entire bookmarked item, including the bookmark itself, to a new location in the same document, the bookmark moves with the moved text; if you do not include the bookmark, it remains where it is in the document. If you copy a bookmarked item to another document, including the bookmark brackets, both the original and the new document will have bookmarks. For this reason, it's a good idea to display any bookmarks before editing your text to make sure the bookmarks end up where you want them to end up when you're done editing.
Go To a Specific Bookmark
-
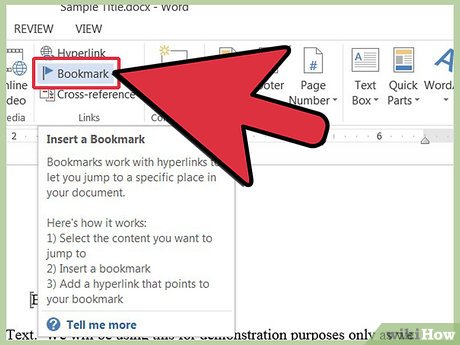 Display the Bookmark dialog box.
- In Word 2003, select "Bookmark" from the Insert menu.
- In Word 2007 and 2010, select "Bookmark" from the Links group on the Insert menu ribbon.
-
 Choose one of the "Sort by: " options. Select "Name" to sort the bookmarks alphabetically by name or "Location" to sort them by their location in the document.
- To display hidden bookmarks in the list, check the "Hidden bookmarks" box.
-
 Select the bookmark you want to go to.
 -
 Click the "Go To" button.
Cross-Referencing a Bookmark
-
 Access the cross-reference feature. You set up a cross reference in the Cross-reference dialog box. To access it, do the following for your version of Word:
- In Word 2003, select "Reference" from the Insert menu and then select "Cross-Reference."
- In Word 2007 and 2010, select "Cross-Reference" from the Links group on the Insert menu ribbon.
-
 Select "Bookmark" from the "Reference type: " field.
 -
 Choose the type of bookmark reference from the "Insert reference to: " field. In most cases, you'll use the "Bookmark text" option.
 -
 Select the bookmark from the "For which bookmark: " list. A cross-reference will be created to your bookmark. The cross-reference will take the form of a hyperlink in the document, unless you uncheck the "Insert as hyperlink" box.
Deleting a Bookmark
-
 Display the Bookmark dialog box.
 -
 Select the name of the bookmark you wish to delete.
 -
 Click the "Delete" button. Your bookmark is deleted. Any text associated with the bookmark remains, however.
- To delete book the bookmark and its associated text, select the item and press the "Delete" key on your keyboard. To make sure the bookmark is also deleted, follow the instructions under "Show Bookmark Brackets in Text."
FAQ
What should I know about Add a Bookmark in Microsoft Word?
Focus on the key features, requirements, limitations, and practical use cases explained in this guide.
How do I get the best results with Add a Bookmark in Microsoft Word?
Follow the recommended steps, use current software or information, confirm compatibility, and review settings before major changes.
Are there any risks or limitations?
Potential limitations depend on compatibility, data quality, cost, privacy, support, and how the product or method is used.
Related Articles
 How to Create Bookmarks in Word 2016: Create Bookmark Word 20164 minutes read
 How to Create Bookmark in Word4 minutes read
 Word Has an Error Bookmark Not Defined - Extremely Effective Way to Fix It6 minutes read
 How to Change the Bookmark Icon on Chrome, Change the Bookmark Icon4 minutes read
 What Is Bookmark? How to Use Bookmark in Web Browser5 minutes read
 Link Download Microsoft Word 20194 minutes read
Reader Comments 0
Sign in with email or Google to join the discussion.