Table of Contents
This practical guide walks through how to access recovery mode (safe mode) in Ubuntu, explains the main requirements, and highlights common issues that may appear along the way.
This article will show you how to access Recovery Mode (Safe Mode) in Ubuntu. (Applies to Ubuntu, Mint, and other Ubuntu-related distributions).
Boot into Recovery Mode in Ubuntu
When you are booting your Ubuntu computer, wait for the manufacturer logo to flash from the BIOS. If your computer boots up too quickly, you need to do this right after powering on. Briefly press the Shift key or the Escape key. On newer computers it's usually Escape. If you miss it, restart your computer and try again.
You should now have access to the Ubuntu GRUB boot menu. Just below the normal boot option you will see an entry that says 'Advanced Options'. Select it and press Enter.
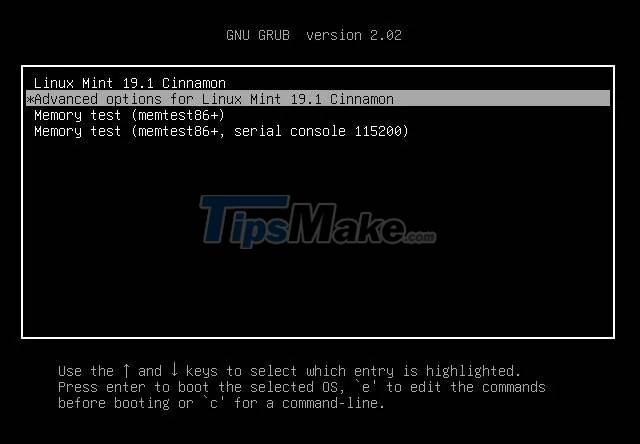
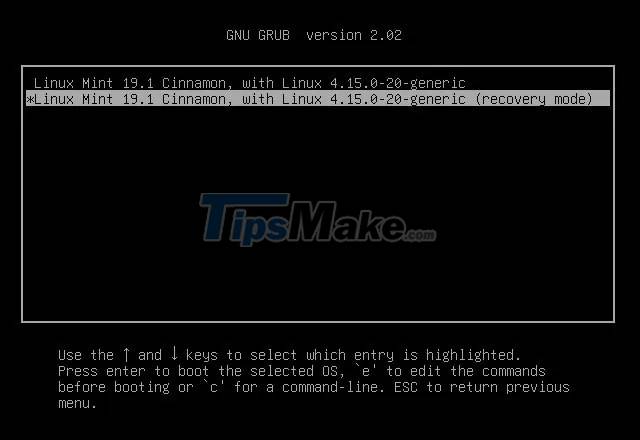
GRUB will take you to a new menu. At the bottom, you'll see one of the entries with the word "Recovery" listed in parentheses.
You will be taken to a simple screen with a blue background and a dialog box containing system recovery options. This is Ubuntu's main Recovery menu; it allows you to perform many tasks necessary to repair a system that is experiencing software problems.

Learn recovery options
You now have seven options to help restore your Ubuntu system. Depending on the problem that you are facing, there will be a suitable solution that you can choose from. As follows:
- Resume: If you somehow accidentally access this menu without needing it, just tap 'Resume' to resume normal startup.
- Clean: If you have storage space issues, this option helps you free up memory space. This helps you avoid a bunch of system glitches related to storage space.
- Dpkg: If you are installing a new package and something goes wrong, this can cause Ubuntu to not work properly. Using 'dpkg' helps you repair the installed packages with problems.
- Fsck: While not always working, 'fsck' is very useful in troubleshooting hard drive related problems. You can also use this option to configure the graphics driver. If you suspect your hard drive is failing or experiencing errors, try using this tool.
- Grub: This option is used only to automatically update the installed Grub bootloader.
- Network: If you're having network issues, use this option to set things up again.
- Root: This is advanced troubleshooting. As you may have noticed, the Recovery Menu opens the system in a read-only state. This root tool gives you more write permissions.
- System-summary: Get a basic overview of your system.
Root Terminal
When it comes to operating system problems, there are many problems that can only be solved by rooting and they require more manual intervention than what the default options in the recovery menu offer. In this case, select 'Drop to root shell prompt' to boot into the root terminal.
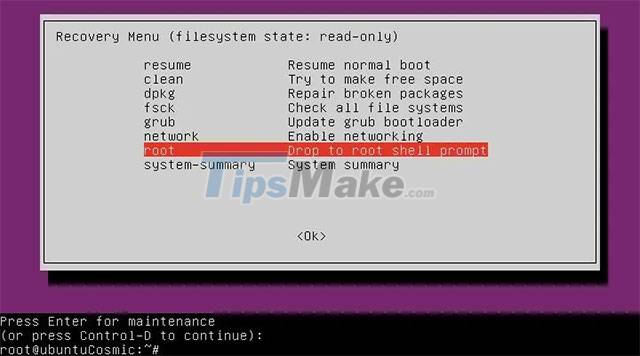
Immediately, you will see the bottom of the screen switch to a terminal window. But first, you'll need to remount the drive's root partition. It's mounted read-only by default for safety purposes, but you'll probably need to tweak it a bit to troubleshoot what's going on. To reset with write permissions, run the following command.
mount -o remount,rw /
If there are additional partitions to deal with, you'll need to remount them as well. This can happen when your '/home' directory is on a separate partition. You can reassign them all at once with just the command:
mount -a

You should now have access to everything on your system as root, so be careful not to mess anything up in the process. Making backups, even just copies of the files you modify, is also a great idea.
After you have detected and fixed the problem, reboot your system and use as usual.
Key Takeaways
Use the information above as a practical reference for how to access recovery mode (safe mode) in Ubuntu. Review each step carefully, confirm any requirements, and choose the option that best fits your situation.
FAQ
What does this guide explain about Access Recovery Mode (Safe Mode) in Ubuntu?
It explains the main concepts, practical considerations, and useful steps related to access recovery mode (safe mode) in Ubuntu without requiring advanced knowledge.
Who can benefit from learning about Access Recovery Mode (Safe Mode) in Ubuntu?
This information is useful for readers who want a clear overview, practical guidance, and reliable steps related to access recovery mode (safe mode) in Ubuntu.
What should I check before applying this information?
Review the requirements, confirm that your device, software, or situation matches the instructions, and back up important data before making major changes.
Related Articles
 How to Access Safe Mode Windows 10 on Startup9 minutes read
 How to Access Recovery Mode on a Mac M14 minutes read
 How to Put iPhone and iPad into Recovery Mode4 minutes read
 How to Turn on Safe Mode on Android7 minutes read
 All Problems with Starting Windows in Safe Mode8 minutes read
 Steps to Restart Mac in Recovery Mode5 minutes read
Reader Comments 0
Sign in with email or Google to join the discussion.