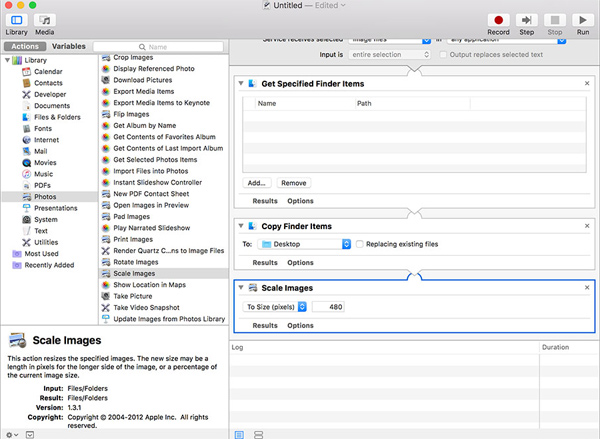
Guide to resize a batch of photos on Mac using Automator
To be able to resize images on Windows, you will need external support tools such as reducing image size with FILEminimizer Pictures. Or use Photoshop photo editing tools to reduce the image size in bulk.
However, on Mac, it is much simpler to use Automator tool. This tool helps users to resize images in bulk and is fully available in Mac OS X operating system without you needing to add any other support application. If you do not know how to do so, please refer to the tutorial below.
Step 1:
First, enter the Automator keyword in the Mac to open the Automator application.

Step 2:
Next, select New Document and select Service in Choose a type for your document .

Step 3:
Next, in the interface to the right of the Services receives selected section , click on Images files .

Step 4:
Then, in Actions section on the left interface, select Files and Folders. Drag Get Specified Finder Items to Build area (on the right) .

Also in the Actions section, select Photos and drag Scale Images to Build area . If the notice board appears to be added, click Add to agree.

Step 5:
In Scale Images , enter the horizontal size you want to resize. For example, I choose a size of 1024px.

Name the resize image as Resize 1024. Next choose File> Save or press Command + S to save.

Step 6:
Right-click on the image you want to resize and select Services at the bottom. Here, you will see the resized image folder created via the Automator application.

The end result is that the entire image has been resized and batched.

Above is the full image resizing guide by Automator available on Mac. With this application, you can reduce the size and size of all images in the folder, with simple operations. We will save a lot of time compared to reducing the size of each image on the machine.
Refer to the following articles:
- 20 convenient shortcuts when using Mac OS X
- Find the router's IP address in Mac OS X
- How to add or delete a Wifi network on Mac OS X
I wish you all success!