Collaborative programming using the Live Share feature in Visual Studio Code
Whether you are learning the first steps of the programming language or an experienced programmer, collaboration is the key to improving skills. Concepts like Pair Programming are common in modern companies, but are there any options for collaboration?
Many teams use tools like Slack and Discord to stay in touch as a team. Version control allows people to collaborate on a project and synchronize it with the same online repository.
These tools are great, but what if there is a way to incorporate these concepts into the IDE? Microsoft has the answer to this problem in Live Share for Visual Studio (VS) Code and Visual Studio. Today's tutorial will focus on VS Code.
(If you're still not sure whether you should choose Visual Studio Code or Atom, refer to the article: Compare the 2 Visual Studio Code editors and Atom to make a decision.)
How to use the Live Share feature in Visual Studio Code
- What is VS Live Share?
- Set up Visual Studio Code to collaborate
- Set up sharing session in VS Code
- Cooperate to write basic code in VS Code
- Subscribe and focus on collaborators
- Use audio in VS Live Share
- Integrating Slack with VS Code
- Security and privacy in VS Live Share
- Collaboration is the advance in Visual Studio Code
What is VS Live Share?
VS Live Share allows two or more people to collaborate when programming in real time using a Microsoft account or GitHub. Standard Live Share sessions support up to 5 concurrent users, though this number can be extended to 30 by changing the settings. Only logged-in users can contribute to the code, and guests can watch sessions and join live chat.

VS Live Share Extension package includes audio, allowing users to share calls, as well as integration for Slack and Discord. Besides the obvious benefits for teleworkers, Live Share is also a useful educational tool. Shared terminals and servers make the Live Share the perfect teaching assistant in the classroom.
Set up Visual Studio Code to collaborate
VS Code is free and available for Windows, macOS and Linux. If you are not yet a VS Code user, download and install it before continuing.
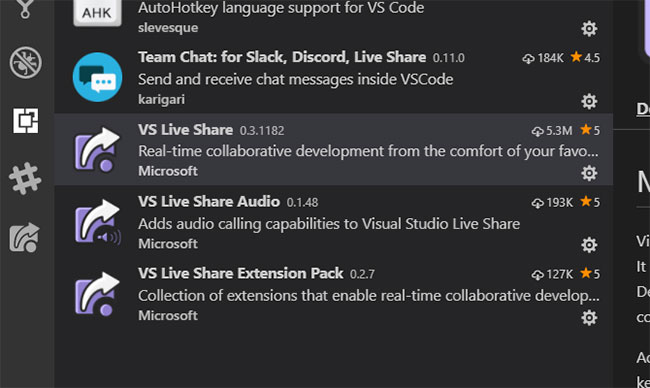
To install VS Live Share, open VS Code and the Extensions tab on the left toolbar. Alternatively, you can use the keyboard shortcut Ctrl + Shift + X Search for VS Live Share in the search bar.

In addition to VS Live Share, Microsoft has released additional tools to communicate via external software and audio. Please install VS Live Share with the VS Live Share Extension Pack. After installation, click Reload under any of the extensions in the list to reload Visual Studio Code and activate them.

When reloading, you'll see a few new icons on the toolbar, a hash icon indicating the Slack and Discord integration dashboard, along with an arrow icon for the Live Share panel.
Set up sharing session in VS Code

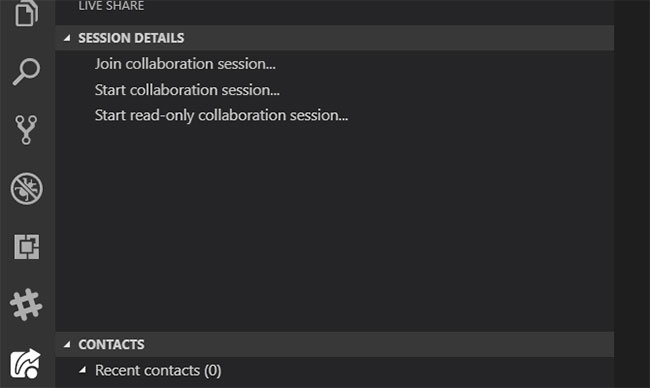
Setting up sharing sessions is quite simple. Open the VS Live Share tab in the left toolbar. The Session Details window provides three options for sharing code:
- Join collaboration session : Use this option to join other people's sessions as long as they've provided you with the URL.
- Start collaboration session : Use this option to create your own collaboration session where other users can edit the code.
- Start read-only collaboration session : Use this option to create a collaborative session where users can view, but not edit, the code.
Clicking on any of these options will prompt you to sign in to your Microsoft or GitHub account and redirect to the browser. To set up the basic session, click the Start collaboration session and select the working directory when prompted. Log in and you will be redirected back to VS Code and prompted to allow the firewall to work.
This is not essential, although recommended for connection speed and stability.

An info window in the lower right corner will contain collaboration links, along with options to create a read-only 'room' and links to more information about the sharing process.

Copy the link to the clipboard and send it to a friend or colleague who also has VS Live Share installed!
Cooperate to write basic code in VS Code
Collaboration writing code does not change your programming experience. Instead, it adds a layer on top. Creating a live sharing session opens a chat window. All users, whether logged in or read-only, can access this window.

At any time during the collaboration process, you can also reopen the chat window, get the shared URL or end the session with the Live Share control panel.

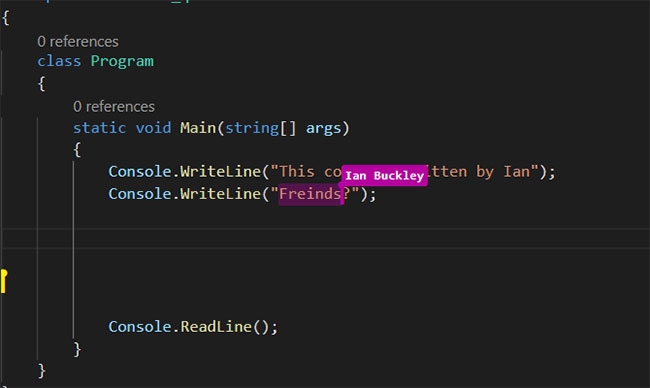
Now, open any file you want to collaborate and start programming as you normally would. Participants working on the same script have a separate colored cursor, showing where they are working. In addition to seeing people working in real time, the highlight feature also makes it easy to point out proposed errors and changes.

Collaboration can occur on any file in the project folder and you can see which scripts everyone is working in the Live Share control panel. You can also share the VS Code terminal in read only, read / write mode and local server to work on JavaScript or other web projects.
Subscribe and focus on collaborators
Sometimes you will want to explain something that requires moving outside of a script. Users can follow each other by clicking on the name in the Live Share control panel. Now, no matter where they go in the project, you'll be dragged to that position to see what they're doing.

Similarly, clicking on the small speaker icon in the Session Details panel focuses the participants on your current vision.

This is useful when you need to draw people's attention to a specific part of the project. Focused participants have the option to continue following you from this point on.
Use audio in VS Live Share
VS Live Share Extension Pack includes integration for audio. Start a session adding a new 'room'. To enter that 'room', click Join audio call in the Audio tab of the Live Share control panel.

All collaborators and guests have access to the call, making it perfect for either collaborating, teaching or presenting to a group about how a project is going on. You can access the settings for a call by right clicking on the active call or clicking the gear icon.
Click the red disconnect icon to leave the chat room (but you can access it again as long as the session is still active).
Integrating Slack with VS Code
Setting up Slack in VS Code is very simple. Click the Slack icon on the left panel and select Setup Slack. This will take you to a browser window to authorize VS Code to access the workspace.

You will need to be an admin to authorize the VS Code Slack application. When linked, the Slack workspace displays as another tab in VS Code.

The Discord setup is similar, though it's worth noting that only one of the services can seem to be integrated at a time.
Security and privacy in VS Live Share
VS Live Share is a great tool for programmers, but it comes with some security considerations. The open nature of the extension combined with the ease of sharing code can be abused.
Because even read-only guests can talk in the conversation, it's likely that inappropriate behavior from people who shouldn't have shared links will happen.
Live Share also allows sharing the terminal in read / write mode. This poses a significant security risk if it falls into the wrong hands.

In short, be careful with friends who share your Live Share link and think carefully before allowing editing and terminal privileges for everyone.
Collaboration is the advance in Visual Studio Code
These extensions are examples of basic integration with VS Code. Seasoned users will be aware of many more things that help complete, analyze and test code. Live Share also allows people to learn both in the classroom and remotely.
And remember, using VS Code, you can also write code in your browser using Microsoft Visual Studio Online.
Hope you are succesful.