Add Bluetooth devices in Windows 7
In this article we will show you the process of connecting Bluetooth devices in Windows 7 as well as giving you precautions for unexpected problems that may occur..
In this article, I will show you the process of connecting Bluetooth devices in Windows 7 as well as providing you with precautions for possible unexpected problems, the purpose of helping too. The process of adding your device is easy.
You may want to see:
- Here are some tips to help your old Windows 7 computer run as fast as it was when you first bought it
- Share files and printers Windows 7 and Windows XP
Introduce
The process of adding Bluetooth devices in Windows 7 is very different from other operating systems, such as in Windows Vista. So in this tutorial, we will show you the process of adding Bluetooth devices in Windows 7 as well as providing you with precautions for unexpected problems that may occur with the item. The goal is to make the process of adding your device easy.
Today, users have heard and used a lot of Bluetooth headset devices on mobile phones. Bluetooth allows users to connect wirelessly but only in a small distance. Technically, when using Bluetooth networks, you will create a Personal Area Network, or PAN.
However, besides the headset devices for mobile phones, another device that is commonly used is Bluetooth mouse for laptop users. To use a Bluetooth mouse for a Windows 7-based computer, we have some specific instructions below for you.
Bluetooth in Windows Vista
In the Windows Vista version, to add a Bluetooth device, simply go to the Control Panel and click Bluetooth Devices , as shown in Figure 1 below.

Figure 1: Bluetooth Devices in Windows Vista
From here, you can click on Add Wireless Device or Bluetooth Settings . What could be easier?
However in Windows 7, that simple process has been changed according to the name of the process. Let us introduce you how to do it.
Add Bluetooth mouse to Windows 7
To add a Bluetooth device in Windows 7, you must go to the Control Panel, from there click View Devices and Printers under Hardware and Sound , as shown in Figure 2 below.
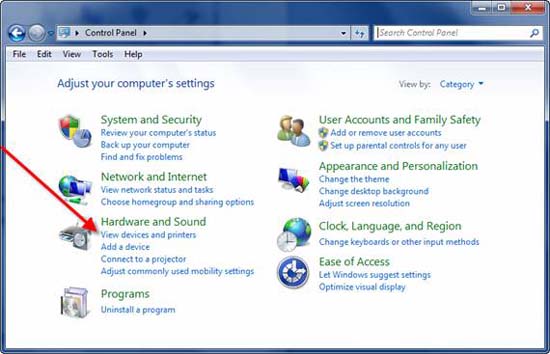
Figure 2: Control Panel in Windows 7
You will then be taken to the Devices and Printers screen.

Figure 3: Adding a new Bluetooth device in Windows 7
Next, before clicking Add a device (as shown in Figure 3), you should do some of the following
- Make sure that if you have a laptop, enable wireless on your laptop.
- Make sure that any software used to control the power or wireless you have is Bluetooth enabled.
- Power on the mouse and press the Connect button.
Now you can click Add a Device and you will see the screen shown in Figure 4 below.

Figure 4: Find the device to add
Select the device you want to add and click Next.
The device driver will load and you will see the window shown in Figure 5.
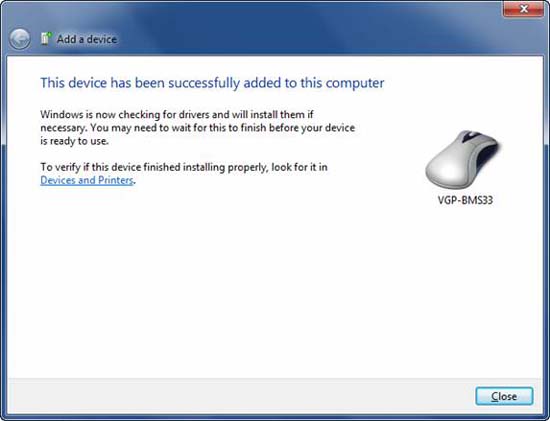
Figure 5: Bluetooth mouse has been added
Here, your mouse will work. You can use it to click Close , and you will see the Devices and Printers window appear.
In fact, adding Bluetooth devices is quite easy, but there are some issues that you need to keep in mind:
- Make sure your laptop or computer supports Bluetooth.
- Make sure the Bluetooth button is turned on.
- Make sure that any software that controls wireless or power is Bluetooth enabled.
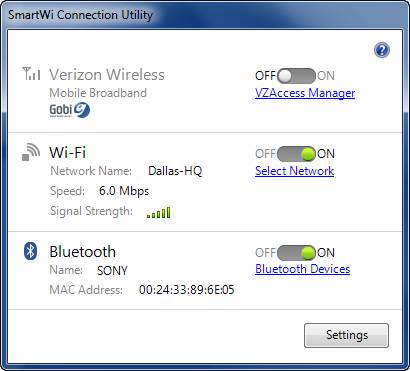
Figure 6: SmartWi connection utility
- Make sure your Bluetooth device is powered on and checked by viewing its power indicator light.
- You can press the Connect button on the Bluetooth device to make the handshake with the Bluetooth adapter on your computer or laptop.
- Make sure that the driver for the Bluetooth device is successfully installed, as shown in Figure 7 and Figure 8 below.

Figure 7: Bluetooth device driver currently installed
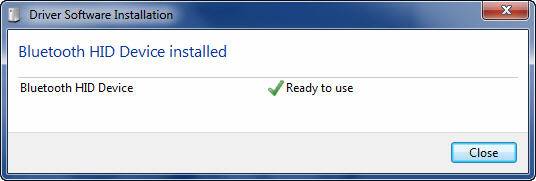
Figure 8: Bluetooth device driver installed
Conclude
The process of adding Bluetooth devices in Windows 7 is much different than what you still do in Windows Vista. In this article, I have shown you the process of adding a Bluetooth device in Windows 7 and some issues to keep in mind to make the process better.