7 Simple and Effective Ways to Block Websites from Opening Automatically on Chrome
There are many ways to install a printer, of which installation via IP address is often chosen by many people.
- How to find printer IP address
- How to install printer via IP address for Windows computer
- How to install printer via IP address for Mac computer
- Some errors that may occur when installing a printer via IP address
- Printer not found
- Printer not responding
- Incompatible driver
- Unable to connect to printer after installation
You want to use a printer to print documents for work or study but have no experience in installation? Currently, there are many ways to install a printer, in which installation via IP address is often chosen by many people. In the article below, TipsMake will guide you through the most detailed steps to install a printer via IP address.
How to find printer IP address
To set up a printer via IP address, you first need to find the IP address of the machine. Below will be how to check on some popular printers.
how to connect printer via ip address
- HP Printer: On the printer screen, select "Network" or "Wireless Settings" -> Select "Network Settings" or "Print Network Configuration Page" -> Print the network configuration page. The IP address will be displayed on this page.
- Canon Printer: On the printer screen, select "Menu" -> Select "System Settings" or "Device Settings" -> Select "LAN Settings" and then select "Print LAN Details" -> The IP address will be displayed on the printed page.
- Brother Printer: Press the "Menu" button on the printer -> Use the arrow keys to select "Print Reports" and then select "Network Config" -> Press "OK" to print the network configuration page. The IP address will be displayed on this page.
If your printer doesn't have a display, you can find its IP address by connecting the printer to your computer via USB and using the manufacturer's driver software.
How to install printer via IP address for Windows computer
To install a printer via IP address with a Windows computer, follow these steps:
Step 1: First, press the Window key on the keyboard, type "Control Panel", then press "Enter" or you can select Control Panel right on the computer's Desktop.
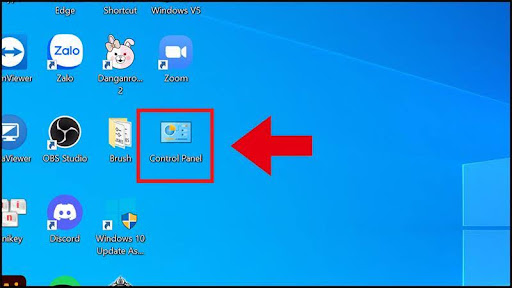
Control Panel
Step 2: In "Control Panel", select "View Devices and Printers".
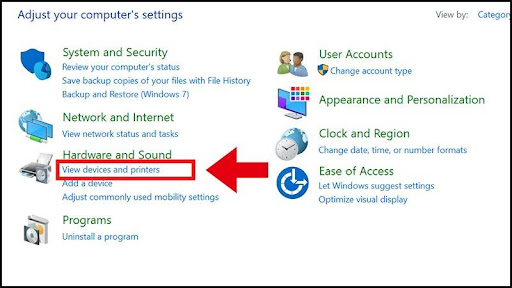
View Devices and Printers
Step 3: Click "Add a printer" at the top of the window
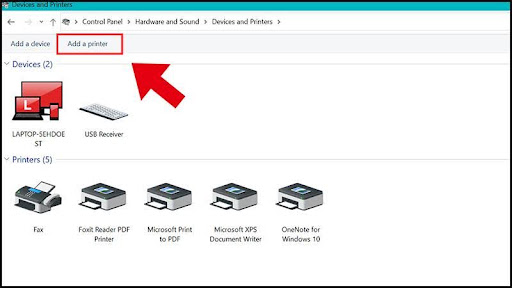
Add a printer
Step 4: When the "Add Printer" window appears, select "The Printer that I want isn't listed"
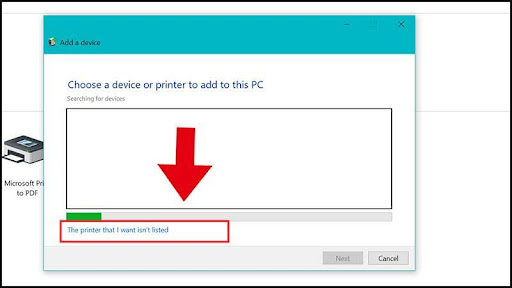
The Printer that I want isn't listed
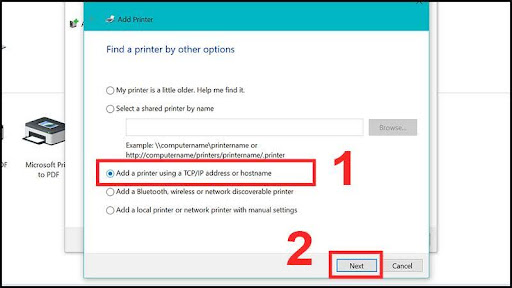
Step 5: Select 'Add a printer using a TCP/IP address or hostname -> click next to find the printer by IP address.
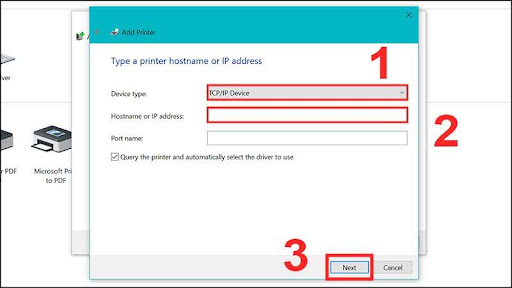
Step 6: Device Type section -> select TCP/IP Device section -> enter the printer IP address in the Hostname or IP address line -> Next.
The Printer that I want isn't listed
Step 7: The computer will automatically search for the printer. When the process is finished, select the printer you want to connect and press Next.
Step 8: Enter the printer name -> Next.
Step 9: Select printer sharing rights -> Next.
Step 10: Click Set as the default printer -> print a test page by selecting Print a test page -> Finish to finish.
How to install printer via IP address for Mac computer
If you're using a Mac, the process for setting up a printer via IP address is as follows:
How to install printer via IP address for Mac computer
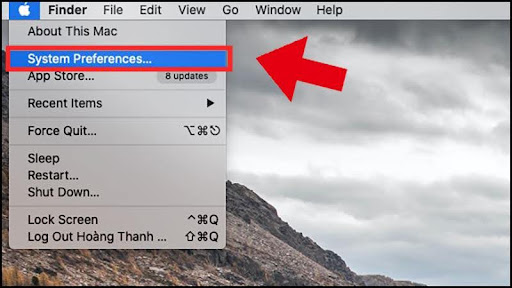
- Step 1: In the top left corner, select the Apple logo -> select System Preferences
- Step 2: Go to Printers & Scanners
- Step 3: Click on the + icon in the bottom left corner
- Step 4: Select the section with the IP icon -> Enter the IP address in the Address section.
- Step 5: Fill in the information in the section below and press Add to finish.
Some errors that may occur when installing a printer via IP address
During the process of installing the printer via IP address, you may encounter some of the following common errors:
Printer not found
The reason is that the printer is not connected properly or the IP address is entered incorrectly. At this time, the computer cannot detect the printer on the network, the "Add Printer" window does not display your printer.
Solution: You need to check the network connection, need to make sure the printer is connected to the network via Ethernet cable or stable Wi-Fi connection. Also, check the indicator light on the printer to confirm the network connection.
Printer not responding
The reason is that the printer is frozen or has a problem with the hardware. At this time, the printer will not print after sending a print command or will not respond to any commands from the computer.
Solution: Turn off your printer, wait a few seconds, and then turn it back on. If your printer is connected via Ethernet, check the cable to make sure it is not damaged and is securely plugged into both the printer and the router. If the above steps do not resolve the issue, contact technical support for further assistance.
Incompatible driver
The cause is that the printer driver is not compatible with the operating system. The printer will not work or work incorrectly after installation.
Solution: You need to visit the printer manufacturer's website and search for the latest driver for your printer model and operating system. Update your operating system to the latest version to ensure compatibility with the printer driver.
Unable to connect to printer after installation
The reason is that the printer's IP address may have changed or conflicted with another device. In this case, the printer worked normally before but cannot connect after a restart or after a period of time.
Solution: Print the printer's network configuration page to check the current IP address. If the IP address has changed, update the new IP address on the computer.
Above are all the steps to help you connect the printer via IP address in the most detailed way. We hope to bring you useful information for the installation process to be successful!
- Steps to block automatic opening of websites on Chrome browser
- How to block websites on Chrome simple, effective
- Block websites from opening automatically on Chrome browser
- Instructions on how to install a printer via IP address in the simplest way
- How to Block Websites on Google Chrome
- How to block Chrome automatically updating on Windows 10
- How to block websites on Chrome automatically
- 6 simple ways to enable the right-click feature to block that site
- How to fix the error of saving JPEG images into JFIF on Chrome
- How to fix The installer error uncompress archive on Chrome
- How to group tabs on Microsoft Edge Chromium
- How to Set Specific Country on Tor Browser
- How to Fix Google Sheets 'Still loading ...' error in Chrome
- How to enable uBlock Origin and Manifest V2 extensions on Chrome
- How to share YouTube videos privately with a password
- How to change mouse cursor on Google Chrome
- How to browse multiple websites with the same Chrome tab
- How to download blocked files on Edge browser on Windows 10?


-
 Detailed instructions on how to connect a printer to a Windows laptop and MacBook.
-
How to fix error 0x0000011b when printing over the network on Windows 11
-
How to find your printer's IP address on Windows
-
The Canon 2900 printer has difficulty pulling out paper when printing.
-
How to fix printer errors such as printing strange characters or font errors.
-
Signs that your printer is running low on ink and how to handle it.
 Detailed instructions on how to connect a printer to a Windows laptop and MacBook.
 How to fix error 0x0000011b when printing over the network on Windows 11
 How to find your printer's IP address on Windows
 The Canon 2900 printer has difficulty pulling out paper when printing.
 How to fix printer errors such as printing strange characters or font errors.
 Signs that your printer is running low on ink and how to handle it.
-
Application
-
Web Email
-
Website - Blog
-
Web browser
-
Support Download - Upload
-
Software conversion
-
Social Network
-
Simulator software
-
Online payment
-
Office information
-
Music Software
-
Map and Positioning
-
Installation - Uninstall
-
Graphic design
-
Free - Discount
-
Email reader
-
Edit video
-
Edit photo
-
Compress and Decompress
-
Chat, Text, Call
-
Archive - Share
-
-
System
-
Mac OS X
-
Hardware
-
Game
-
Tech info
-
Technology
-
Science
-
Life
-
Electric
-
Program
-
Mobile