3 ways to set up different background images on each Windows 10 screen
Setting up multiple monitors on Windows is quite simple and it only takes a few minutes to operate. After you have set up a multi-screen mode (multiple screens), you can set each wallpaper separately for each screen. To do this, please refer to the following article of Network Administrator.

1. Through Settings
Step 1:
Right-click any space on the Desktop, then select Personalize to open the application settings and find the Background item.

Step 2:
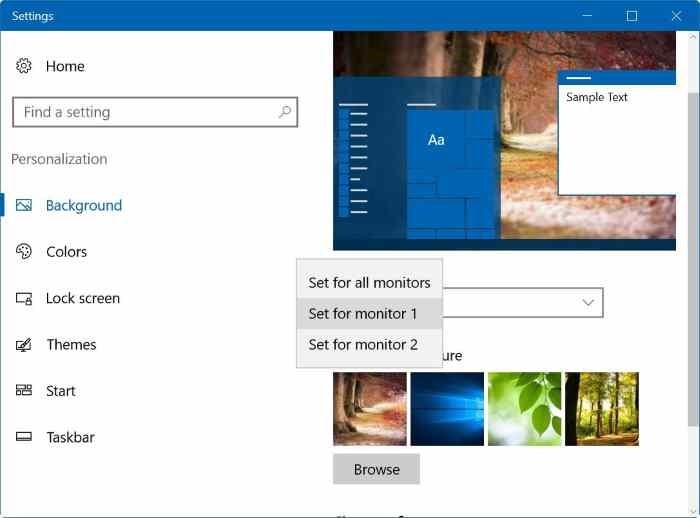
Here under Choose your picture, right-click the image you want to set as a wallpaper for a screen and select Set for monitor 1, Set for monitor 2 or Set for monitor 3 .

In case, if you want to set up new images as wallpaper for your screen, click the Browse button to find the image you want to set as the screen image, click Choose picture to add images to the item Choose your picture . Then right-click the image and select Set for monitor 1, 2 or 3 .


Important note:
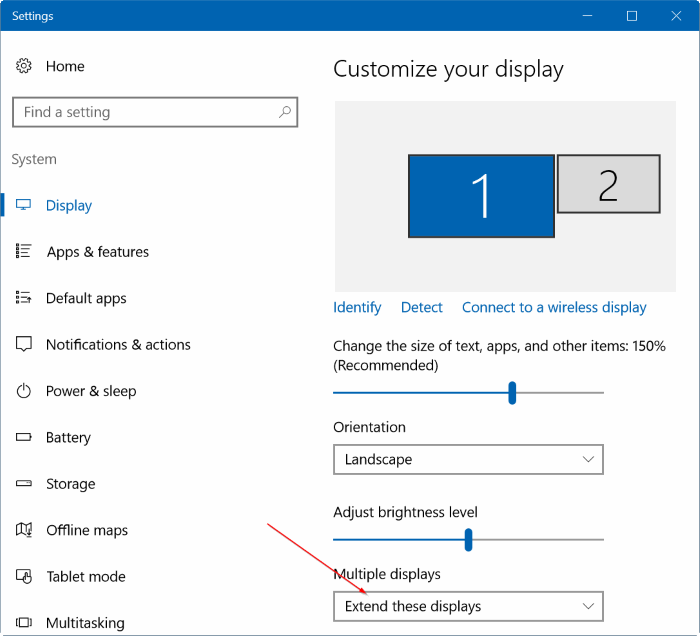
If the Context menu does not appear the options Set for monitor 1 and Set for monitor 2, then you must set the Duplicate these displays option on Settings.
To use 2 screens on your Windows 10 computer, first right-click any space on the Desktop, then click Display Settings. Under the Multiple displays section, click the Extend these displays button and click Apply.

2. Use Control Panel
Step 1:
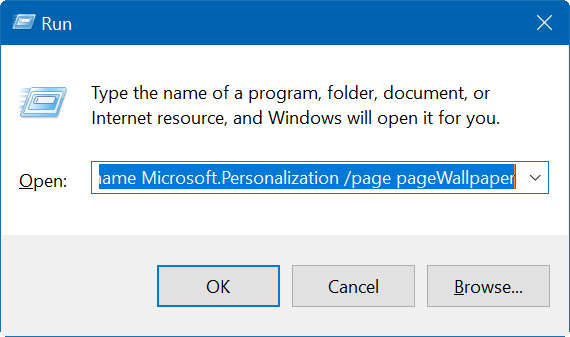
Press the Windows + R key combination to open the Run command window. Alternatively, right-click the Start button in the bottom left corner of the screen, select Run.
Step 2:
On the Run command window, enter the following command and press Enter to open the Desktop background window:
control / name Microsoft.Personalization / page pageWallpaper

Step 3:
Right-click an image that you want to set as a wallpaper for a screen, select Set for monitor 1, 2, 3 or 4.

Note:
If the Context menu does not appear the options Set for monitor 1 and Set for monitor 2, then you must set the Duplicate these displays option on Settings.
To use 2 screens on your Windows 10 computer, first right-click any space on the Desktop, then click Display Settings . Under the Multiple displays section, click the Extend these displays button and click Apply.
3. Through File Explorer
Step 1:
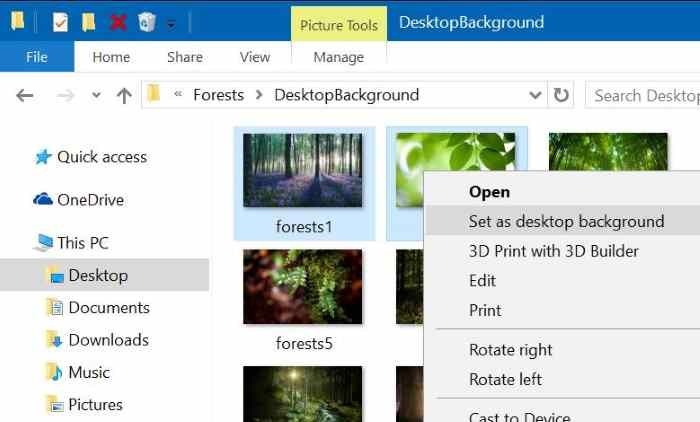
Navigate to the folder containing the image you want to use to set it as the background image.
Step 2:
Select 2 images (if there are multiple screens), right-click it and select Set as desktop background to set the images for each screen.

Refer to some of the following articles:
- Summary of some ways to fix Windows 10 crash, BSOD error and restart error
- Create virtual machines with Hyper-V on Windows 8 and Windows 10
- This is how to reset network settings on Windows 10 with just one click
Good luck!
You should read it
- How to Make a Transparent Image Using Gimp
- How to insert a background image in Word
- How to change the lock screen background in Windows 10
- How to remove image background with Paint or Paint 3D
- Set up Desktop wallpaper as a Start Screen screen background image on Windows 8.1
- How to enable transparent background on Windows Terminal
 Fix the error of not adjusting screen brightness on Windows 10
 How to check if your computer is running Windows 10 Hyper-V?
 Automatically 'clean up' the Recycle Bin on Windows 10
 How to fix 'An operating system not found' error on Windows 10 and Windows 8.1
 What is the directory $ WINDOWS. ~ BT, can delete $ WINDOWS. ~ BT or not?
 Fixing the error 'WiFi doesn't have a Windows 10 configuration IP validation'