3 easy ways to create collaborative photo albums
People often take photos in special events such as holidays, weddings, halls, etc. but after the event, collecting photos from friends and family seems a bit . tired. Here are 3 easy ways to collect and share photos with all participants after the meeting.
1. Facebook

Features photo album sharing on Facebook.
If all event attendees have accounts on Facebook then it will be very easy to create photo albums for everyone to access, contribute to. Facebook introduced a shared photo album in August 2013.
Start by creating a photo album in Facebook as usual (don't forget to check the High Quality checkbox to upload photos in high resolution)> open albums from your personal page by going to Photos> Albums> [Album name].
When the album is opened, click the Change to Shared Album button in the upper left corner. A pop-up window appears to let you add people who can upload photos or see the album. Set up everything, press Save .
2. Dropbox

Dropbox combo box and Send to Dropbox make it easy to create and share collaborative albums.
For this tip to work, you need a Dropbox account and an email with the Send to Dropbox service (Send to Dropbox creates an email address that is connected to your Dropbox account. Anything is sent to the address. That email will appear in the attachment folder on Dropbox).
After you have the Send to Dropbox email , tell the event participants to send their photos to this address. After that, you will have to include all the received images in the special folder created for the event.
After in the folder has some photos, just send the sharing link to everyone that they can see the folder. The best thing about this method is, people don't need to have an account on Dropbox, just have an email account and a web browser to view the album.
3. OneDrive

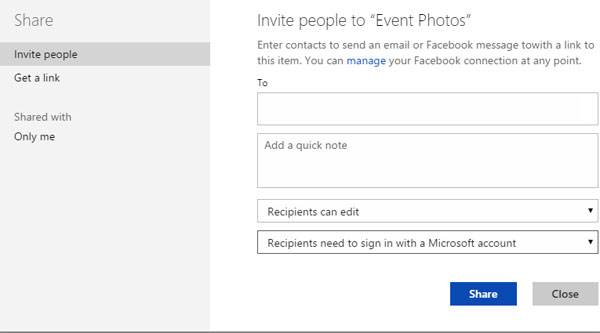
Share an album with others on OneDrive.
Microsoft's OneDrive has an easy way to allow many people to share, contribute photos to an album. Create a new folder in OneDrive> open it> click on the Details window icon in the upper right corner> click on the Share folder link.
In the pop-up window, click Invite people to add email addresses, short notes to the people you are sharing the folder with. Select Recipients can only view (default setting).
Two drop-down menus will appear. Change Recipients can only view to Recipients can edit so that the recipient can edit and then decide to view, transfer the second menu from Recipients don't need a Microsoft account to Recipients need to sign in with a Microsoft account or not .