Set up iCloud Drive on iOS 8 and Mac OS X 10.10 Yosemite
With both iOS 8 and Mac OS X 10.10 Yosemite, Apple has improved and changed iCloud Drive completely different from the old version. If you do not know how to set up this new feature, see how to do it below.
Table of Contents
With both iOS 8 and Mac OS X 10.10 Yosemite, Apple has improved and changed iCloud Drive completely different from the old version. If you do not know how to set up this new feature, see how to do it below.
As we know, before iCloud Drive, iOS users only use iCloud storage service from Apple to back up data on the device. But with the arrival of Mac OS X 10.10 Yosemite, iOS 8 and iCloud Drive users will get more appropriate cloud storage service, integrate more deeply into the system with the same way as Dropbox or Google Drive Processing. Allows users to store and access their data from any Apple device or via iCloud Drive for Windows application.
Price
Apple provides users with a limit of 5GB of storage for iCloud Drive account for free and offers 4 paid options with a maximum capacity of up to 1TB for $ 19.99 a month.

iCloud Drive on Mac OS
On Mac computers, setting up for iCloud Drive is relatively easy. During the installation of Yosemite, you will be asked if you want to upgrade to iCloud Drive. If you agree to upgrade, after installing and opening the Finder, you will see iCloud Drive listed in Sidebar on the left.
If iCloud Drive is not enabled during Yosemite installation, after installing it can activate this feature by going to System Preferences> iCloud and clicking on iCloud Drive option at the top of the list.

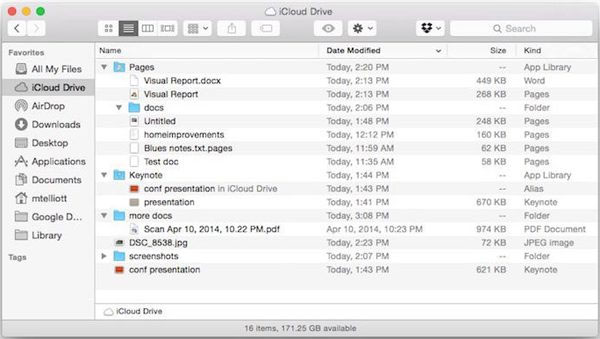
When you first open iCloud Drive in the Finder, you will see the main interface does not have any data. To store data, you just need to drag and drop files and folders into the empty pane on the right. In addition, users can create new folders to categorize and manage data by right-clicking in the iCloud Drive window.
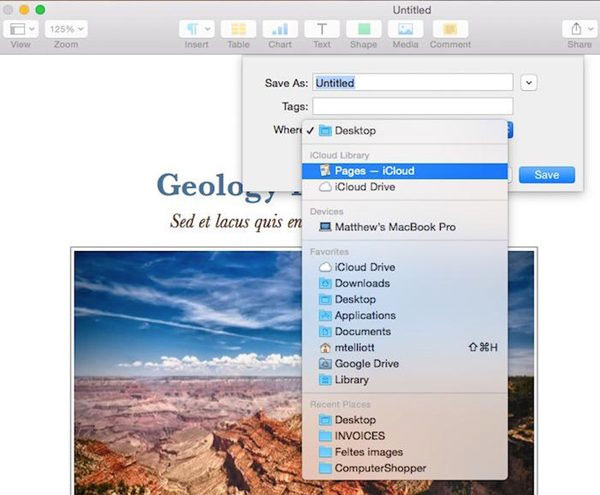
iCloud Drive is now integrated into Apple's iWork application. Therefore, when saving a document in Pages or a presentation in Keynote , iCloud Drive will be listed as one of the locations to save data. When first saving a file from the iWork application, a corresponding folder will also be created automatically in iCloud Drive.
iCloud Drive on iOS
On iOS, the setup will be a little different because there is no standalone iCloud Drive app for users to see all the files and folders stored in Apple's cloud. Instead, iCloud Drive is hidden in third-party applications and Apple applications. For example, in the Pages app in addition to the list of documents stored on the device, there are also documents stored on iCloud Drive.
Before you can use iCloud Drive in an application, you must activate iCloud Drive via the Settings menu on iOS device by: Accessing Settings> iCloud and then clicking iCloud Drive . Next, click the convert button to activate iCloud Drive. Just below you will also see a list of apps that can work with iCloud Drive.
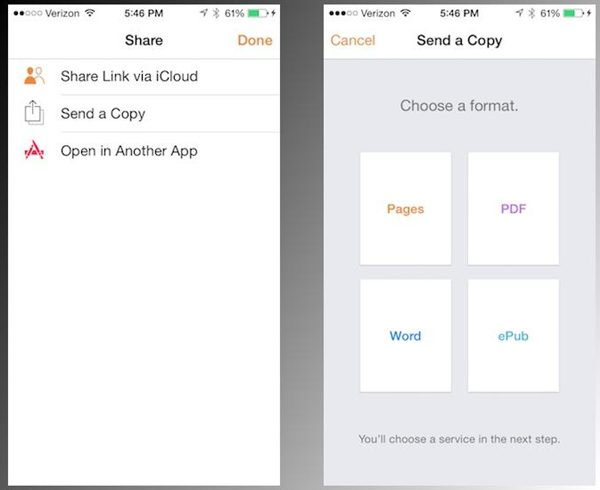
To move a document you created via iWork application on iPhone or iPad to iCloud Drive, just click the Share button in the upper right corner, select Send a copy and then select a format.
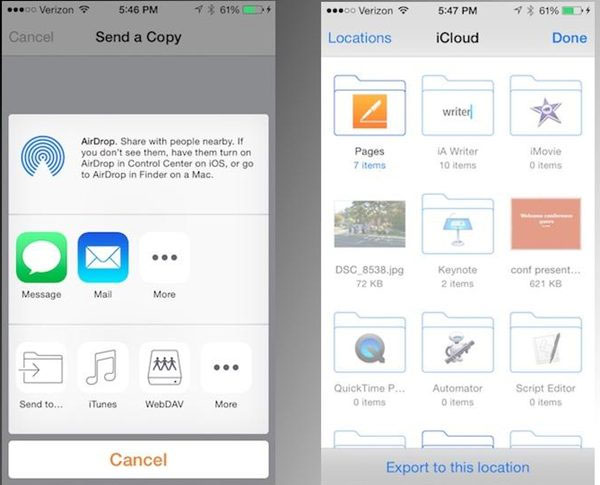
Next, click the Send to button and you will see the folders, representing the applications that iCloud Drive supports. If an application is incompatible with the type of file being saved, the folder will be grayed out. Touch the folder you want to save and click the Export to this location button.
Was this article helpful?
Your feedback helps us improve.
Related Articles
 6 Best iCloud Drive Alternatives for iPhone/iPad7 minutes read
 Notes before updating Mac OS X 10.10 Yosemite3 minutes read
 OS X Yosemite for download today1 minutes read
 How to recover deleted files on iCloud Drive2 minutes read
 Should I use Time Machine or iCloud Drive to back up my Mac?9 minutes read
 Summary of the hottest technology news in late October7 minutes read
Reader Comments 0
Sign in with email or Google to join the discussion.