How to fix Windows 10 not booting error
Have you just upgraded or installed the Windows 10 operating system and when you try to start your computer, you discover that Windows 10 won't boot? If this is the situation you're facing, try the solutions below to see if they resolve Windows 10 startup problems.
1. Confirm that the computer has completed the POST process
In many cases Windows 10 cannot boot, the computer may not be able to control the operating system. If you start the computer and the POST bar fills up completely, then disappears, then it has completed the POST process successfully.
2. Disconnect any external devices

Sometimes hardware can interfere with the normal boot process of Windows. In this case, unplug all devices connected to the computer such as printers, scanners, digital cameras, video recorders, USB devices, CD/DVDs, MP3 players , memory card reader, and any other peripherals you have plugged in. Keep only the mouse, screen and keyboard (if using a PC).
After doing this, unplug the computer from the wall outlet, remove the laptop battery, hold down the power button for 10-15 seconds, then plug it back into the power outlet and restart.
3. Check the specific error message you receive
You can check online for the specific error message you receive when Windows 10 fails to boot. Such messages include black screen or blue screen of death errors and how to fix them.

'Windows Failed to Start' 0xc00000f
One of the most common error codes related to Windows 10 not starting is 'Windows Failed to Start' 0xc00000f. The most commonly cited reason for this is an error in the BCD (or Boot Configuration Data).

The best way to fix this error is to repair the BCD. Do the following:
Once you have recovery media, insert it into your PC, then restart your PC. The device will boot straight into the recovery media. (Otherwise, you'll have the option to select the recovery drive while your PC is starting up). Click Next on the Windows Setup screen, then click 'Repair your computer'.
Go to Troubleshoot > Command Prompt, then enter the following commands:
bootrec /FixMbr bootrec /FixBoot bootrec /ScanOs bootrec /RebuildBcd
After that last command, type exit in Command Prompt, press Enter, and restart your PC (no need to insert installation media).
4. Check motherboard connection

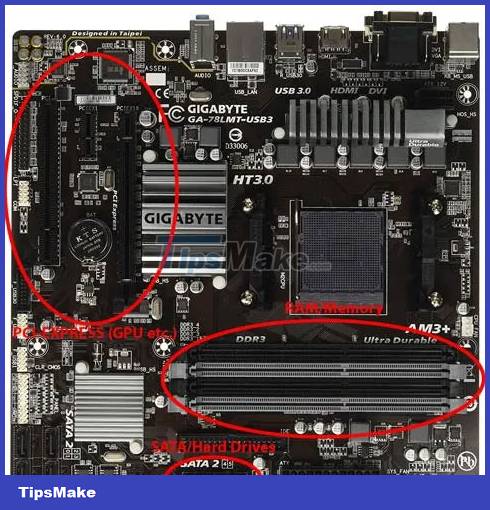
If you get a completely blank screen when Windows tries to start, it might be a good idea to look inside to make sure all the hardware is installed properly as it should. Here are the key ingredients you should consider:
- Memory/RAM: RAM comes in the form of small, thin bars that can easily come off if you accidentally do something with your computer. Modern laptops often keep RAM in a compartment on the underside, meaning you don't need to open up the entire machine to check the RAM. Open the RAM compartment, take out the RAM and reinsert it to make sure it is securely connected.
- Operating system hard drive: Another possibility is that your main Windows hard drive has disconnected from the motherboard (or power source). Press the SATA cable firmly in and make sure it is also connected to the PSU.
- PCI-E card: It is unlikely - but still possible - that a disconnected GPU or other PCI-Express device could prevent Windows from booting. Make sure all devices are connected properly.
5. Boot in Safe Mode
Safe Mode starts the computer with limited files and drivers but Windows will still run. To know if you're on Safe Mode, you'll see words in the corners of the screen. Refer to: How to enter Safe Mode Windows 10 when starting to know how to do it.
If the problem of Windows 10 not starting persists, check to see if it occurs when your computer is in Safe Mode.
If the problem of Windows 10 not booting does not occur when in Safe Mode, then your default settings and basic drivers do not contribute to the problem.
If this doesn't help, try the next solution.
6. Reset your PC
Performing a computer reset allows you to choose which files you want to keep or delete, then reinstall Windows.
Note: All your personal files will be deleted and settings reset. Any apps you installed will be removed, and only pre-installed apps that came with your PC will be reinstalled.
7. Perform a system restore
If Windows 10 won't boot after the upgrade, use System Restore while in Safe Mode to create a restore point when you install new apps, drivers, or Windows updates, or when you create a restore point manually.
System restore does not affect personal files. However, it will delete applications, drivers, and updates installed after the restore point is created.
8. Perform automatic repair
Step 1: Insert USB or Windows installation disc, then restart the computer. You will see a message asking you to press any key to boot from DVD (Press any key to boot from DVD).
Step 2: Press any key to boot from DVD.
Step 3: When you see the Install Windows page displayed, click Repair your computer to start Repair your computer.
Step 4: In WinRE, go to the Choose an option screen.
Step 5: Click Troubleshoot.
Step 6: Click Advanced Options.
Step 7: Click Automatic Repair.
To do this you need to download the Windows 10 ISO then create the Media Creation tool, you can do this from another computer.
Note: If you don't see the Press any key to boot from DVD message, you need to change the boot order in your BIOS settings to boot from disc or USB.
Be careful when changing BIOS settings because the BIOS interface is designed for advanced computer users. Changing the settings may prevent your computer from booting properly.
You should only update the BIOS if necessary, such as when resolving compatibility issues. It can be complicated and cause the computer to become inoperable in case of any error.
Follow the exact steps below to change the boot order, then perform the repair:
Step 1: During the reboot process, check for any instructions on how to interrupt a normal boot.
Step 2: Go to BIOS Setup Utility. Most computers use the F2, F10, ESC or DELETE key to initiate this setup.
Step 3: Find a tab in the BIOS setup utility labeled Boot Order, Boot Options, or Boot.
Step 4: Use the arrow keys to go to Boot Order.
Step 5: Press Enter.
Step 6: Find the removable device (CD, DVD or USB flash drive) in the Boot list.
Step 7: Use the arrow keys to move the drive up to appear in the first position in the Boot list.
Step 8: Press Enter.
Step 9: The boot sequence has now been changed to boot from DVD, CD or USB flash drive.
Step 10: Press F10 to save changes and exit BIOS Setup Utility.
Step 11: Click Yes in the confirmation window.
Step 12: Your computer will restart normally.
Step 13: Let the scan run for a few minutes and remove any malware that infects your computer.
Step 14: Select your preferred language, currency, time, keyboard, or other input method.
Step 15: Click Next.
Step 16: Click Repair your computer.
Step 17: Select the operating system you want to repair (in this case Windows 10).
Step 18: Click Next.
Step 19: On the Choose an option screen, select Troubleshoot.
Step 20: Select Advanced Options.
Step 21: Click System Restore or Startup Repair.
Once the repair is complete, check if the Windows 10 boot problem goes away, if not, try the next solution.
9. Connect various video outputs to the computer
You can try different video output combinations, such as the one below, and see if the Windows 10 boot problem persists:
Connect to another adapter from integrated graphics to discrete card or vice versa
Connect to another output from HDMI to DVI, DisplayPort to VGA, or any other combination
10. Boot into Safe Mode with Networking
Step 1: Restart the computer.
Step 2: When the login screen is displayed, hold down the SHIFT key while you select Power > Restart.
Step 3: After the computer restarts to the Choose an option screen, select Troubleshoot.
Step 4: Click Advanced options.
Step 5: Click Startup Settings.
Step 6: Click Restart.
Step 7: When it reboots, you will see a list of options. Select 5 or F5 for Safe Mode with Networking.
Safe Mode with Networking starts Windows in Safe Mode, including the network drivers and services you need to access the Internet or other computers on the same network.
Once in Safe Mode, you can do the following to try and resolve the issue of Windows 10 not booting:
11. Perform Clean boot
Please perform a Clean boot to remove any software conflicts that may be causing the problem.
Performing a Clean boot for your computer helps reduce software-related conflicts that may explain the root cause of Windows 10 boot failure. These conflicts can be caused by applications and services starting and running in the background whenever you start Windows normally.