Why should you have a SystemRescue USB handy?
Modern computers are built to last, and you rarely run into problems that render your computer useless. While hardware problems require a certain level of skill to fix, most software problems can be fixed with tools you can keep on a rescue USB drive.
Why should you have a SystemRescue USB handy?
Being able to repair your own PC is a valuable skill that every avid PC user should have. SystemRescue makes this easier because you can create a SystemRescue USB once and carry it with you to access or repair your system when needed. Having a recovery USB can be handy, but reinstalling your operating system isn't always an option.
Aside from rescuing your PC, there are a few other reasons why you might want to keep a rescue USB handy. It allows you to access administrative and other IT tools that you don't necessarily use on a daily basis, and it gives you a firsthand understanding of how your computer works.
Since most of these tools, including SystemRescue, are Linux-based, using a rescue USB also gives you the opportunity to learn about Linux at the same time if you don't already know it. Most computer knowledge, especially Linux, comes from trying to solve problems yourself and experimenting with new operating systems or programs whenever you get the chance.
How to create a SystemRescue USB
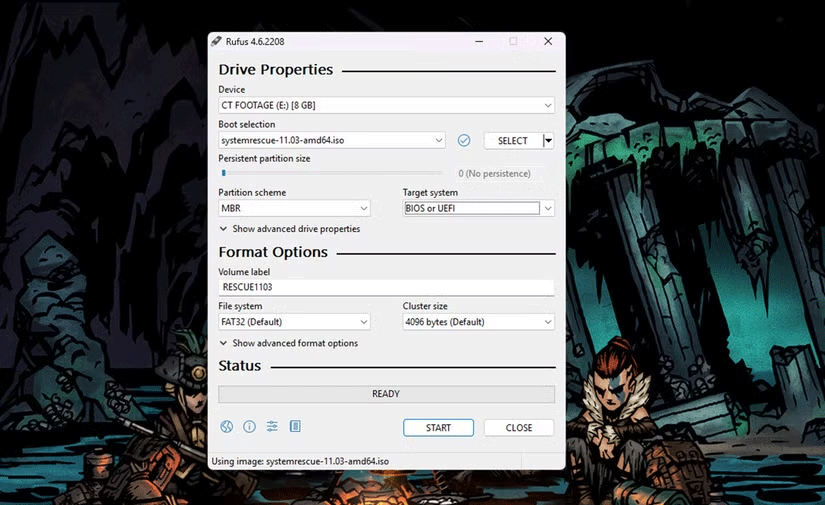
The process of creating a SystemRescue USB is very simple. You just need to download the latest version of SystemRescue, download Rufus, take a USB with at least 8GB of storage, and create yourself a bootable SystemRescue USB in no time. The process is exactly the same as creating a bootable USB from an ISO.
If you're using Linux, SystemRescue offers its own SystemRescue USB Writer, which works on most, if not all, Linux distributions. Here's how you can quickly create a USB if you're using Windows:
- Download and install Rufus.
- In the Boot selection section , click the SELECT button to select the SystemRescue ISO file.
- Under Partition scheme , select MBR from the drop-down list.
- Under Target system , select BIOS or UEFI.
- Next, check the Volume label field , which should say RESCUEXXXX. The Xs represent the version number of the ISO file you downloaded.
- Set File system to FAT32 . You can leave the Cluster size setting at the default value.
- Click the Start button to create the boot drive.

From this point on, you're free to boot your PC from your newly created bootable drive. You can start right away; your PC won't be damaged while running SystemRescue. You can boot into the toolkit to try out the tools, see what works, or install your own tools or scripts.
Alternatives to SystemRescue
SystemRescue is a free tool that has everything you need to get your PC back up and running. However, if you want to use something else, try Clonezilla-SysRescCD, Rescatux, or GParted Live. They are all bootable Linux-based system rescue tools that can rescue both Windows and Linux systems.
PCs don't break down often, but they can be a hassle when they do, and having a rescue USB handy can save you a lot of time and effort getting your hardware back online.