User management in Windows 7
Like some workstations, Windows 7-based computers can be used by one or more users, and Windows 7 has been designed to operate as a single and multi-user operating system..
Like some workstations, Windows 7-based computers can be used by one or more users, and Windows 7 has been designed to operate as a single and multi-user operating system.
Windows 7 is very flexible and can provide support in many different situations, in which each user will be granted an appropriate license and a separate environment. Then every user has to log in with each account, each of which has a desktop, Start menu, Documents, History, Favorites and personalization folders.
All user data is in the Users folder of the system drive, where each account will have a subfolder named after this account. The two main tools mentioned in this article will be the Family Safety and User Accounts wizard tool (in Control Panel), and the traditional Local Users and Groups tool (in Computer Management).
Account type
Before creating an account on a Windows 7 system, we need to differentiate between the two main types of accounts in Windows 7.
Administrators (administrator). The account type will have full control of the system. They can install application software, hardware drivers, and can create and edit new users or user groups. In addition, they can reset passwords, policy settings and edit the Registry. Windows 7 will identify tasks that require administrative rights with a Windows security icon.
Standard users (standard users). This type of account is allowed to log in to the computer, run the application, edit individual account information, save the file in their user directory. Users will be restricted from making changes on the system.
First user
When installing Windows 7, the installer will ask us to enter a user account and password for that account, then it will be used to create the first user account. This account will join the admin team with the highest privileges. From this account we can create and manage all other user accounts. When a user is the only user of a computer, sometimes this first account will be the only account created. However, even though it is the only user of the system, we should create a Standard User account for daily use. Doing so separates the account normally used with administrative privileges used when managing the system. If you want to install the software or change the configuration for the system while you are logged in as a standard user account, Windows will display a message asking for an administrator account authentication so we will not have to log in. admin account to perform these tasks.
Create a new account
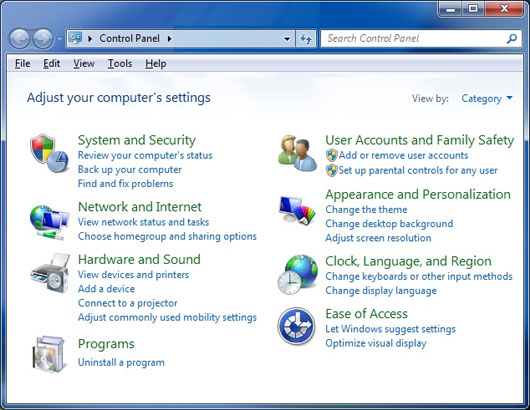
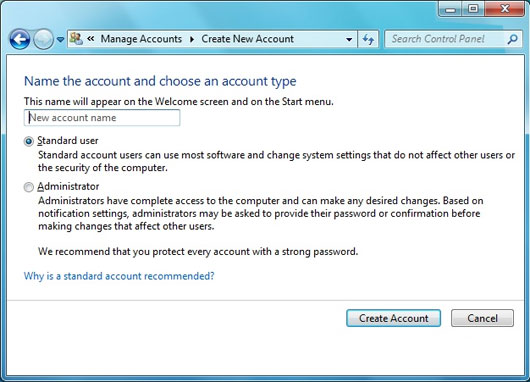
To create a new account, go to Control Panel | User Accounts and Family Safety | Add or Remove User Accounts . Click on the Create a new account link , then enter a name for the account, select the account type (Administrator or Standard User) and click the Create Account button. By default, Windows will not assign a password to a new account. To create a password for this account, click on its icon and choose Create a password .
Once you have created an account we can customize this account. First need to access Control Panel | User Accounts and Family Safety | Add or remove user accounts . Then, Manage Accounts window will appear. In this window we can change the account name, set or remove the password, change the image, install Parental Controls control, change the type or delete this account. Note, after removing the user password of the removed account, it will lose all encrypted files, personal licenses and stored passwords.
If you accidentally delete the last admin account on the system, you should not worry because Windows 7 integrates an administrator account without a default password that has been hidden. Like all other admin accounts, this account also has full control over the system. However, to use it we have to boot the computer into Safe Mode .
Parental Controls

Change image
Use the Local Users and Groups tool
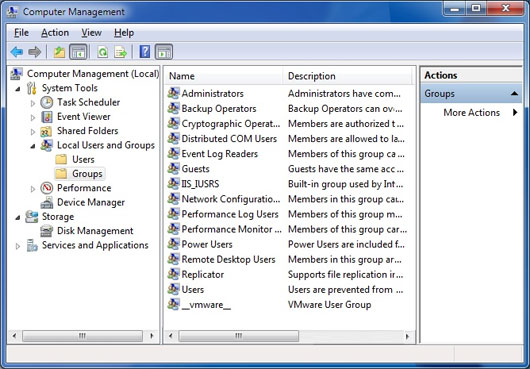
Although the Windows 7 wizard-based user management tools are very powerful and easy to use, some users still use the legacy tool called Local Users and Groups. This tool hasn't changed much since its introduction in Windows 2000. To access this tool, right-click the Computer icon and select Manage , and the Computer Management window will appear. Expand the node Local Users and Groups .
Create a new user . Right-click Users and select New User , enter a name for the user and then click Create .
Edit user accounts . In Local Users and Groups , expand the Users node and then double-click the user account name you want to edit.
On the General tab, we can edit the following settings by selecting the appropriate checkboxes:
Group management . All Windows accounts are members of at least one group. Group members are determined by the license they have. Most users use built-in groups in Windows (called Account Types in the Create User wizard), but we can create another group and customize it. Groups are used to simplify computer administration tasks by allowing administrators to apply settings and licenses to multiple accounts simultaneously.
Manage user accounts for domain members
Windows 7 is very flexible and can provide support in many different situations, in which each user will be granted an appropriate license and a separate environment. Then every user has to log in with each account, each of which has a desktop, Start menu, Documents, History, Favorites and personalization folders.
All user data is in the Users folder of the system drive, where each account will have a subfolder named after this account. The two main tools mentioned in this article will be the Family Safety and User Accounts wizard tool (in Control Panel), and the traditional Local Users and Groups tool (in Computer Management).
Account type
Before creating an account on a Windows 7 system, we need to differentiate between the two main types of accounts in Windows 7.
Administrators (administrator). The account type will have full control of the system. They can install application software, hardware drivers, and can create and edit new users or user groups. In addition, they can reset passwords, policy settings and edit the Registry. Windows 7 will identify tasks that require administrative rights with a Windows security icon.
Standard users (standard users). This type of account is allowed to log in to the computer, run the application, edit individual account information, save the file in their user directory. Users will be restricted from making changes on the system.
First user
When installing Windows 7, the installer will ask us to enter a user account and password for that account, then it will be used to create the first user account. This account will join the admin team with the highest privileges. From this account we can create and manage all other user accounts. When a user is the only user of a computer, sometimes this first account will be the only account created. However, even though it is the only user of the system, we should create a Standard User account for daily use. Doing so separates the account normally used with administrative privileges used when managing the system. If you want to install the software or change the configuration for the system while you are logged in as a standard user account, Windows will display a message asking for an administrator account authentication so we will not have to log in. admin account to perform these tasks.
Create a new account
To create a new account, go to Control Panel | User Accounts and Family Safety | Add or Remove User Accounts . Click on the Create a new account link , then enter a name for the account, select the account type (Administrator or Standard User) and click the Create Account button. By default, Windows will not assign a password to a new account. To create a password for this account, click on its icon and choose Create a password .
Edit account
Once you have created an account we can customize this account. First need to access Control Panel | User Accounts and Family Safety | Add or remove user accounts . Then, Manage Accounts window will appear. In this window we can change the account name, set or remove the password, change the image, install Parental Controls control, change the type or delete this account. Note, after removing the user password of the removed account, it will lose all encrypted files, personal licenses and stored passwords.
If you accidentally delete the last admin account on the system, you should not worry because Windows 7 integrates an administrator account without a default password that has been hidden. Like all other admin accounts, this account also has full control over the system. However, to use it we have to boot the computer into Safe Mode .
Parental Controls
Children always want to be free on the computer without being monitored by parents. However, not everyone satisfies this desire. So Microsoft has integrated the Parent Controls feature into Windows 7 to help parents keep them under control every time they surf the Web or play games, even if they're not around. First we need to access the Control Panel | User Accounts and Family Safety | Hãy đặt một PARNHỆNH điều khiển cho người dùng nào . Select users who want to control.
Since all admin accounts can remove these controls, if an administrator account is not set for a password, Windows 7's Parental Control feature will force users of this account to set a password during the login. next.
Then we just need to select the On option , enforce current settings to enable Parental Controls, and then modify the settings accordingly.
Then we just need to select the On option , enforce current settings to enable Parental Controls, and then modify the settings accordingly.
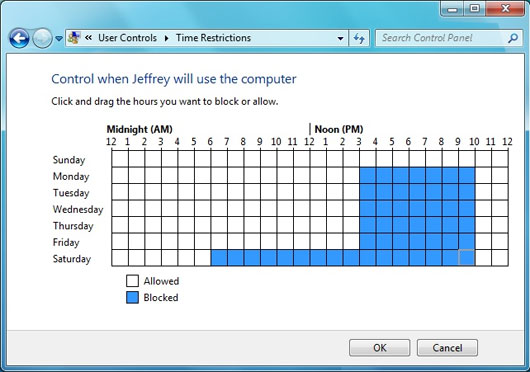
- Time limits . This setting allows us to allow or deny the use of computers by hour or day.
- Games . Here we can allow or deny users of this account a Game. In addition, we can allow or block a specific Game category.
- Allow and block specific program . If you want to limit the use of certain applications on the system, this will be the installation that we need to use.
The Parental Controls feature of Windows 7 can work with the Windows Live Family Safety tool, which allows users to install Parental Controls on the Web.
Change the password
The easiest method to change the password for the account being logged in is to press Ctrl + Alt + Del and select Change a Password . In the window that appears, we just need to enter the current password into the Current Password box, and the new password in the Confirm New Password box and then click the Change Password button.
Change image
Windows 7 allows you to select an image for each account. This will be the symbol of the account on the login screen. To use another image, we just need to go to Control Panel | User Accounts . In the Users area, click on the link Change your account picture , then select the desired image.
Create a password reset disk
The password reset disk will be very useful in case we forget the password of the account, but we can only create this disk when logged into the system, so it is best to create the disk. This after the new password is installed. We can use USB drive to create this disk.
To create a password reset disk, go to Control Panel | User Accounts and Family Safety | User Accounts | Create a password reset disk . A wizard will then appear to guide us through the process. We only need to specify the drive to store this password and enter the password that the account is using.
When you log in to your account with an incorrect password, Windows will display a Reset password link below the password box. We just need to click on this link to launch the Password Reset Wizard. When notified, select the drive containing the password and then enter the new password and password hint (password hint).
Use the Local Users and Groups tool
Although the Windows 7 wizard-based user management tools are very powerful and easy to use, some users still use the legacy tool called Local Users and Groups. This tool hasn't changed much since its introduction in Windows 2000. To access this tool, right-click the Computer icon and select Manage , and the Computer Management window will appear. Expand the node Local Users and Groups .
Create a new user . Right-click Users and select New User , enter a name for the user and then click Create .
Edit user accounts . In Local Users and Groups , expand the Users node and then double-click the user account name you want to edit.
On the General tab, we can edit the following settings by selecting the appropriate checkboxes:
-
User must change password at next logon (User must change password during next login).
-
User cannot change password ( User cannot change password ).
- Password never expires (Password does not expire).
-
Account is disabled (Account disabled).
-
Account is locked out .
To unlock an account that is locked by Windows, usually due to entering the password incorrectly too many times (the number of times specified in Local Security Policy), uncheck this box.
Group management . All Windows accounts are members of at least one group. Group members are determined by the license they have. Most users use built-in groups in Windows (called Account Types in the Create User wizard), but we can create another group and customize it. Groups are used to simplify computer administration tasks by allowing administrators to apply settings and licenses to multiple accounts simultaneously.
In addition to Users (or Standard User) and Administrators , we will see many other groups in Windows 7. Some are used for compatibility with previous operating systems, while others are designed for personal purposes. , such as allowing access to backup and restore files, to read Log files, or to connect via Remote Desktop.
Create a new group . Right-click Groups in the Local Users and Groups tool and select New Group . Enter the name and description for the group, then click the Add button to add members to the group. Done clicking Create .
Create a new group . Right-click Groups in the Local Users and Groups tool and select New Group . Enter the name and description for the group, then click the Add button to add members to the group. Done clicking Create .
Manage user accounts for domain members
Each computer is a member of a group or a domain. Computers that are members of a domain often have a network administrator who manages the user accounts created on that computer. These accounts are not on separate computers but in a central database named Active Directory. The working group is larger than an ad-hoc network in which computers are managed separately. However, only computers that use Windows 7 Pro version or higher can connect to the domain.
When a computer connects to the domain, user management options will change slightly. The Parental Controls will disappear, the User Account tool will replace User Accounts and Family Safety, and we can only create local users through the Local Users and Groups management tool.
Add domain to a local group . In Control Panel , open User Accounts and click on the link Give other users access to this computer . Enter the user name and domain name here (or click Browse to get information from the Active Directory). Then click Next and Finish .