Turn photos into pencil paintings
You want to have a beautiful portrait, but don't have the time or have a lot of money to hire people to paint or you simply want a very unique picture. You can do this with just one photo and Adobe Photoshop software
You want to have a beautiful portrait, but don't have the time or have a lot of money to hire people to paint or you simply want a very unique picture. You can do this with just one photo and Adobe Photoshop software


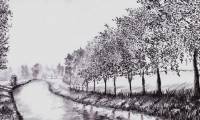
The resulting image
Step 1
- Open the image file to do, in the background.
- Create 3 copies of the background. (Figure 1)

Figure 1
Step 2
- Use the Desaturate command (to switch from color image to grayscale image in the same color mode) by selecting each layer (copy) and pressing Ctrl + Shift + U or go to Image> Adjust> Desaturate. (Figure 2)

Figure 2
Step 3
- Click on the top layer, use the 'Find Edges' filter for this layer by going to Filter> Stylize> Find Edges. (Figure 3)

Figure 3
- Then change the blending mode from 'Normal' to 'Color Burn' on the layers palette. (Figure 4)

Figure 4
-The picture will now look like Figure 5.

Figure 5
Step 4
- Click on the second layer (Background copy 2) and press Ctrl + I to Invert this layer.
- Then change the blending mode from Normal to Color Dodge. (Figure 6)

Figure 6
- Next, apply the gaussion blur filter to this layer by selecting Filter> Blur> Gaussion Blur and setting the Radius value to 10 pixels. (Figure 7)

Figure 7
Your photo now looks almost like a pencil drawing. (Figure 8)

Figure 8
Step 5
- While layer 2 is being selected, lock layer 1 and 3. After that, press Ctrl + E to link the layers (see illustration). (Figure 9)

Figure 9
- Now you have only 2 layers left: 1 original background and 1 complete black and white lead drawing. (Figure 10)

Figure 10
Step 6
- Apply the Angled Strokes filter by selecting Filter> Brush Stokes> Angles Strokes, and then setting the values shown in Figure 11.

Figure 11
- Now you have a very beautiful monochrome lead drawing. (Figure 12)

Figure 12
Step 7 (optional)
- To add color to the painting, lower the value of Fill Opacity (on the layer palette) to 60%. (Figure 13)

Figure 13
- That's it, your painting is complete, now you can print or save your work!
Was this article helpful?
Your feedback helps us improve.
Related Articles
 Looking at these photos, everyone thinks they're photos, not hand-drawn2 minutes read
 How to turn photos into paintings using Photoshop3 minutes read
 How to turn photos into paintings on Photo2Sketch2 minutes read
 How to turn an image into a pencil sketch in Photoshop17 minutes read
 Top app to turn photos into paintings on the phone9 minutes read
 Top 3 websites to help you turn photos into pictures quickly and beautifully3 minutes read
Reader Comments 0
Sign in with email or Google to join the discussion.