Working with Network Monitor (Part 4)
In the previous article of this series, I showed you how to filter the Network Monitor capture file so that only the communication between the desired servers is displayed. In this part 4, we will introduce you to ha.
 Working with Network Monitor (Part 1)
  Working with Network Monitor (Part 2)
  Working with Network Monitor (Part 3)
Brien M. Posey
In the previous article of this series, I showed you how to filter the Network Monitor capture file so that only the communication between the desired servers is displayed. Filtering out communication with servers that you don't care about is actually filtering the 'capture' files, but there may still be many clutter that you have to classify to locate the information you care about inside. . For example, we have pinged to one of the other servers in the network. A standard ping command generates 12 data packets. If you look at Figure A, you will see that even after filtering out communication with other servers, there are still more than 12 data packets displayed here.

Figure A: When you make a capture there will be a lot of clutter to classify
The scary part of this capture is that all of those packets were captured over a 5 or 6 second period. You can only imagine how many packages will be captured over a larger period of time, or have more servers as in the case of the real environment.
However, there are other things you can do to classify clutter. In this case, we are interested in reviewing the packages related to the PING command. Any time you execute the PING command, Windows will use the ICMP protocol. That way we can filter the list so that only ICMP has the relevant packages displayed.
Note that we have filtered the list to observe the necessary servers. To filter the list by the protocol, click the Filter icon (the icon looks like a chimney). When you do this, you will see the Display Filter dialog box shown in Figure B.

Figure B: The Display Filter dialog box allows you to filter by server and protocol
To filter by protocol, select the Protocol == Any line, click the Edit Expression button (this button will appear instead of the Change Operator button that is displayed on the image). By doing so, you will see a screen similar to the one shown in Figure C. This window will list all the protocols that Network Monitor knows as well as brief descriptions of them.
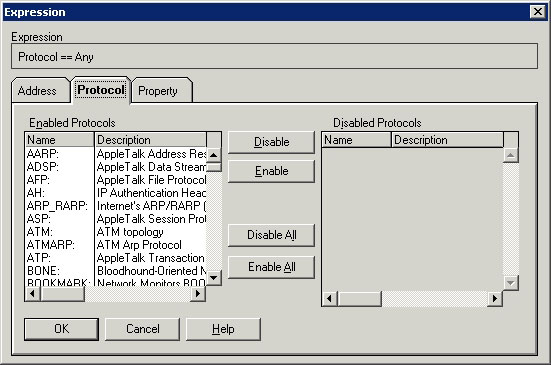
Figure C: The Expression dialog lists the protocols known by Network Monitor
To create a filter, simply click the Disable All button. Doing so will transfer all the protocols shown in the image from the Enabled Protocols list to Disabled Protocols. Drag the Disabled Protocols list until you locate the ICMP protocol. Select the ICMP protocol and click the Enable button. By doing so, ICMP will be the protocol listed on the Enabled Protocols list. Click OK twice and the capture will be filtered to display the packages you are interested in as shown in Figure D.
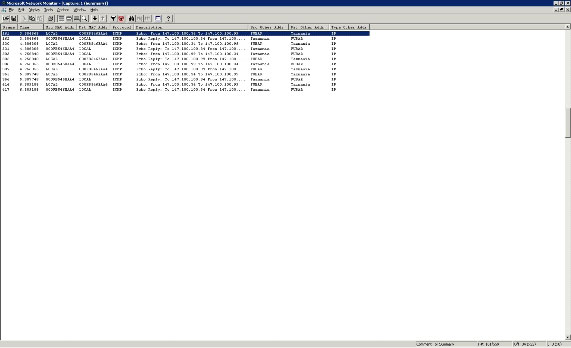
Figure D: You can filter simultaneously by host or protocol
The technique and we introduce you to will work well if you understand exactly which protocol you care about. Sometimes you may just need a general sense of what is going on in the communication between the two servers, and may not need to know specifically which protocol is involved in that communication situation. Even in some situations, there are techniques you can use to classify clutter.
The technique introduced to you is the technique that we used in the real environment. The idea behind this technique is to filter 'junk' packages. Before we introduce to you how this technique works, we want to mention the standard for classifying a package as 'trash'.
As you can see, we used a computer called FUBAR to execute the PING command for a server called TAZMANIA. Let's assume that we know that there are two computers that we are interested in analyzing, but let's be prepared that we do not understand ICMP as the protocol used by the PING command. In this case, the first thing we do is filter out the list of captured packets to exclude situations that communicate with the server other than the servers we care about. To do so, we will use the same technique used in Part 3 and the results will be shown as you see in Figure A.
When we are only interested in looking at ICMP packets, use filters to exclude non-ICMP packets. In this technique, we will do the opposite. Instead of eliminating protocols except one protocol, we will leave all the protocols that were originally allowed and then filter out separate protocols when we realized that there was no need to care about them.
As you can see in Figure A, one of the most frequently used protocols is TCP. When you see the TCP packet, it is a piece of a component that is left from another frame. If I'm trying to get a general understanding of what's going on in a trace, the first thing I often do is filter out TCP packets.
You can click on the filter icon to access the Display Filter dialog box. Click the Protocol == Any line and click the Edit Expression button. Select the TCP protocol, click the Disable button. However, an error in the current version of Network Monitor will not allow you to do this. To do this in another direction, we have created a list for each capture protocol used. Then disable all protocols such as enabling the protocols used for capture. From there can disable the protocol. For example, if you compare Figure E to Figure A, you will see that we were able to classify the trace by filtering out the TCP protocol.
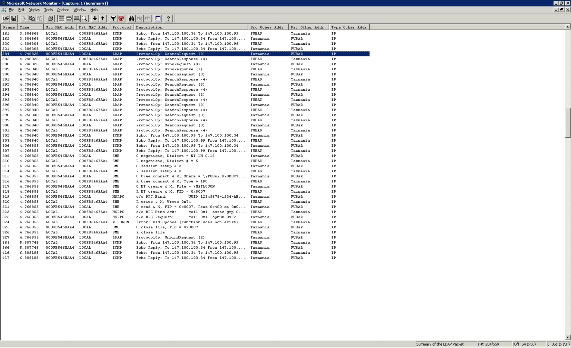
Figure E: Filter out protocols that aren't related to what you're looking for
can significantly reduce the number of packages you have to classify
Conclude
In this part 4, I have shown you two different techniques for isolating the packages you need to perform. In Part 5 of this series, I will continue the discussion by showing you how to extract data from a captured data frame.
 Working with Network Monitor (Part 5)