These fixes help resolve CPU fan errors
Are you trying to start your computer but encounter CPU fan errors? This error may occur after updating the BIOS or replacing the CPU cooling fan. Luckily, fixing the error is easy..
1. Make sure the CPU fan is plugged in properly
CPU fan errors usually occur when your computer cannot detect the CPU fans connected to the motherboard's fan headers. This prevents the computer from booting to avoid damaging the CPU. To confirm this, check if the CPU fan is spinning normally.
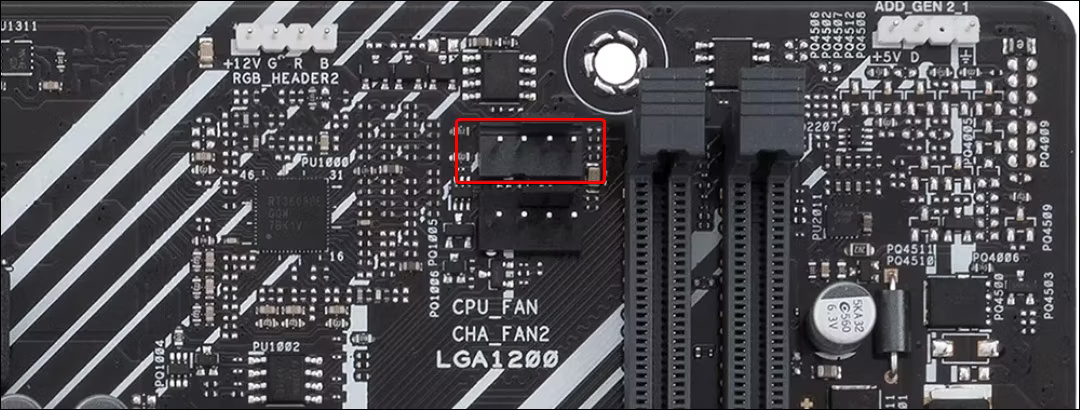
If the fan spins, you need to carefully check whether the fan connector is securely plugged into the CPU_FAN header on the motherboard. The red circle in the image below is the CPU_FAN header on the ASUS Prime motherboard.
If you can open the computer, try reconnecting the fan connector to make sure it is securely connected. Also, make sure the CPU cooler is installed properly. Refer to the owner's manual for exact instructions for your cooler.
Some motherboards today have two CPU fan headers: AIO_PUMP and CPU_FAN. AIO_PUMP is a dedicated plug that provides stable voltage so the AIO pump can run at maximum speed and maintain a steady flow. Fans attached to the AIO cooler must be within the CPU_FAN header.
If you have an air cooler, you can simply plug the fan into the CPU_FAN header without worrying about the AIO_PUMP header.
In the image below, the CPU_FAN header is highlighted in red, while the AIO_PUMP header is highlighted in green on the ASUS Prime motherboard.

Sometimes you will get CPU fan errors if you connect the pump to the AIO_PUMP header. A quick workaround is to connect the AIO pump to the CPU_FAN header and the heatsink fans to other fan headers in the motherboard.
However, if you want to use the dedicated AIO_PUMP header (as recommended by some radiator manufacturers), you can adjust your BIOS settings to bypass the message and boot normally.
2. Set CPU fan speed to Ignore
Before changing the features that control CPU fan speed, make sure the CPU cooler is operating properly and maintaining a safe temperature. This will help fix any potential damage that may have occurred from overriding the error message.
When it sees a CPU fan error, it will prompt you to enter the BIOS menu. If you have an ASUS motherboard, press F1 or Delete to select Run Setup . Once in the BIOS, simply exit and let Windows boot normally. If the computer boots and doesn't overheat under normal workloads, the AIO cooler is probably working properly.

Even if the computer cannot boot or Windows is not installed, you can still check to see if the heatsink is working or not. Just enter BIOS and find the Fan Profile section . Here you will see your AIO pump listed along with its RPM. If the cooler is detected and the RPM value is within the expected range, you can safely ignore the CPU fan speed warning in the BIOS.
To bypass the CPU fan warning on ASUS motherboards, follow these steps:
- When you see a CPU fan error, press the corresponding key to enter BIOS. Usually, the key is F1 , but it may vary depending on the motherboard manufacturer.
- In BIOS, go to Advanced Settings (F7) in the lower right corner.

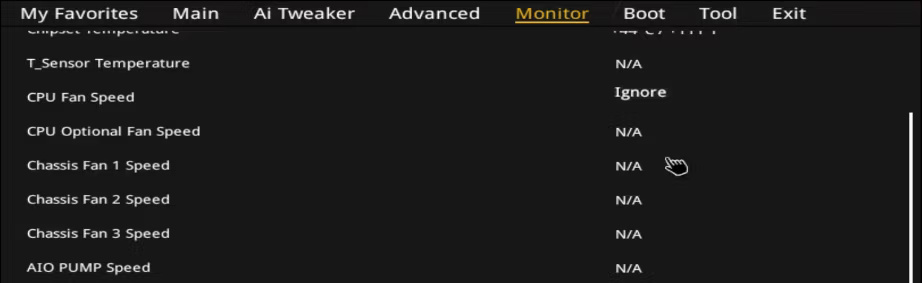
- Open the Monitor tab .
- Click to expand the Fan Speed Monitor options .
- Click the CPU Fan Speed drop-down menu and select Ignore .
- Next, click to expand the CPU Q-Fan Configuration option .
- Click the CPU Fan Speed Lower Limit drop-down menu and select Ignore .

- Go to the Exit tab and select Save Changes and Exit .
The computer will now reboot and enter Windows without the CPU fan error.
3. Update BIOS to the latest version
Typically, CPU fan errors can occur if you are using an outdated BIOS version. So, if you encounter this error, check if a newer BIOS version is available.
The BIOS update process varies depending on the motherboard manufacturer, although not by much. If done correctly, you can safely update your BIOS using USB in just a few minutes.
4. Switch the CPU fan type from DC mode to PWM mode
Another factor contributing to this error is incorrect fan mode configuration in BIOS. If you have a CPU fan connected to the 4-pin header on your MSI motherboard, switching the CPU fan type from DC to PWM mode may help resolve the error. Here's how:
- and start pressing the Delete key to enter BIOS.
- In BIOS, open Hardware Monitor .
- In the Fan Control section , select the CPU cooler.
- Now select the Smart Fan Mode option above the graph and select PWM mode on the left.
- Finally, press F10 to save the changes and exit the BIOS menu.

5. Check the CPU fan for hardware errors
Finally, consider the possibility of a hardware failure in the CPU cooling fan. On average, depending on the manufacturer, CPU cooling fans can last 4 to 7 years. If the CPU fan won't spin at all, make sure it has no debris or cables obstructing the fan blades. Worn bearings in CPU fans are another potential cause of failure.
If a hardware error occurs, the CPU temperature will increase rapidly under load and your computer may shut down to avoid any damage to the CPU. In this case, you may need to replace the fan or in rare cases the entire cooler to fix the error.
In short, experiencing a CPU fan error does not necessarily mean that the CPU cooling fan is defective. Usually, you just need to make sure the cooler is plugged into the correct plug. And if the temperature is checked, you can adjust the fan control settings to fix the error and start your computer normally.