Table of Contents
If OBS Studio will not record—or the saved video has no sound—start by identifying the exact symptom. A recording that never starts has different causes from a file that records video but omits the microphone, desktop audio, or one selected track. Check the Audio Mixer first, make a short test recording, and change one setting at a time.
Match the symptom to the likely cause
| What you see | Check first |
|---|---|
| Start Recording produces an error | Recording path, free disk space, file permissions, encoder, and OBS log |
| The microphone meter does not move | Mute state, selected input device, Windows microphone access, and hardware connection |
| Desktop Audio does not move | Selected playback device or an Application Audio Capture source |
| Meters move, but the saved file is silent | Recording-track selection and source-to-track assignments |
| Only one source is missing | That source's properties and its boxes in Advanced Audio Properties |
| You hear echo or duplicate sound | Duplicate sources and Audio Monitoring settings |
If you are setting up OBS for the first time, see how to install OBS Studio and create a basic recording setup. The comparison of OBS Studio and Streamlabs Desktop also explains how the two applications differ.
1. Run a controlled recording test
- Close programs that can take exclusive control of the same microphone or audio interface.
- In OBS, confirm that the intended scene is active and that the required sources are visible.
- Speak into the microphone and play a system sound. Watch the corresponding meters in the Audio Mixer.
- Record for 20–30 seconds, stop normally, and play the file in a current media player.
OBS recommends testing before a real recording or stream. Its official quick-start guide also advises selecting audio devices manually when the meters do not move. Do not set every device to “Default” simply for convenience: if Windows changes its default playback or input device, OBS may capture a different device the next time it starts.
2. Check the Windows volume mixer—but use it for the right problem
Open Settings > System > Sound > Volume mixer. Make sure OBS is not muted and that its output device is the one you are listening through. These controls affect what OBS plays to you, including monitored audio; they do not add a missing microphone source or repair an incorrect recording-track assignment.
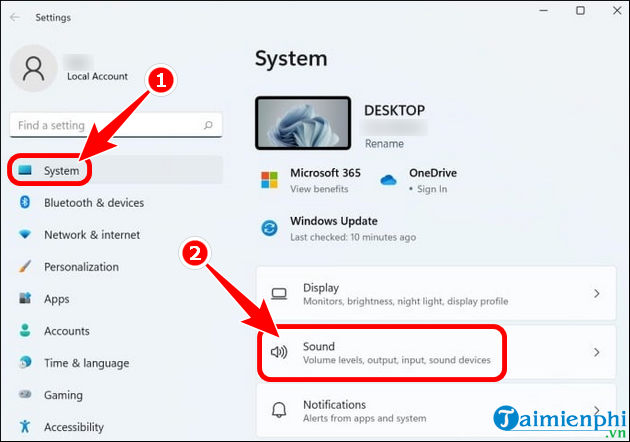
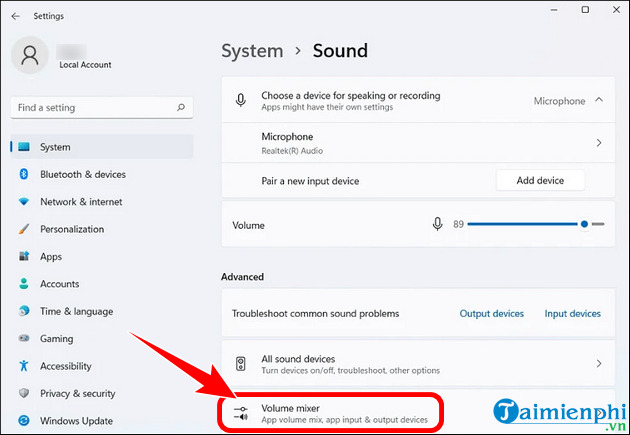
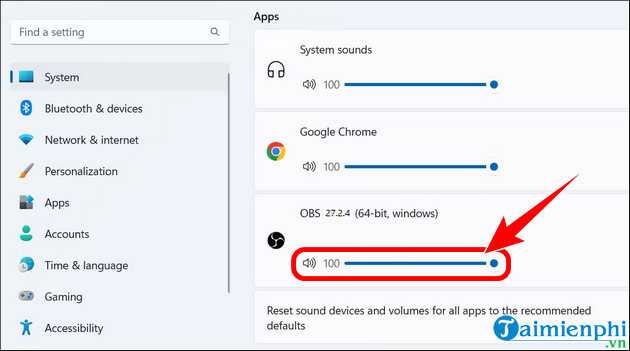
For a microphone, also check Settings > System > Sound > Input. Select the intended device, run Windows' input test, and confirm that the input meter responds.
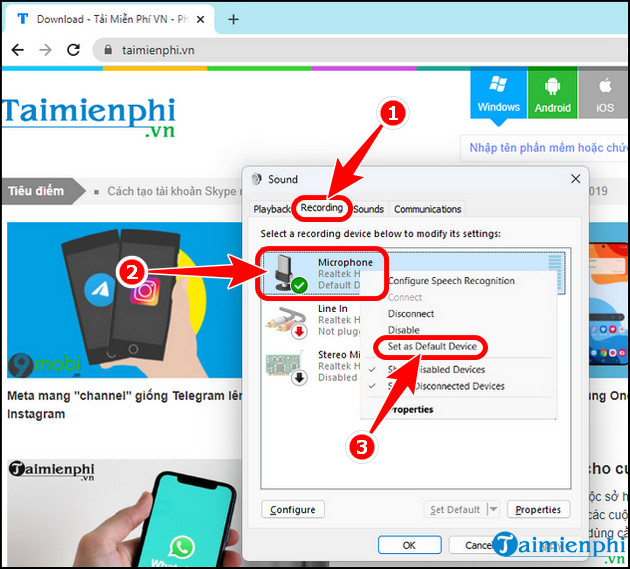
3. Allow desktop apps to use the microphone
Go to Settings > Privacy & security > Microphone. Turn on Microphone access and Let desktop apps access your microphone. OBS is a desktop application and may not appear as an individually switchable app in the Microsoft Store app list.
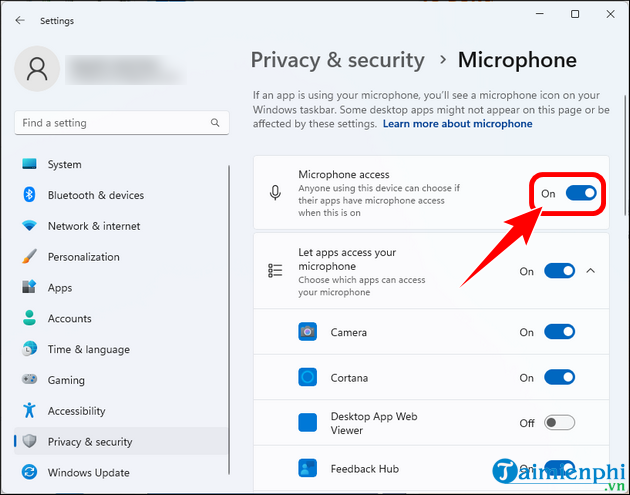
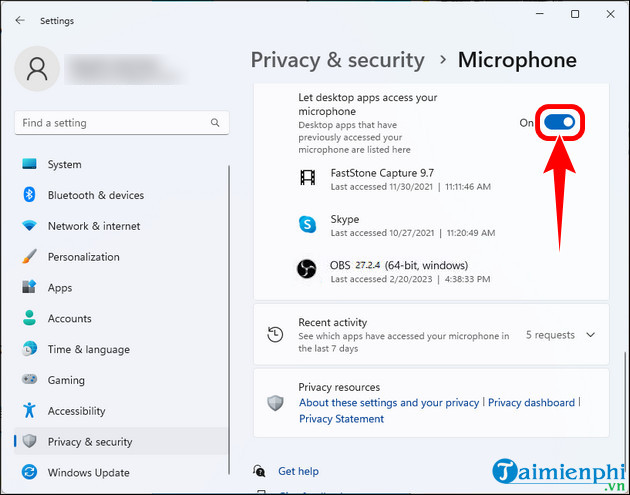
Microsoft documents the same controls in its guide to turning on microphone permissions in Windows. If Windows' own input test also shows no signal, check the headset mute switch, cable, USB port, Bluetooth connection, or audio-interface controls before changing more OBS settings.
4. Select the correct source in the OBS Audio Mixer
Look at Mic/Aux and Desktop Audio in the Audio Mixer. A crossed-out speaker icon means the source is muted. If a meter stays still, open its menu, choose Properties, and select the exact device you want.
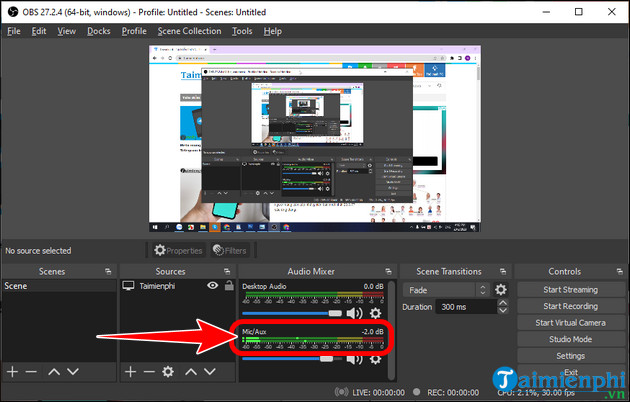
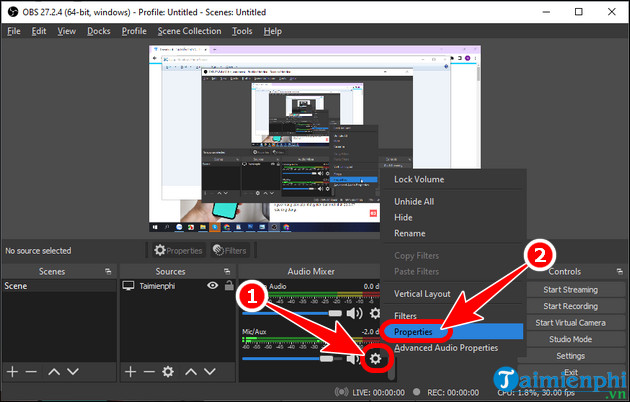
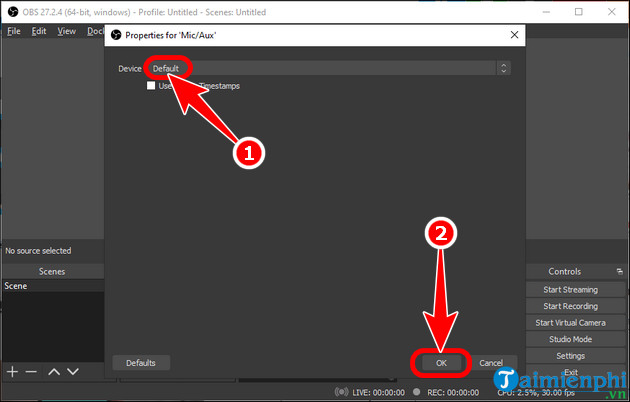
Do not copy an arbitrary fader value such as –2 dB. Speak at your normal loudest level and adjust the fader so that the signal remains clear without repeatedly reaching the red clipping area. If the signal is extremely low before OBS, correct the device's input level or interface gain first.
You can add Audio Input Capture or Audio Output Capture to a specific scene instead of using global devices. The OBS audio-source guide explains this approach. Avoid capturing the same device globally and as a scene source, because that can duplicate sound.
5. Verify recording tracks in Advanced Audio Properties
A moving meter proves that OBS receives the source; it does not prove that the source is routed to the track you are recording. Open the Audio Mixer menu and choose Advanced Audio Properties.
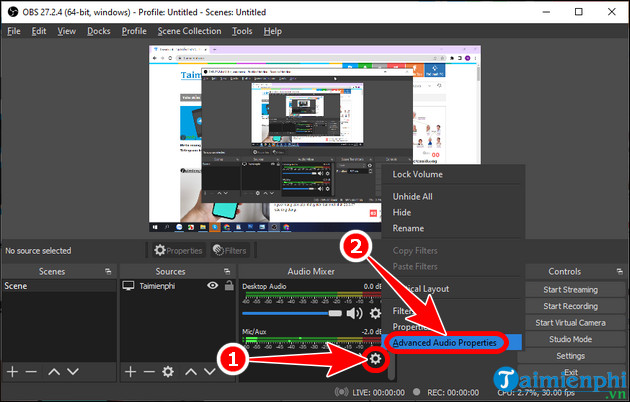
- Open Settings > Output and note which audio track or tracks are enabled for recording.
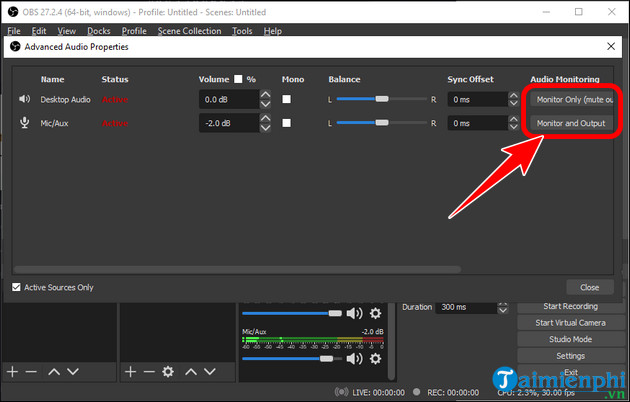
- In Advanced Audio Properties, make sure every source you need has a check mark for at least one enabled recording track.
- For a simple file that should play with all sound in ordinary players, route all required sources to track 1. Add separate tracks only when you intend to edit sources independently.
This matches OBS's multiple-audio-track recording guide. Some media players play only the first audio track by default, so a multi-track file can seem to be missing audio even when another track contains it.
For most sources, leave Audio Monitoring set to Monitor Off. “Monitor and Output” is useful only when you deliberately need to hear that source; used carelessly, it can create echo or duplicate audio.
6. Check global audio devices and per-application capture
Open Settings > Audio in OBS. Under Global Audio Devices, select the intended microphone and playback device explicitly, or disable a global device if you already capture it with a scene source.
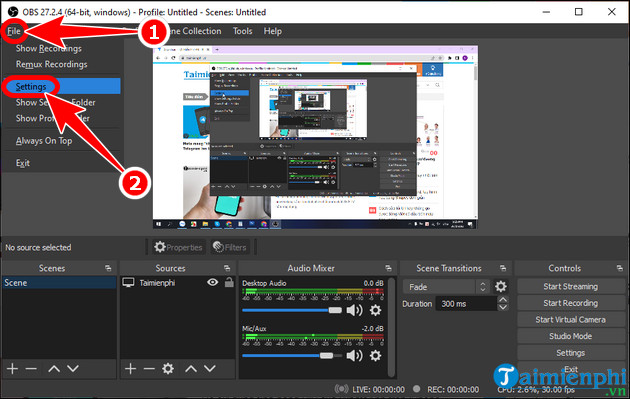
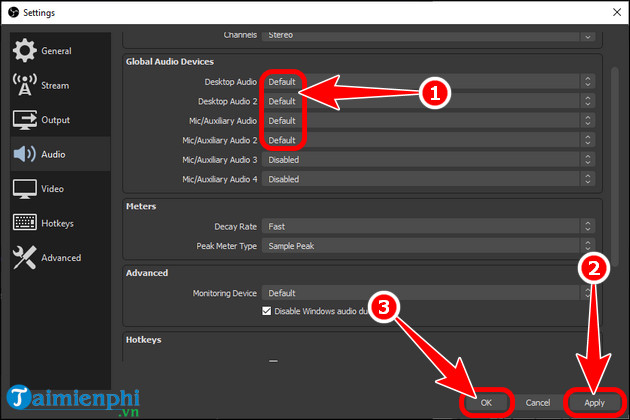
If you want sound from one program rather than all desktop audio, add an Application Audio Capture source. On supported Windows versions, OBS can capture an application's audio directly. Disable global Desktop Audio when it duplicates that application source; OBS notes this in its Application Audio Capture guide.
7. If recording will not start, check output and encoder settings
When the problem occurs before a file is created, audio permissions are usually not the cause. Check these items instead:
- Recording path: In Settings > Output, choose an existing folder where your Windows account can write files.
- Storage: Confirm that the destination drive has enough free space and is still connected.
- Format: OBS recommends MKV because an interrupted recording is less likely to become entirely unusable; use File > Remux Recordings afterward if you need MP4.
- Encoder: If a hardware encoder fails, update the graphics driver from Windows Update or the GPU manufacturer's official site, then test another encoder.
- Third-party components: Start OBS in Safe Mode to test without third-party plugins or scripts.
The settings and MKV recommendation are documented in the OBS standard recording guide.
8. Update audio drivers only when Windows also has a device problem
If the device is missing from Windows Sound settings or fails the Windows input test, check Windows Update > Advanced options > Optional updates. For a laptop, USB interface, or motherboard audio adapter, prefer the device maker's support page. Device Manager can also search for a driver, but it may report that the best driver is installed even when the manufacturer offers a newer package.
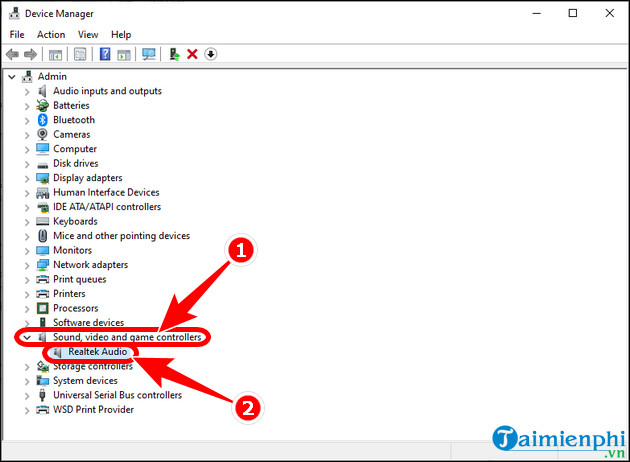
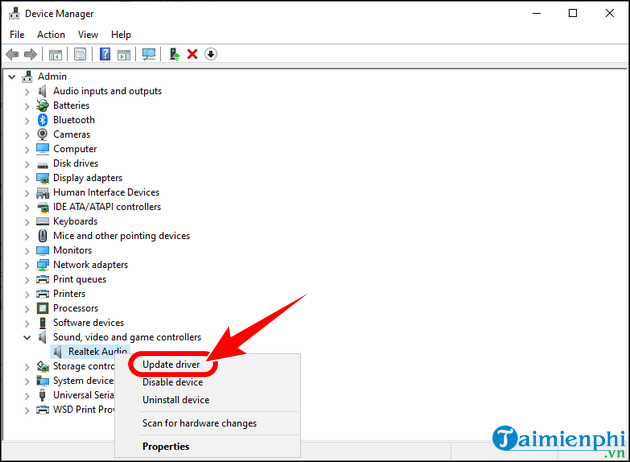
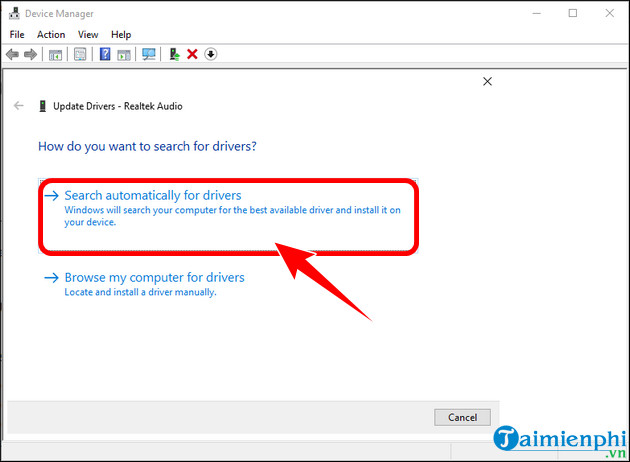
Avoid generic “driver updater” utilities. They are unnecessary for ordinary OBS troubleshooting and can install unsuitable drivers.
9. Run OBS as administrator only for a specific reason
Running OBS as administrator is not a general fix for missing audio. Try it when Game Capture must hook an elevated game, or when OBS reports GPU overload and the official performance guidance recommends the test. Close OBS, right-click its shortcut, select Properties > Compatibility, and enable the option only if the test solves the identified problem.
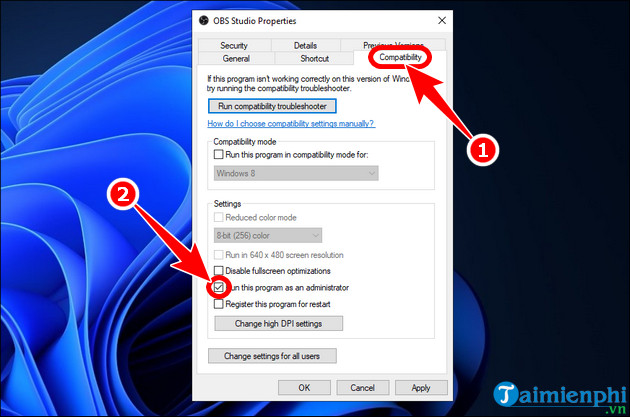
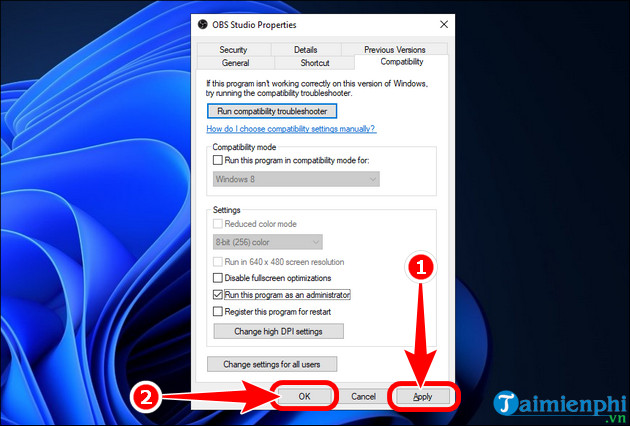
Persistent administrator mode gives OBS elevated access, so leave it off when it does not address the problem.
10. Read the OBS log before reinstalling
After reproducing the error once, choose Help > Log Files > Upload Current Log File. The log records the selected devices, recording path, encoder, skipped frames, and many initialization errors. Save its URL when asking for help in the OBS support forum.
If a clean test scene works, compare it with the original scene for duplicate audio sources, missing track assignments, or problematic plugins. Reinstalling OBS should be a last step: back up your profile and scene collection first, because reinstalling alone may not change a setting stored in your existing configuration.
Related Articles
 OBS Studio - Free, Open Source Software9 minutes read
 How to Make a Recording Studio: Step-by-Step Guide16 minutes read
 How to Use Camtasia Studio to Record a Screen8 minutes read
 How to Install Obs Studio in Ubuntu3 minutes read
 How to Using OBS Studio, Live Streaming and Screen Recording5 minutes read
 Seven Tips on How to Soundproof Your Home Studio for Music7 minutes read
Reader Comments 0
Sign in with email or Google to join the discussion.