Table of Contents
Backup: Sync Files with Spideroak is easier to understand when the core ideas are paired with practical examples. The sections below explain the topic clearly, highlight useful steps, and point out details that can prevent common errors.
Network administration - There are countless online storage, backup and file synchronization services on the web. Some of them are only for specific devices, such as the Asus EeePc. Others are designed for certain operating systems, like Windows or Ubuntu. However, there are some services that can work with all types of devices and operating systems, allowing you to synchronize your data. SpiderOak is one of such services and is the service that we want to cover Here.
SpiderOak is a free and fee-based service that allows users to store, backup and sync on all Windows, Mac and Linux operating systems. Users can access their data via the website or use a desktop application that runs on different platforms. SpiderOak also has an iPhone application available through iTunes AppStore.

Setting
The first step to getting SpiderOak is to download the application from its website. This website promises to protect your privacy and will not violate it.
The price schedule is something that SpiderOak has many differences. However, it is somewhat like Dropbox and other services, it also offers a free account with 2GB of storage space, this account also has backup and sync features. In addition SpiderOak also offers a Plus account, which is a paid account with a fee of $ 10 for 100GB per month. Based on this price you can set yourself a suitable plan.
1 . Click Download SpiderOak to get started (the service will try to detect your operating system version, but most likely fails, so a practical approach is to click Ubuntu Lucid Lynx).
2 . When the download process is complete, click the installation package and follow the normal installation process.
3 . After installing, run SpiderOak or find it in the applications menu.
4 . When you first run SpiderOak, the program will ask you to provide your account information or register a new account. Please select a new account in this step.
5 . Enter your contact information.
6 . In the next screen, you will be asked for username and password information. Enter the required information and click Next , then enter the security code.
7 . Click Next again and then create your secret code.
Backup and sync
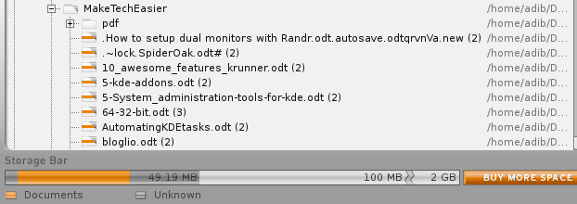
When launching SpiderOak, you will first see the Backup tab. If there are a few typical directories, such as Documents and Photos, it will display these folders and give you the option to backup them. If there is no specific folder in the list, you can click Advanced to enter the directory tree. Check the files you want to backup, then click Save . Soon, the program will start the backup process.
You can also add more directories if you want, but make sure that all are within storage limits. A storage space checker at the bottom will allow you to check your online storage space. If there are no files to backup, you can minimize SpiderOak into your system tray.
Now, if you want to perform data synchronization, you can go to another computer and download SpiderOak. Two computers must not use the same operating system. After installation is complete, launch SpiderOak, but now instead of selecting a new account, simply enter your established account information. The program will ask if you want to add a new computer or reinstall on an existing computer. Select the new computer settings, then name your second computer.
Next, select the folders and files you want to backup, as if you did on the first computer.
1. Click the Sync tab and click New .
2. Enter a name and description.
3. With a folder, click Browse and navigate to the folder you want to synchronize on the second computer.
4. Click Select to finish.
5. With the other folder, click Browse to find the folder on the first computer.
6. Click Next
7. Save
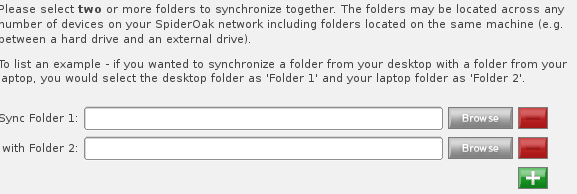
SpiderOak will start the synchronization process, copy files to and from each folder until these folders match. Later, any time you add or edit files on certain computers, they will be synchronized with the folder on the other computer.
In Preferences -> Schedule , you can change the backup rate for backups and sync at your discretion. In the Backup section of Preferences , you can also set SpiderOak to ignore certain types, sizes and lifespans of certain files.
FAQ
What is Backup: Sync Files with Spideroak?
Network administration - There are countless online storage, backup and file synchronization services on the web.
Why is Backup: Sync Files with Spideroak important?
A clear understanding of Backup: Sync Files with Spideroak helps you make informed decisions, avoid common mistakes, and use the relevant tools or techniques more effectively.
How should beginners approach Backup: Sync Files with Spideroak?
Start with the fundamental concepts, follow the examples step by step, and test each change in a safe environment before applying it to important systems or data.
Related Articles
 Download Software That Supports Backing up Spideroak One Secure4 minutes read
 How to Sync Files Over a P2P Network with Resilio Sync5 minutes read
 Sync Files for Free Across All Devices with Syncthing: How-To Guide7 minutes read
 How to Use Musical. Ly - Extreme Lip Sync Application8 minutes read
 How to Use Mega Sync Client on Windows6 minutes read
 Top 5 Lip Sync Apps on the Best Phone8 minutes read
Reader Comments 0
Sign in with email or Google to join the discussion.