Table of Contents
This guide provides a clear overview of sleep, including how to Adjust the Amount of Time Before the Computer Automatically Sleep, how to Prevent the Mouse from Waking the Computer from Sleep Mode. Use it to understand the topic, compare the available options, and make a more informed decision.
In this guide, Tipsmake will discuss all the things you can do with Windows 10's Sleep mode setting, so you can experience more of what the Windows system can offer.
How to Adjust the Amount of Time Before the Computer Automatically Sleep
The first thing you need to configure in Windows' Sleep mode settings is how long the PC should wait before going to Sleep. The system allows you to assign different periods of time when the device is plugged in and running on battery power. To adjust these settings, follow the instructions below:
Step 1. Press the Win + I key to open the Settings application.
Step 2. Then click System > Power & sleep.
Step 3. In Sleep, there are two settings you can customize: On battery power, PC goes to sleep after and When plugged in, PC goes to sleep after. Use the drop-down menu to choose how long the computer should be in standby mode before going to sleep.
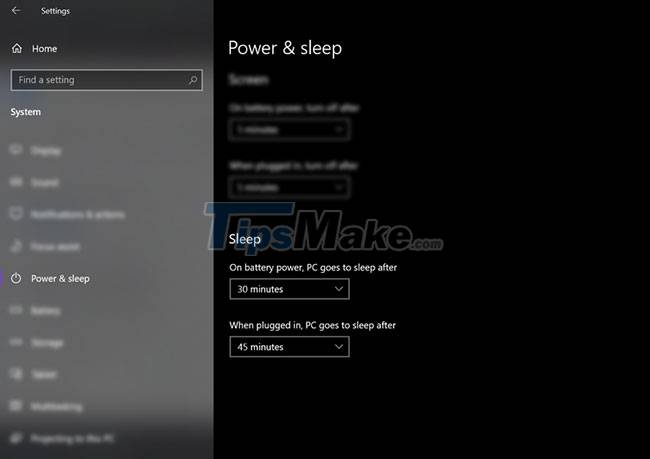
Step 4. If you don't want your computer to automatically go to Sleep, select Never from both options. By choosing this option, your laptop will always work. However, this option will quickly drain the battery, especially if the laptop is not plugged in.

How to Prevent the Mouse from Waking the Computer from Sleep Mode
The computer will automatically wake up from Sleep mode if you move the mouse or trackpad. If you don't want this to happen, you have the option to disable this setting using your PC's Device Manager tool. Here's how to do it:
Step 1. Open Run by pressing Win + R. Then type devmgmt.msc to open Device Manager.
Step 2. Expand the Mice and other pointing devices section by clicking the arrow next to it.

Step 3. Next, right-click your mouse and select Properties from the menu.

Step 4. Then, click the Power Management tab.
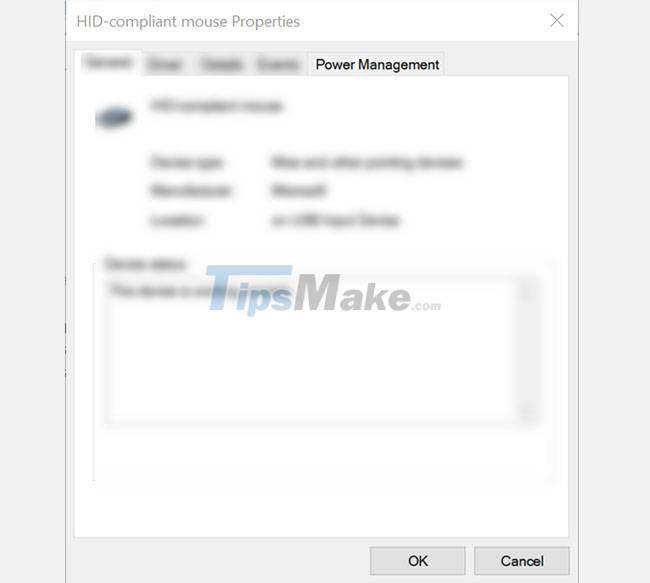
Step 5. In the Power Management tab, uncheck the box next to the Allow this device to wake the computer option, and then click OK at the bottom of the window.
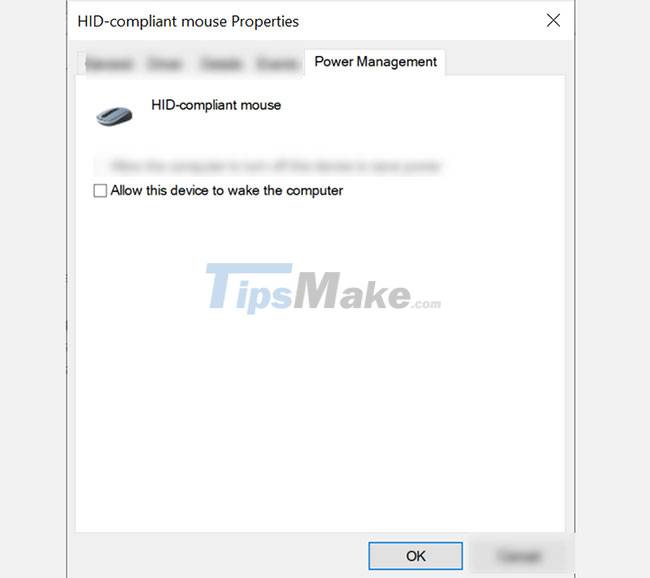
After this configuration, your computer will remain in Sleep mode even if you move the mouse or trackpad. If you want to wake up your PC, you need to press the power button.
How to Manually Activate Sleep Mode
If you don't want to wait to put your computer into Sleep mode, Windows allows you to manually enable it. You have two options for doing this: Change the function of the power button and put the laptop to Sleep when you close the lid. Follow the steps below to configure these settings:
How to manually set up Sleep mode via the power button
Step 1. Open Settings by pressing Win + I key.
Step 2. Then click System > Power & sleep.
Step 3. Next, click Additional power settings in the right part of the window.

Step 4. In the Power Options section, select Choose what the power button does.

Step 5. Here you have the option to define the function of the power button when you press it. You can even choose what it does when your laptop is on battery or plugged in.
Step 6. In the When I press the power button section, select Sleep from the drop-down menu of On battery and Plugged in options.
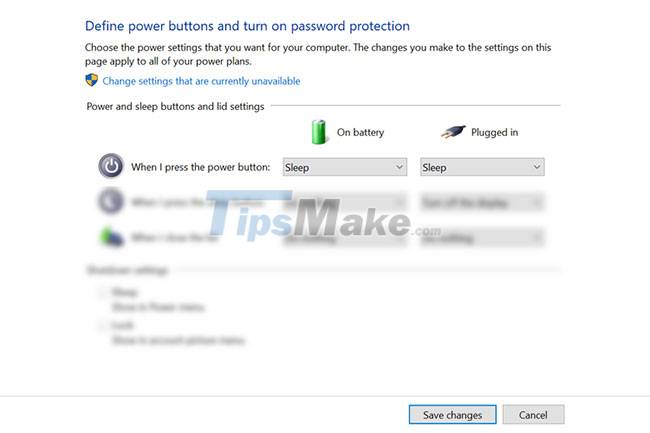
Step 7. If your laptop has a Sleep button, you can also change the settings here.
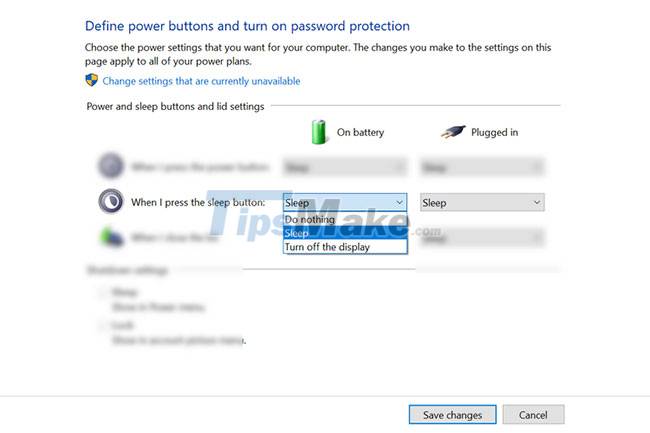
Step 8. You can access the shutdown settings on this page, so the Sleep button will appear on the Power menu. Just make sure that the box next to the Sleep in Shutdown setting is checked.
Step 9. Finally, click Save changes to save these current settings.
How to Put the Laptop in Sleep Mode When Folding
In addition to changing the function of the power button, you can manually put your device to Sleep by folding the laptop down. This can save you a lot of time, especially if you're always on the go. You won't need to press anything more, just fold the laptop down and you're ready to go. Here's how you can enable this setting.
Step 1. Open Settings by pressing Win + I.
Step 2. Then click System > Power & sleep.
Step 3. From the Power & sleep window, click Additional power settings in the Related settings section. This will open the Power Options window.

Step 4. On the left menu, select Choose what closing the lid.

Step 5. In the When I close the lid settings, select Sleep from the drop-down menu for both On battery and Plugged in options.

Step 6. Finally, click Save changes.
Although Windows 10 has set the Sleep mode setting when users buy the device, it is often not suitable for individual usage. Thankfully, you can modify these settings depending on your needs and get the most out of the Sleep feature this system has to offer.
Conclusion
Understanding Sleep makes it easier to compare options, avoid common mistakes, and apply the information in this guide more effectively. Review the relevant requirements before making changes or choosing a solution.
FAQ
What is Sleep?
How to Adjust the Amount of Time Before the Computer Automatically Sleep The first thing you need to configure in Windows' Sleep mode settings is how long the PC should wait before going to Sleep.
Why is Sleep important?
Understanding Sleep helps you evaluate features, compatibility, performance, and potential limitations before you choose a product or follow a procedure.
What should you consider when using or choosing Sleep?
Consider your specific goal, compatibility requirements, available features, cost, security, and the practical recommendations described in this guide.
Related Articles
 How to Change Windows 11 Sleep Mode Settings4 minutes read
 To Enable or Disable Sleep Mode in Windows 105 minutes read
 Here Are the 3 Fastest Ways to Put Your Computer to Sleep4 minutes read
 How to Troubleshoot Problems with Sleep Mode in Windows 109 minutes read
 How to Fix Windows 10 Automatically Activating Sleep Mode4 minutes read
 How to Set up a Windows 11 PC to Automatically Go to Sleep4 minutes read
Reader Comments 0
Sign in with email or Google to join the discussion.