How to turn off Sleep mode in Windows 10/11
Sleep mode or sleep state is a low-power state available in Windows operating systems, including Windows 10 and Windows 11. This low-power Sleep mode is very useful, especially for laptop users and users. tablet, as it helps extend battery life.
What is Sleep mode in Windows?
Unlike Hibernation, when a device is put into Sleep mode, it consumes a very small amount of power, but you can resume your work very quickly (almost instantly) by pressing any button. any key on the keyboard, move the mouse, touchpad, or press the power button.
Because the Sleep state consumes a small amount of power on a battery-powered device, if the battery level drops below the limit, Windows will automatically put the device into Hibernation mode (if enabled) to avoid losing power. data.
With default settings, your PC may go into Sleep mode after 15 (when on battery) or 30 minutes (when plugged in) of inactivity.
However, the problem here is that the Sleep mode is at the default setting so it will automatically put the device into Sleep state after a period of not using the device. Therefore, there will be many cases where when you are downloading data, the device will automatically enter Sleep state and be forced to resume to download again.
For example, your Windows 10 PC may go into Sleep mode while a file is being downloaded via a web browser, forcing you to start the entire download process from the beginning, if the server from where you are downloading the file down does not provide continued support.
The article below will help you customize the Sleep mode time, or disable Windows 10/11 Sleep mode if necessary.
How Sleep mode works in Windows
If you pay attention, you will see your screen turn off after a few minutes of inactivity. That's when Sleep mode comes into play. Because the screen consumes a lot of power, turning it off is the first step Windows takes. This is ideal for situations where you will start using your computer in a few minutes.
In Sleep mode, also commonly known as Standby or Suspended mode, the computer's state is saved in RAM. This makes the computer appear to be turned off, even though you can hear the fan running at low speed. However, the reality is that the computer is still on and waiting for you to input from the mouse or keyboard.
This is an energy saving mode designed to stop most system activities when the computer is idle. Any open files or applications will be moved to system memory (RAM) so the system uses low power. It is most preferred because waking up the computer is faster than restarting. But sometimes, problems related to Sleep mode can appear in Windows.
Leaving your laptop in Sleep mode overnight is not necessarily harmful. In fact, this is especially useful when you're using your laptop unplugged and want to keep your PC running as long as possible. The default Sleep setting for most Windows computers is set to two hours when not in use. However, you can change this at any time.
How to turn off Sleep mode in Windows 10/11
1. Keep your PC powered up with PowerToys
Microsoft PowerToys is a collection of advanced tools that let you do more with your Windows 10 and 11 systems. Its Awake feature lets you keep your PC awake on demand, temporarily or indefinitely. To prevent Windows from sleeping while a program is running:
1. Visit Microsoft's GitHub page and download PowerToysSetup-X64.exe. Run PowerToysSetup and install the application.
2. Next, launch PowerToys and open the Awake tab on the left.
3. Here, turn on the Enable Awake switch to activate it.
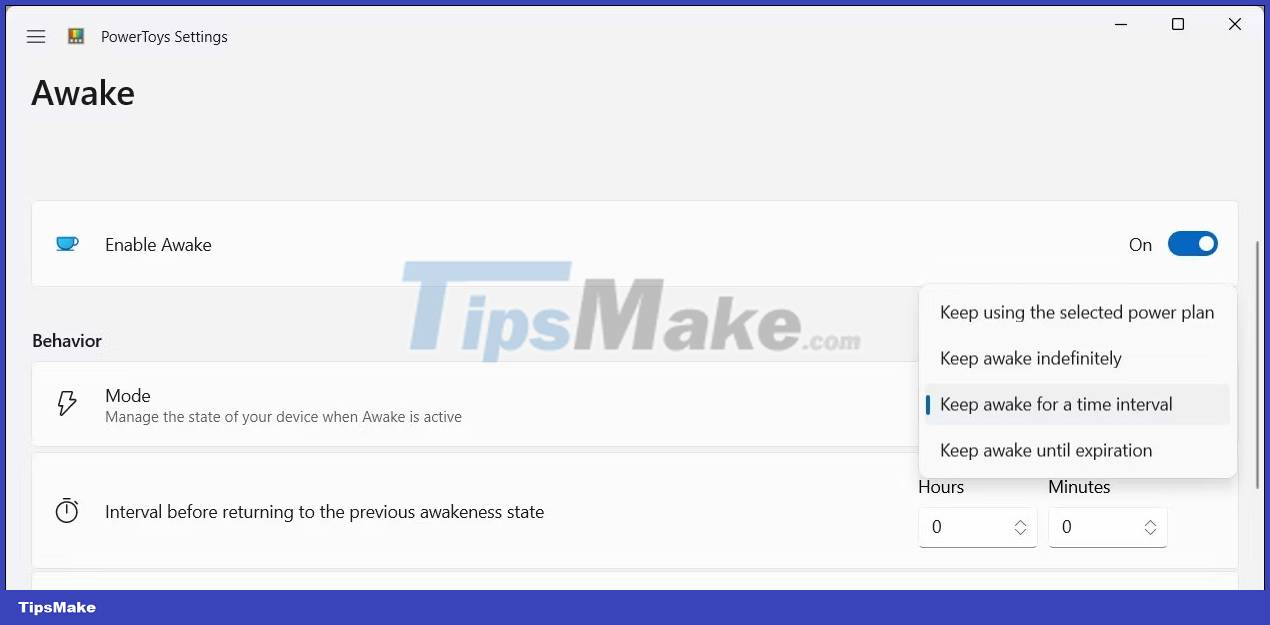
4. In the Behavior section, click the drop-down menu for Mode and select Keep awake for a time interval.
5. Enter the duration in hours or minutes. For a longer period, select Keep awake until expiration, then enter the end date and time. After that period, your PC will return to your Windows computer's default power plan. If you choose Keep awake indefinitely, your PC will stay awake until you turn this option off.

6. Next, turn on the Keep screen on button to ensure your computer does not turn off the screen when awake.
PowerToys will now keep your PC awake for the specified time. If you need to turn it off, change the Behavior Mode to Keep using the selected power plan.
- (Free of charge)
2. Keep your PC always on with Insomania

Insomania is a free third-party lightweight utility to temporarily disable Sleep mode on Windows. When enabled, it calls the SetThreadExecutionState API to notify the system that it is currently in use, preventing the system from going to Sleep mode.
When you open the program, a pop-up window with the message "This computer cannot go to sleep while this window is open" will appear. You can minimize the window so it runs in the background and your PC won't go into Sleep mode. Closing the window will end the application and restore the system's default power settings.
On the other hand, Insomania doesn't have an option to keep your screen on. If you need to keep the screen on, consider using PowerToys or Don't Sleep.
- (Free of charge)
3. Use Don't Sleep to lock Sleep and Shutdown mode
Don't Sleep offers more power management options than PowerToys and Insomnia. It can block Sleep and Hibernation modes as well as keep your screen on. Furthermore, it can also help you prevent accidental shutdowns. You can use Don't Sleep to configure both Sleep and Awake options.
To use Don't Sleep:
1. Download and install your preferred version of Don't Sleep (portable or install).
2. Open the Please Don't Sleep tab.
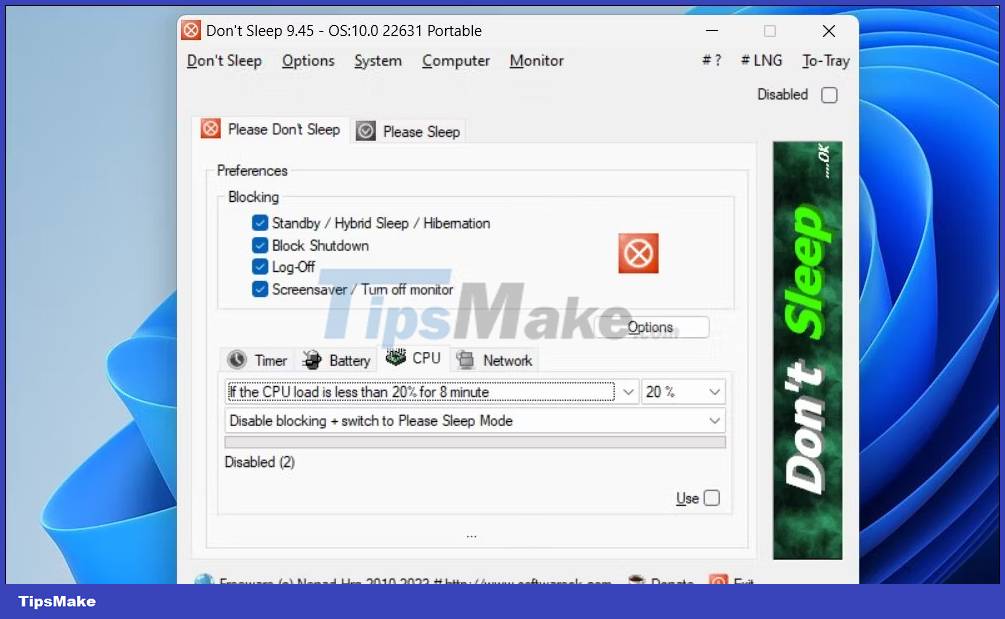
3. Here, you can select the source options to block in Preferences. By default, all power options are blocked by the application.
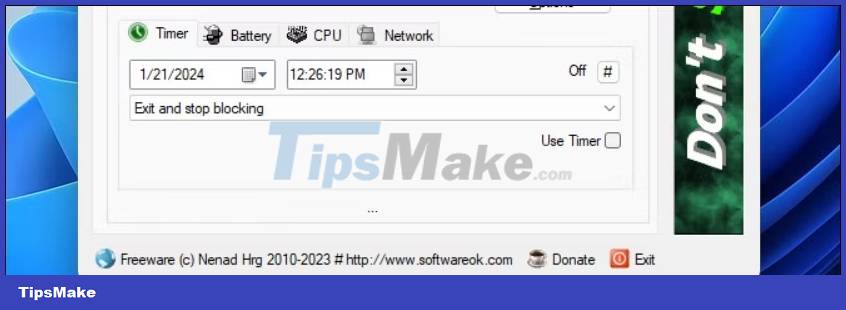
4. In the Timer tab, set the time for your computer to stay on before the default power scheme is restored.
5. Click the To-Tray option in the top right corner to minimize the application to the system tray.
6. To disable the application, select the Disabled option in the upper right corner.
You can also configure Don't Sleep to set dynamic power management rules based on your system's battery, CPU, and network parameters. Don't Sleep has some additional features on the toolbar. For example, click the Monitor option and select Monitor Off to turn off your monitor, or click Computer to access power options.
- (Free of charge)
4. Turn off Sleep mode in Settings
You can prevent your computer from entering a low-power sleep state by configuring Sleep mode in the Settings app. While this only provides a basic level of control over power and Sleep options, it works well if you don't want to use a third-party tool.
To change sleep time and screen usage in Windows 10 and 11:
1. Press Win + I to open Settings.
2. Open the System tab and then click Power & battery. In Windows 10, go to Settings > System > Power & sleep.
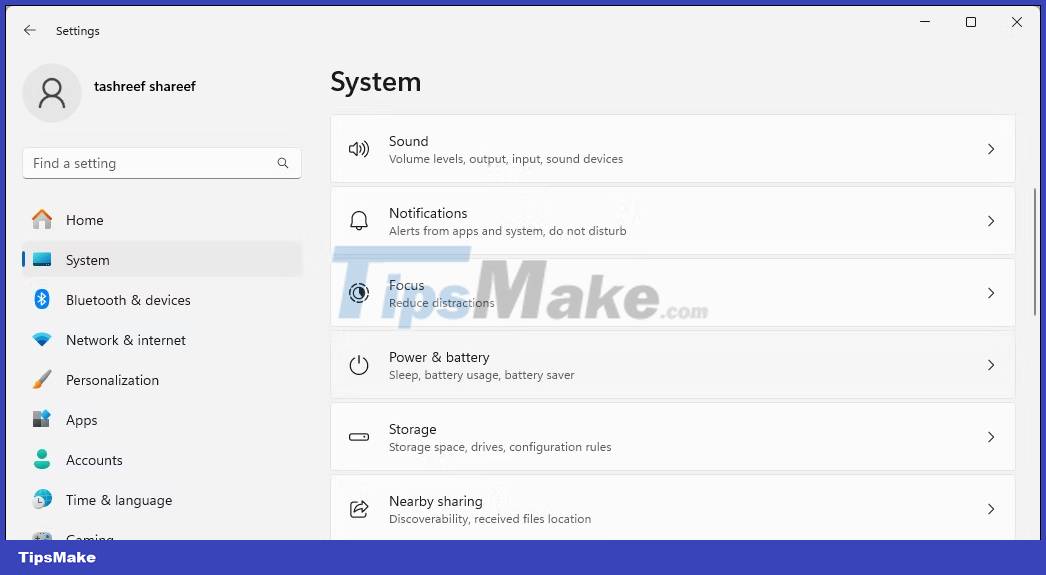
3. In Power, click to expand Screen and sleep.
4. Next, click the On battery power, put my device to sleep after and When plugged in, put my device to sleep after drop-down menus, then select the time range from 1 minute to 5 hours. Select Never to completely turn off Sleep mode.
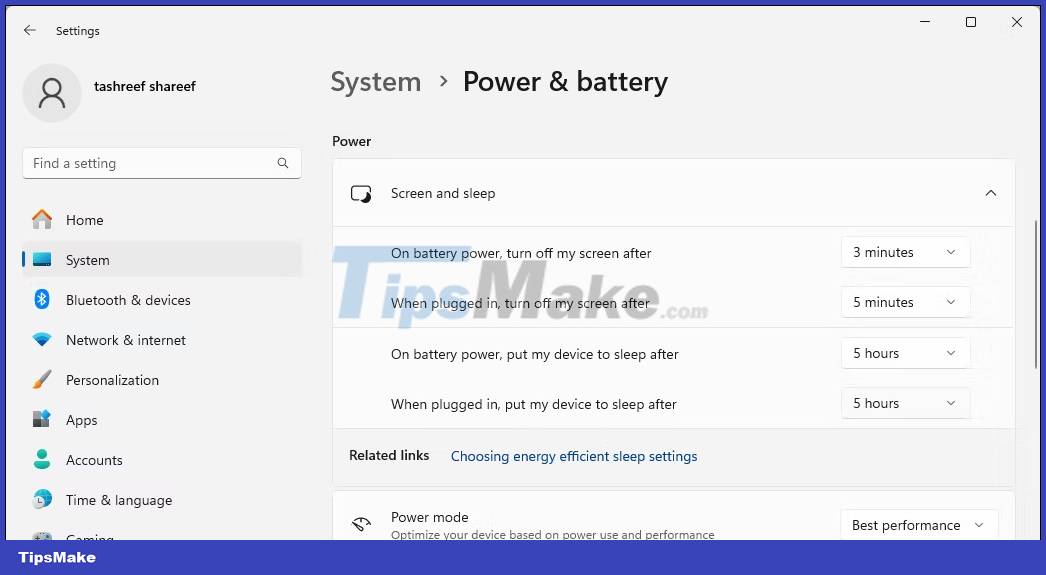
5. To configure the timeout period for your screen, click the On battery power, turn off my screen after and When plugged in, turn off my screen after drop-down menus, then select a time interval from 1 minute to 5 o'clock. Select Never to prevent the screen from turning off.
Not all programs can prevent Windows computers' default sleep behavior. If Sleep mode disrupts your workflow, you can use these third-party utilities to keep your PC awake for short or extended periods of time.
How to change and customize Windows 10/11 Sleep mode settings
By default, Windows puts your screen to sleep in less than half an hour after you leave it untouched, and your PC will typically Hibernate after a few hours. Here's how to configure and customize those settings.
For desktop PCs, setting Sleep mode is less of a problem because you're not limited by the battery. Laptops and mobile devices are not the same, they require careful Sleep mode settings to get the most power from the battery possible. You don't want your laptop to drain power when not in use, so here's how you can easily configure Sleep mode settings in Windows.
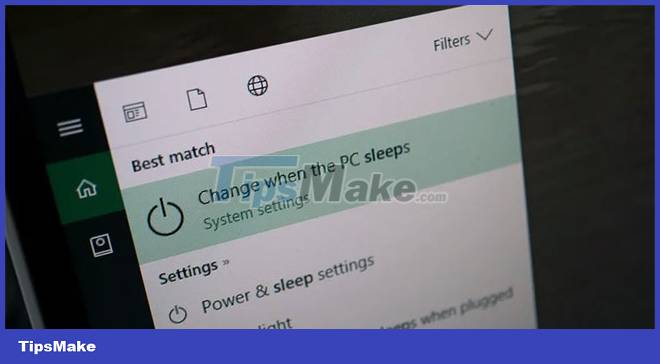
You can modify Windows Sleep settings with these steps:
1. Open search by pressing the keyboard shortcut Windows + Q.
2. Type "sleep" and select "Choose when the PC sleeps".
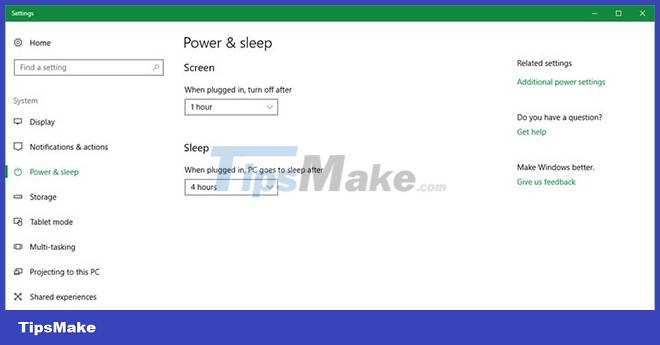
3. You will see two options:
- Screen: Configure when the screen goes into Sleep mode.
- Sleep: Configure when the PC will go into hibernation mode.
4. Set the time for both options using the drop-down menu.
If you're using a laptop, there are actually 4 options divided into two categories: One for when you're on battery and one for when you're plugged in. With option 1, you will see Windows 10/11 behave accordingly when your PC drains the battery, while the latter option will affect the time you have to leave your device plugged in to charge. They should be varied so you can make the most of the available power.
Adjusting Windows 10/11 Sleep mode helps the computer save battery power, when the computer is still working but we are not sitting in front of the screen. Besides, users can also disable Windows 10 Sleep mode if desired.
Common errors related to Sleep mode on Windows 10/11
Error related to peripheral devices
Sometimes peripheral devices such as keyboard, mouse, scanner. can conflict with the power settings on your computer and block your computer from entering Sleep mode. The only solution you can do is to disconnect the peripheral every time you want to put the computer into Sleep mode and plug it back in when you are ready to work again.
Error related to Screensaver
Screensaver settings may also conflict with the Sleep settings you set. Therefore, activating Screensaver can also prevent your computer from entering Sleep mode. You can disable Screensaver by following these steps:
Step 1: Click the Start button and type "change screensaver". Then select "Change screen saver" in the search results.
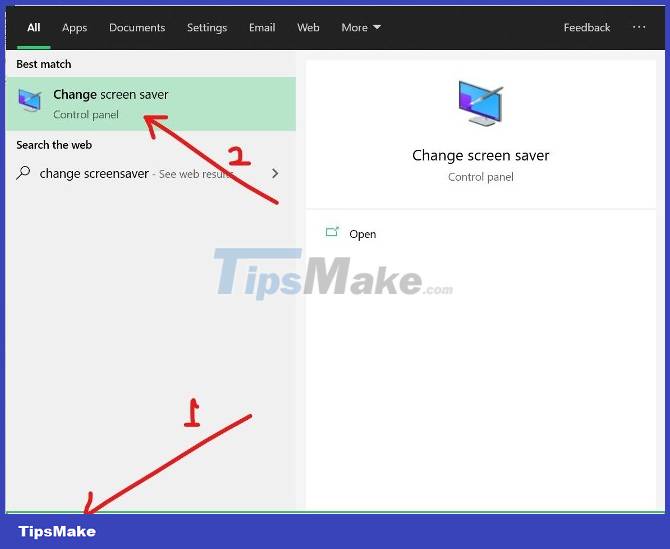
Step 2: Select None in the drop-down menu in the Screen saver section.
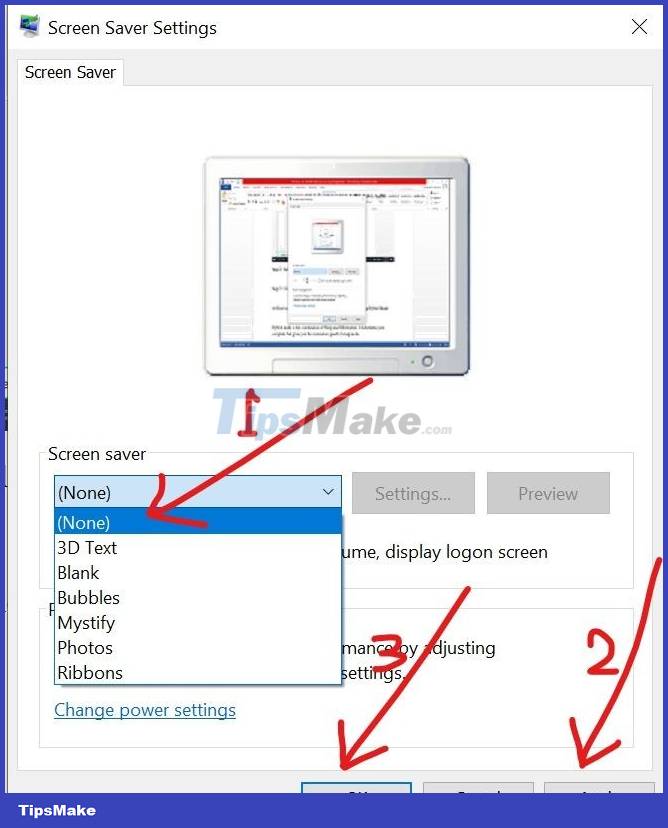
Step 3: Click Apply and OK to complete the installation.
Error related to Hybrid Mode
Hybrid mode is a combination of Sleep and Hibernation. It puts your computer into Hibernation mode but allows you to wake your computer up as quickly as Sleep mode.
To disable Hybrid mode, follow these steps:
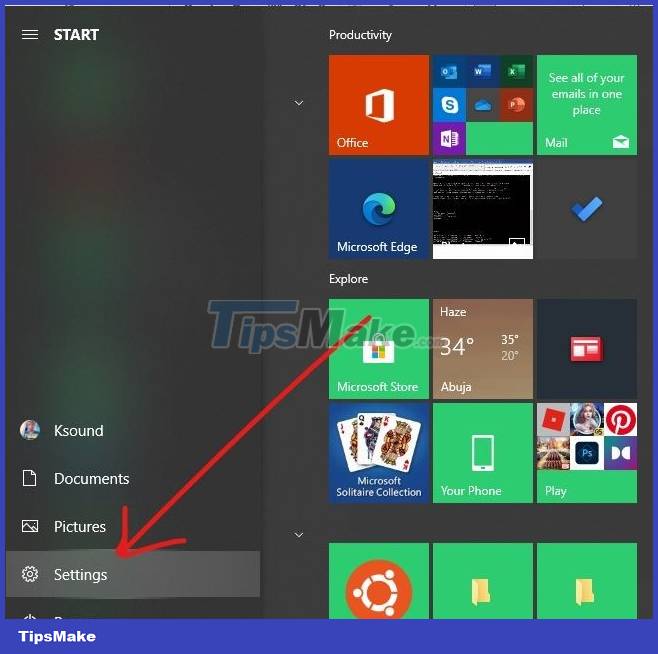
Step 1: Click the Start button then select Settings.
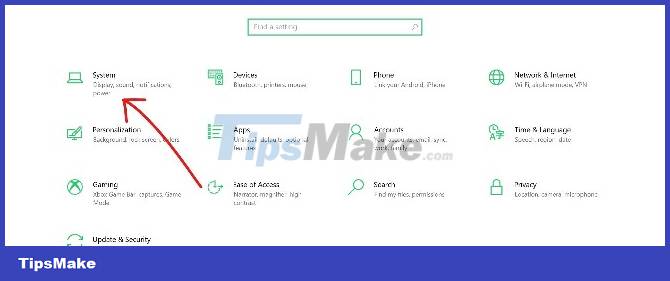
Step 2: Select System from the menu.
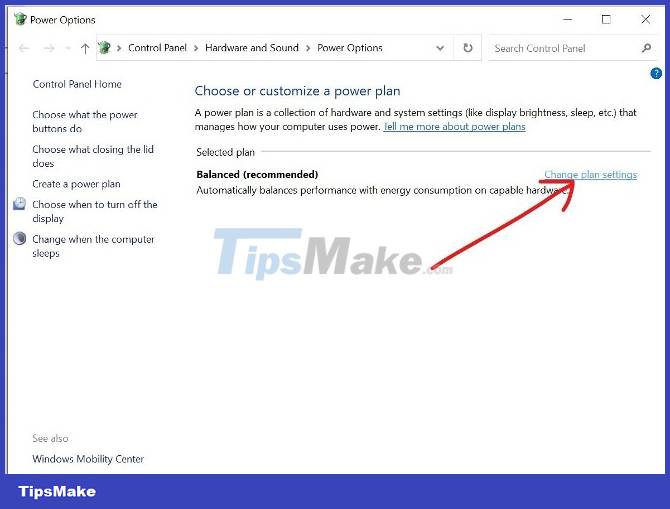
Step 3: Click Power & Sleep and then continue to click Additional power settings in the upper right corner.
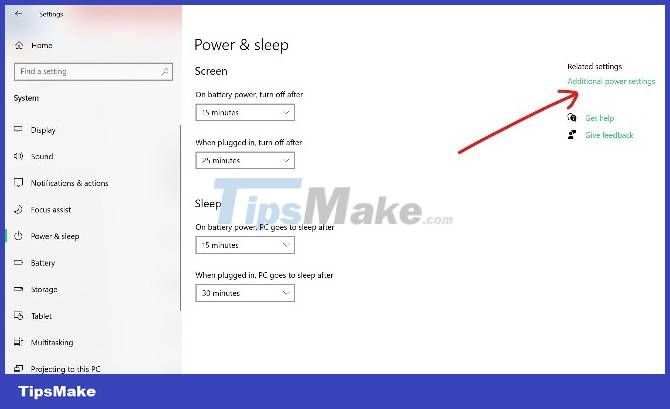
Step 4: Find and click Change plan settings.
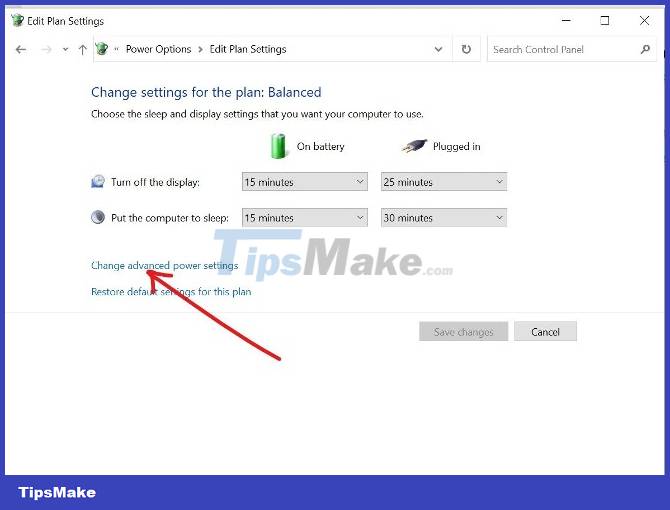
Step 5: Click Change advanced power settings.
Step 6: Expand the Sleep and Allow hybrid sleep sections in the tree menu.
Step 7: Switch to Off in both On battery and Plugged in sections.
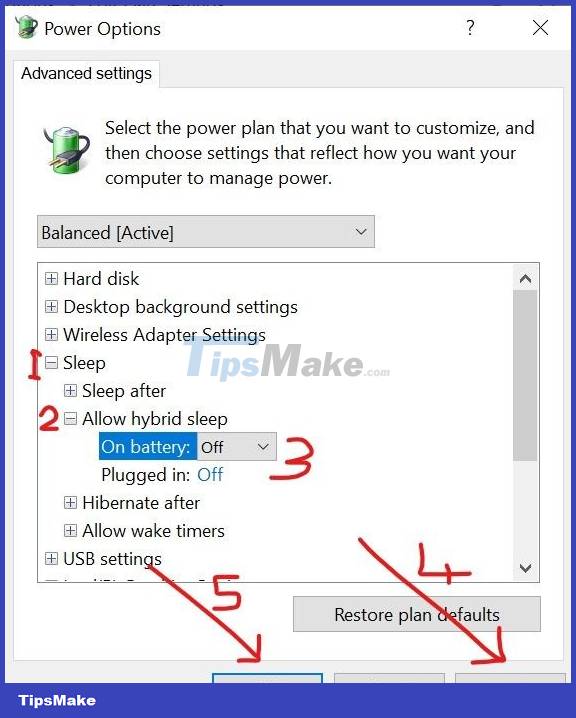
Step 8: Click Apply and OK to complete the installation.
Wishing you success!