Table of Contents
This practical guide walks through ways to enable sleep mode on Windows 11 pcs, explains the main requirements, and highlights common issues that may appear along the way.
Here are all the ways to enable sleep mode on Windows 11 PCs that Review to use when needed.
Using the Start menu
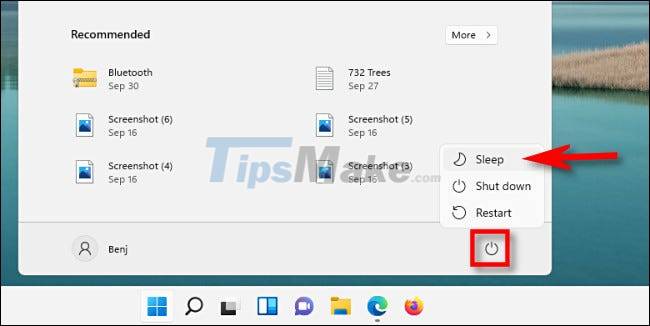
One of the easiest ways for you to put your PC to sleep is to use the Start menu. First, click the Start button on the taskbar. When the Start menu opens, tap the power icon in the bottom right corner. In the small pop-up menu, select ' Sleep '. Your PC will immediately go to sleep.
Use dedicated keys
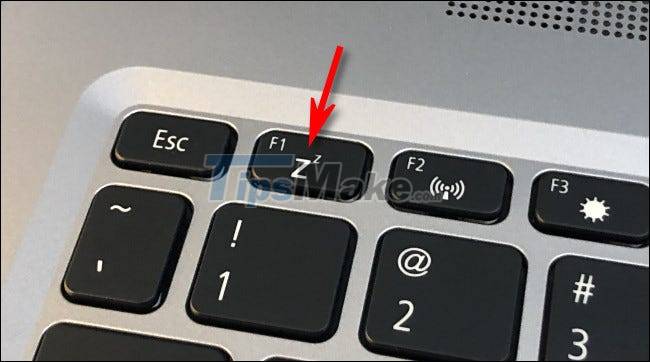
Many Windows 11 PCs and tablets have a dedicated physical key on the body, or a keyboard that enables quick sleep mode with a single press. These keys are often printed with the crescent moon logo, the word ' sleep ', or simply a few small 'Z's. Tap it and your PC will quickly go to sleep.
Using the Power User menu

You can also use the Power User menu in Windows 11 to put your computer to sleep. Do this by right-clicking the Start button on the taskbar (or pressing Windows + X ) and in the menu that appears, clicking ' Shut Down or Sign Out ', then ' Sleep '. 'Sleep' will arrive instantly on your PC.
Using Command Prompt
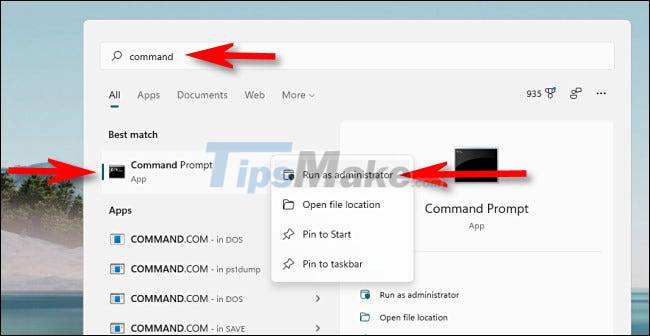
Like many other tasks, you can also activate sleep mode with a command in Windows 11. First, open the Start menu and enter the keyword ' command '. Right click on the Command Prompt icon and select ' Run as Administrator '.
When the Command Prompt opens, you'll need to run the command to disable 'hibernation' for the sleep command to work.
powercfg -h off
Now, enter the following command to put the PC to sleep:
rundll32.exe powrprof.dll, SetSuspendState Sleep
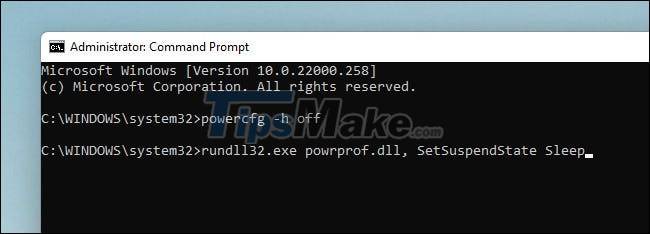
As soon as you press Enter, the PC will immediately go to sleep.
Use the login screen or Ctrl + Alt + Delete
Similar to shutdown and restart tasks, you can also initiate sleep from the login screen or Ctrl + Alt + Delete in Windows 11. To do so, click the power icon in the corner bottom right of the screen and select ' Sleep ' in the menu that appears. Your PC will immediately go to sleep.
Wish you have a good experience with Windows 11!
Key Takeaways
Use the information above as a practical reference for ways to enable sleep mode on Windows 11 pcs. Review each step carefully, confirm any requirements, and choose the option that best fits your situation.
FAQ
What does this guide explain about Enable Sleep Mode on Windows 11 Pcs?
It explains the main concepts, practical considerations, and useful steps related to enable sleep mode on Windows 11 pcs without requiring advanced knowledge.
Who can benefit from learning about Enable Sleep Mode on Windows 11 Pcs?
This information is useful for readers who want a clear overview, practical guidance, and reliable steps related to enable sleep mode on Windows 11 pcs.
What should I check before applying this information?
Review the requirements, confirm that your device, software, or situation matches the instructions, and back up important data before making major changes.
Related Articles
 To Enable or Disable Sleep Mode in Windows 105 minutes read
 How to Troubleshoot Problems with Sleep Mode in Windows 109 minutes read
 Here Are the 3 Fastest Ways to Put Your Computer to Sleep4 minutes read
 How to Enable and Disable the Sleep Mode in Windows 102 minutes read
 How to Turn Off Windows 10 Sleep Mode Extremely Quickly7 minutes read
 How to Fix Windows 11 Won't Lock in Sleep Mode?3 minutes read
Reader Comments 0
Sign in with email or Google to join the discussion.