Set the AutoCorrect function in Excel
The following article gives detailed instructions for you to set up the AutoCorrect function in Excel.
To set up the AutoCorrect function in Excel, do the following:
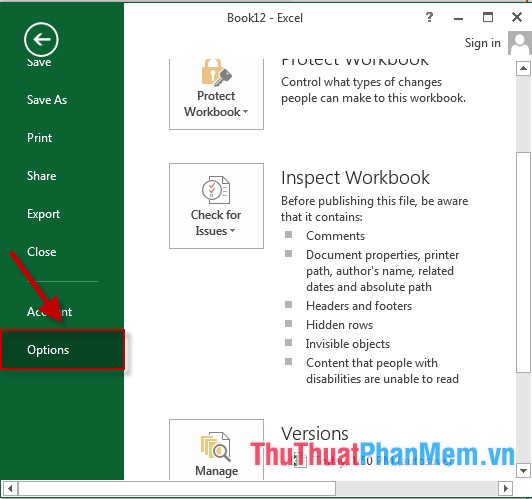
Step 1: On the card File -> Option:
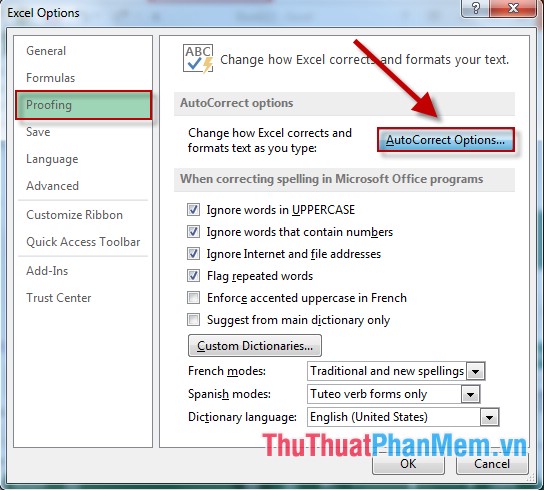
Step 2: The Excel Option dialog box appears -> Choose Proofing -> AutoCorrrect Options .
Step 3: The AutoCorrect Englich dialog box appears in the section:
- Replace: Enter the abbreviation name.
- With: Enter content for the abbreviation.
After you finish typing click Add to put the abbreviation into the dialog box:
Step 4: The abbreviated phrase has been added -> click OK to complete:
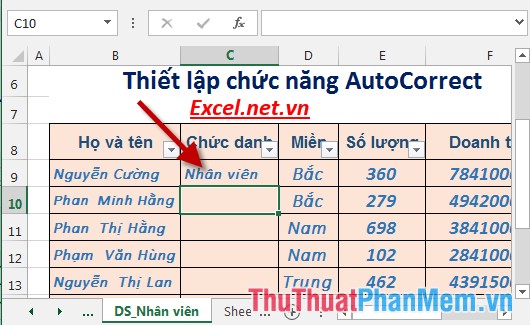
- Return to the spreadsheet -> type nv:
- Press Enter -> nv automatically turns into Employee:
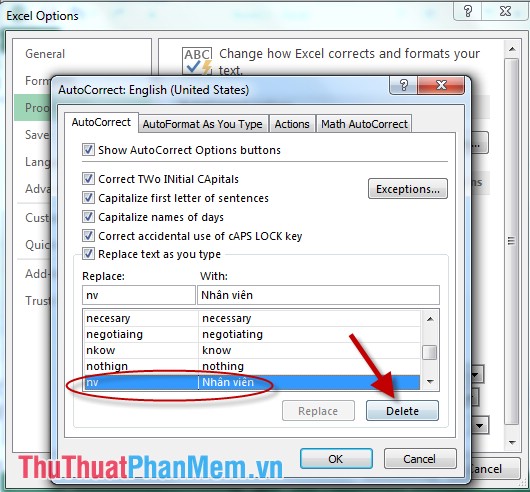
- In case you want to type the normal nv word that is not a substitute for the phrase Staff perform the following: Go back to File -> Option -> Proofing -> AutoCorrect -> AutoCorrect English dialog box appears -> select phrases Words to delete -> Delete:
After deleting the abbreviation, go back to the worksheet and type nv, press Enter -> result:
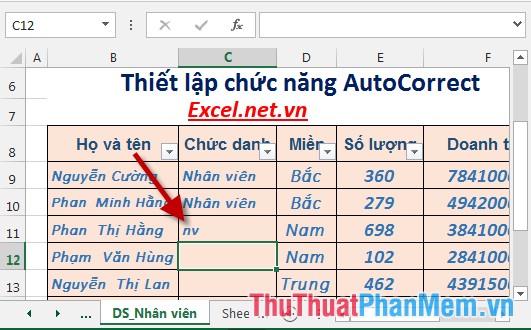
- However, you should use the AutoText feature that Excel supports available to be proactive in using phrases instead of content or not.
The above is a detailed guide on how to set up the AutoCorrect function in Excel 2013.
Good luck!
You should read it
- Typing, abbreviation in Word, Excel with AutoCorrect
- Basic Excel functions that anyone must know
- How to use Hlookup function on Excel
- How to use the SUM function to calculate totals in Excel
- How to use the LEN function in Excel
- How to use COUNTIF function on Excel
- How to use the MOD function and QUOTIENT function in Excel
- How to use MID functions to get strings in Excel
May be interested
- How to protect spreadsheets in Excelinstructions on how to protect spreadsheets in excel. protecting spreadsheets is an essential need of many users, thanks to this feature who makes spreadsheets can secure their data. to protect a spreadsheet, follow these steps: step 1: right-click v
- How to insert and delete worksheets in Excelinstructions on how to insert and delete worksheets in excel. 1. insert a sheet (sheet) in excel. step 1: right-click on any sheet (or you can choose a new sheet location) - insert: step 2: the insert dialog box appears - click worksh
- How to choose images as a background for a spreadsheet in Exceldetailed instructions to you how to choose images to make up the worksheet in excel. to create wallpaper you follow these steps: 1. create a wallpaper for spreadsheets from images available on the computer. step 1: go to pagelayout - background: step 2: insert p dialog box
- How to change the SheetTab color and hide the worksheet in Excelinstructions on how to change the color sheettab and hide the worksheet display in excel. sheettab is where the names of the sheets are displayed so you need to color them to distinguish them better. 1. how to change the color of sheettab in excel. step 1: right-click the name of the sheet to change color - tab color -
- How to rename, copy and move spreadsheets in Excelinstructions on how to rename, copy and move spreadsheets in excel. 1. how to change the name of the worksheet (sheet) in excel - method 1: + double-click the worksheet name - when the selected worksheet name is entered, enter the new name of the worksheet: + after entering the name
- Overview of the interface in Excel 2013, 2016overview of the interface in excel 2013, 2016. the following article helps you understand the overview of the interface in excel 2013, 2016. when you open the excel interface, work as shown.