Quickly insert current date and time into a cell in Excel
In Excel, you can quickly fill out current date, month, and time information as static or dynamic values. The static value is the date and time value at the time of filling without automatically updating on subsequent days when you open or perform calculations on a spreadsheet.
Table of Contents
In Excel, you can quickly fill out current date, month, and time information as static or dynamic values. The static value is the date and time value at the time of filling without automatically updating on subsequent days when you open or perform calculations on a spreadsheet. Dynamic values are the date and time values that change each time you open Excel or perform calculations on spreadsheets. Depending on the static or dynamic value, there will be different input methods.

Shortcuts to fill the current date in Excel as static values
On a worksheet, select the cell you want to insert the current date or time.
Do one of the following:
To insert the current date, press Ctrl +; (semi-colon).
To insert the current time, press Ctrl + Shift +; (semi-colon).
To insert the current date and time, press Ctrl +; (semicolon), then press the Space key (space) and press Ctrl + Shift +; (semi-colon).
Example done on Excel spreadsheet:
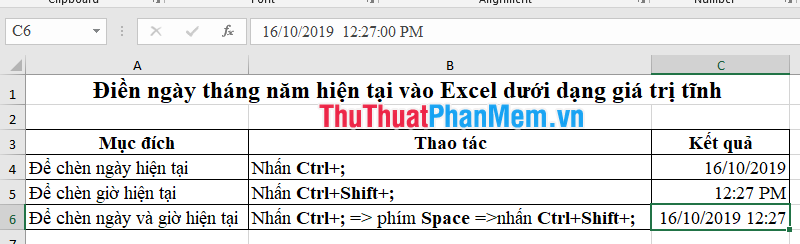
Because the results are static, the value of the cell does not change when you reopen the Excel worksheet or perform the calculation.
How to fill current date in Excel as dynamic values
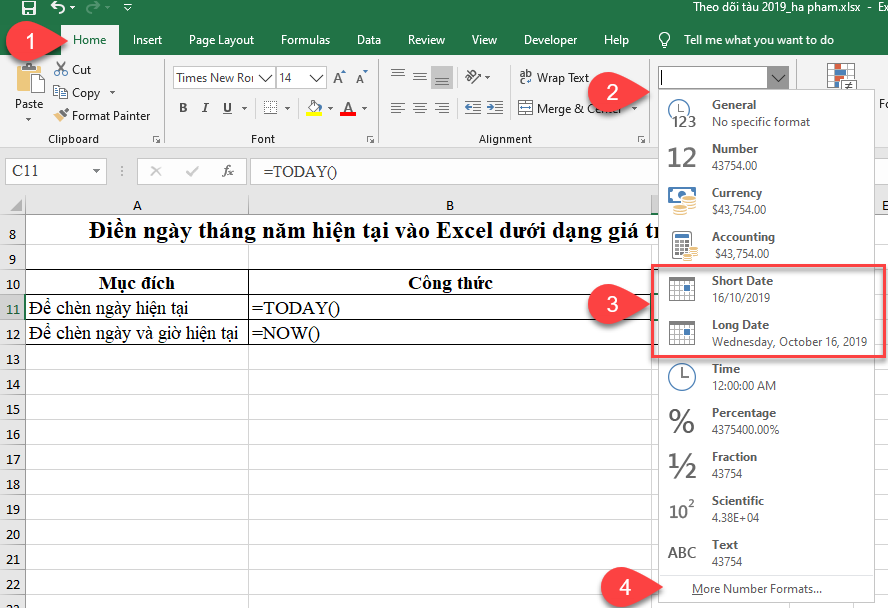
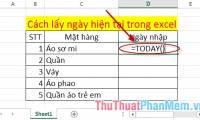
To automatically update the date, month and time according to the time of calculating / opening a worksheet; You use the TODAY or NOW functions with the function structure and use the following.
= TODAY (): This function will return the result as day, month, year of the current time.
= NOW (): The Now function returns the date and time of the current time.
Note: The two time functions above have no arguments.

Note:
- The date and time are taken from the computer's system clock.
- The date and time are automatically updated if you turn the file off and on or when the macro contains a function. If you leave the worksheet as is or click Save, the function does not automatically change the results.
How to fill a date range in ascending order by date
Similar to filling ordinal numbers, you can enter a date range in ascending order by: filling the first date in the first cell in Excel worksheet => Click in the first date cell and then drag the Fill Hand (the small square in the bottom right corner in the selected cell) to the right or bottom of all the cells you want to fill in the date.

Autofill date according to certain distance
Step 1: Fill the first day in any cell.
Step 2: Select the cell, right click on the fill handle , scroll down to the last cell you want to fill the date and release the mouse. (similar to how to create dates in ascending order by date, but right click on the fill hande button, not the left mouse button).
Step 3: When you release the mouse button, the Menu panel appears, select Series .

Step 4: In the Series dialog box , select the Date unit as you wish and enter the appropriate numbers into Step Value . After setup as desired, click the OK button to finish.

If you enter the parameter as shown in the image above, with the first day of October 16, 2019, the next day after that will be November 16, 2019.
Change the date or time format
To change the date or time format, select the cell you want to change, on the Home tab (1) , click the Number format box (2) to choose the format type, select the available format type (3) or click More Number formats . (4) to select the appropriate format.
Good luck!
Was this article helpful?
Your feedback helps us improve.
Related Articles
 Instructions on how to insert the current date in Excel4 minutes read
 What is the function in Excel that retrieves the current date and time?5 minutes read
 NOW function - The function returns the current date and time in Excel2 minutes read
 How to automatically update the Excel file editing time3 minutes read
 Current date and time in Python4 minutes read
 How to get the current date in Excel3 minutes read
Reader Comments 0
Sign in with email or Google to join the discussion.