Quick fix 800 error when connecting VPN on Windows 10
Error 800 is the most common error that users often encounter in the process of connecting a virtual private network (VPN). An error means that the server is inaccessible, and configuring the parameters may cause the error. So how to fix 800 error when connecting VPN on Windows 10, please refer to the following article of Network Administrator.
Table of Contents
Error 800 is the most common error that users often encounter in the process of connecting a virtual private network (VPN). An error means that the server is inaccessible, and configuring the parameters may cause the error. So how to fix 800 error when connecting VPN on Windows 10, please refer to the following article of Network Administrator.
Error 800 occurs because of two main reasons: either because the VPN router configuration is incorrect or due to a program error on the router .
1. Check the username (username), password and server type
Step 1 :
Press the Windows + I key combination to open the Settings window, then at the Settings window, click Network & Internet .
Step 2 :
Next on the Network & Internet window, find and click the VPN in the left pane, and this time on the screen of the window in the right pane will display all Virtual Private Network options.
Step 3 :
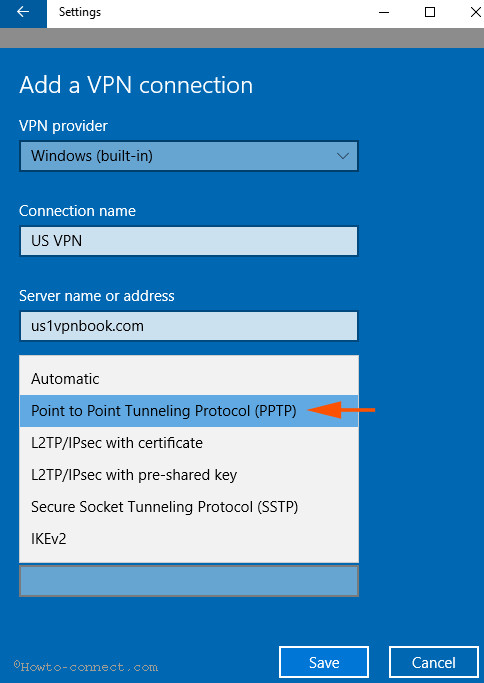
Click Add a VPN Connection (including to plus icon) and a popup window will appear.
Step 4 :
Here you check whether the IP address, username (username) and password are correct or not. If not, edit it and try connecting again.

Step 5 :
Next, select ' Point to Point Tunneling Protocol (PPTP) ' at the VPN type Menu .
Step 6 :
Make sure that the Server name or address box does not include "http:///" and "/".
2. Configure Windows Firewall and Router correctly
Step 1 :
Allow the application to communicate on the Windows Firewall for PPTP and connect the virtual private network you are using. Configure the Firewall Rule if the error steps are executed.
Step 2 :
Also allows Router for network Virtual private network (PP) and PPTP.
Step 3 :
To avoid errors, a problem occurs when you choose PPTP and TCP Port 1723 and Protocol 47.
3. Customize Firewall Properties to fix 800 error when connecting VPN on Windows 10
Step 1 :
Press Windows + X key combination to open Power User Menu, here you click Control Panel then click Windows Firewall .
Step 2 :
On the Windows Firewall window, find and click the Advanced Settings link in the left pane.
Step 3 :
Click Action from the Dropdown Properties Menu .
Step 4 :
By default the tab is opened as Domain Profile, but you need to switch to the IPsec Settings tab.
Step 5 :
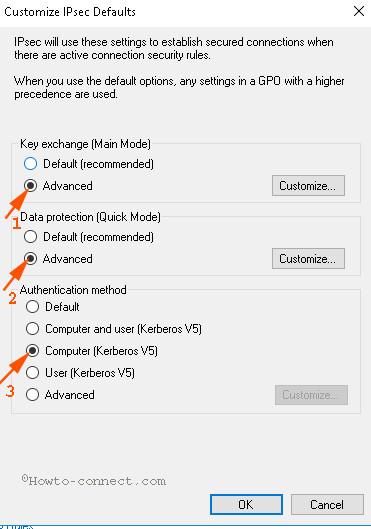
Click Customize on the IPsec Defaults pane.
Step 6 :
On the Wizard window, proceed to configure some options carefully:
- 'Key exchange (Main Mode)' - Advanced
- 'Data Protection (Quick Mode)' - Advanced
- 'Authentication method' - Computer Kerberos (V5).
Step 7 :
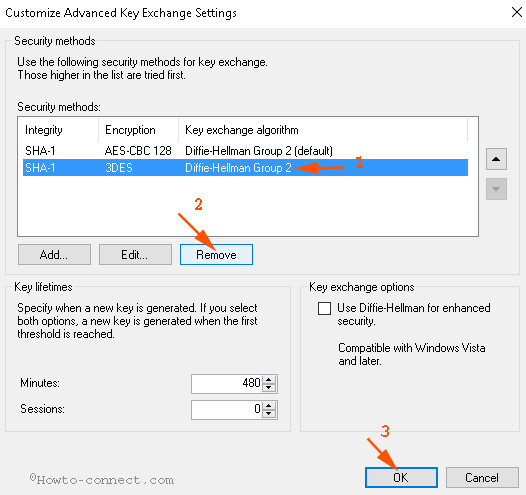
Customize Key Exchange (Main Mode) section is Customize .
Step 8 :
In the Security methods section, select 3DES in the Encryption column and then click Remove . Click OK to close the Customize Advanced key Settings window.
Step 9 :
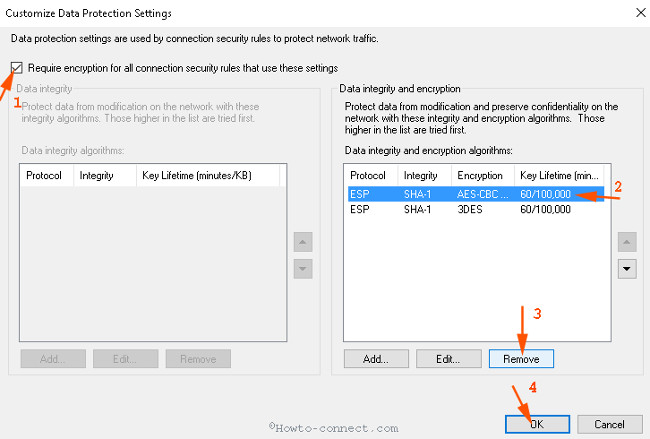
Do the same, click the Customize option on Data Protection (Quick Mode).
Step 10 :
Select " Require Encryption for all connection . This will open the ' Customize Data Protection Settings ' window.
Step 11 :
Click on AES-CBC . in the Encryption column and select Remove , then close the dialog box window.
Refer to some of the following articles:
- Wifi on Windows 10 does not connect after starting from Sleep mode
- How to delete Wifi saved on Windows 10?
- How to use Command Prompt to manage wireless networks on Windows 10?
Good luck!
Was this article helpful?
Your feedback helps us improve.
Related Articles
 Fix iPhone error not connecting to computer9 minutes read
 How to Bring Mac Quick Look to Windows2 minutes read
 Fix connection error with Apple ID server on Windows 103 minutes read
 Fix 'A Duplicate Exists Name on the Network' error4 minutes read
 Fix 'Windows was unable to connect to' error when connecting to wifi2 minutes read
 Fix iTunes error: 'An iPhone Has Been Detected But It Could Not Be Identified'3 minutes read
Reader Comments 0
Sign in with email or Google to join the discussion.