Fix PS5 not connect to WiFi
There are many reasons for your Playstation 5 not connecting to the WiFi network. Here are some of the most common problems and how you can fix them.
How to determine if the Playstation network is faulty
In some cases, the problem might not be on your part. Sony's PSN server may be experiencing problems or under maintenance, although this is quite rare. At that point, you will have no choice but to wait for the problem to be fixed. However, it's important to determine if the problem originated from the PSN server.
Step 1. Open a web browser and visit the PlayStation Network Service Status website at this address.
Step 2. Check the service status here to see if there are any reported issues with the PSN network.
Step 3. If the website cannot load, your internet service may stop working. But if other sites can still load, you can try visiting a standalone site like DownDetector to confirm the problem.
How to check if PS5 is properly connected to the network
Check to see if your connection is having problems by doing the following:
Step 1. On the main screen of PS5, click Settings .

Step 2. Enter network settings by clicking Network .

Step 3. Click Test Internet Connection.

Step 4. Wait until the test is completed.

Step 5. If the test fails, try reconnecting to your Wi-Fi router by navigating to Settings> Set Up Internet Connection.

Tip: If the PlayStation 5 server is still working, your router is working properly, but your PS5 still cannot connect to the internet, try restarting the device and restarting the router. This is a simple method but can be surprisingly effective in many cases, especially if your PlayStation 5 has been left in Rest Mode for an extended period of time.
How to change DNS settings on PlayStation 5
Changing DNS settings can be considered as an advanced fix, making a difference if the problem is on the side of the internet service provider (ISP) you are using.
Here's how to change DNS settings on PlayStation 5.
Step 1. Click Settings .
Step 2. Select Network .
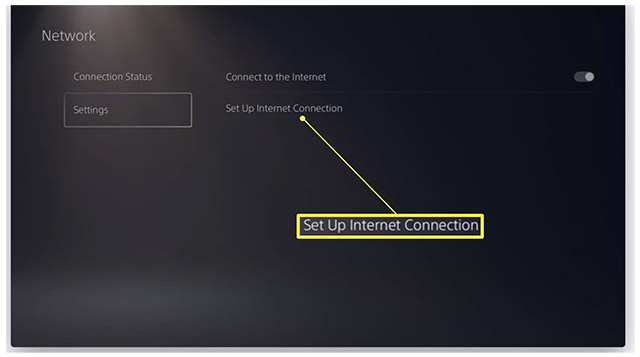
Step 3. Continue to click Settings .
Step 4. Click Set Up Internet Connection.
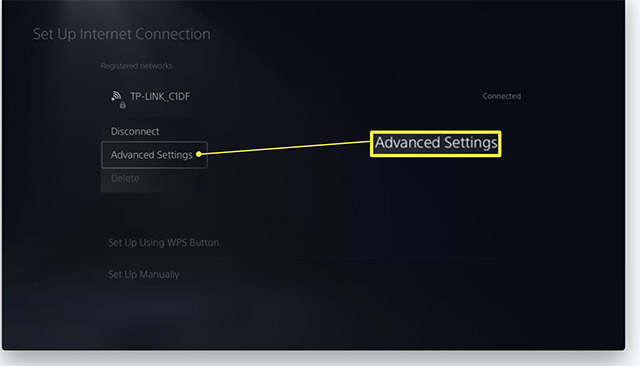
Step 5. Click the network you want to connect to.

Step 6. Click Advanced Settings.

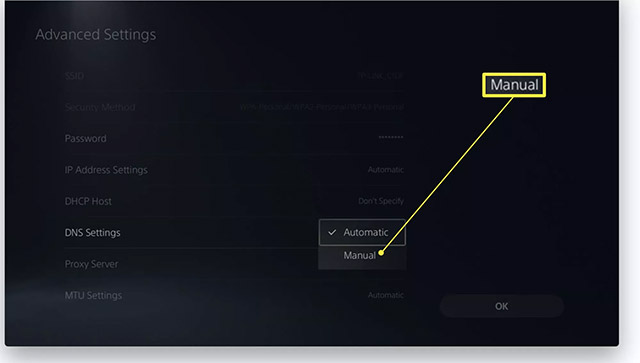
Step 7. Click on DNS Settings.

Step 8. Click Manual

Step 9. In the Primary field, enter: 8.8.8.8 ; Secondary, enter: 8.8.4.4 - to match the DNS Google usually works.
Step 10. Click OK to save all changes.
You should read it
- ★ Instructions to fix the error of not connecting to wifi on iPhone
- ★ Fixed driver disconnection when connecting to WiFi connection
- ★ WiFi error when connecting to a special network name that can be used to hack iPhone
- ★ Steps to block Windows 10 from automatically connecting to Wifi
- ★ How to fix the problem of not connecting to WiFi in Windows 10