Table of Contents
This article examines Introduction and explains the main developments, practical implications, and context readers should understand.
Introduction Overview
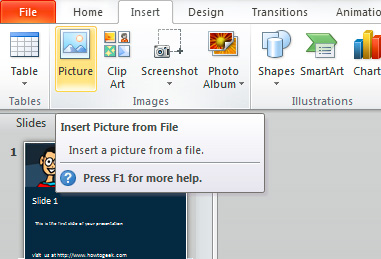
To perform the test, we can open an existing PowerPoint file or create a new one, then insert the image via the Insert menu > Picture> Insert Picture from File:
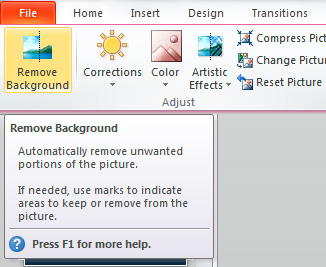
Then, open the Format Picture tab and click Remove Background:
One thing to note is that PowerPoint does a pretty good job depending on the different color areas in the image, defining the background and covering it with purple:
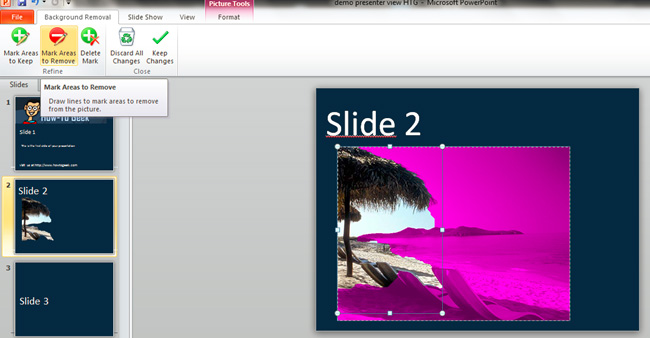
If you need a little more customization, use Mark Areas to Remove and select the rest you need to process in the image:

Once completed, click Keep changes and the entire selection will be deleted:

Then, if you want, you can also select and insert another background image:

Quite simple and easy, with just a few basic steps we have finished the job. Of course, this process can only be used with less textured images and not too complicated. Good luck!
FAQ
What does Instructions to Remove Background Images with PowerPoint 2010 explain?
This article examines Introduction and explains the main developments, practical implications, and context readers should understand.
Who is most affected by Introduction?
Introduction Overview To perform the test, we can open an existing PowerPoint file or create a new one, then insert the image via the Insert menu > Picture> Insert Picture from File: Then, open the Format Picture tab and click Remove Background: One thing to.
What are the key takeaways from this topic?
Of course, this process can only be used with less textured images and not too complicated.
Related Articles
 How to Remove Image Background in PowerPoint3 minutes read
 Instructions for Inserting Background Images into SVG Images in PowerPoint5 minutes read
 PowerPoint - Inserting Background Images into Slides Is Simple and Easy5 minutes read
 PowerPoint Background Blur: Complete Guide and Key Details6 minutes read
 Instructions to Delete Online Background Images for Free4 minutes read
 How to Remove Background Online, No Need to Install Photoshop5 minutes read
Reader Comments 0
Sign in with email or Google to join the discussion.