Use the blur feature in Photoshop
Use Blur Gallery in Photoshop to create blurring effect to create clarity of images with visual adjustments on images.
Table of Contents
Use Blur Gallery to create blurring effect to create clarity of photos with intuitive adjustments on images.
Each blurring tool provides visual adjustments on the image to apply and edit the blurring effect. With full blurring adjustment, use Bokeh customization to style the overall blurring effect. Photoshop provides full size, live preview when using the effects of Blur Gallery.
First, download Adobe Photoshop.
Select Filter > Blur Gallery and select the desired effect.
Note: With lens blur (Field blur, Iris blur, and Tilt / Shift blur) , press the M key to see the blur mask used in the image. The black area is the area that does not blur, the white area indicates the blur area in the image.
Field blur
Use Field blur to erase the slope of a blurred object by defining fuzzy points with different amount of blurring. Add axes to the image and set the amount of opening for each pin point.
The end result is the combined effect of all pin points in the image. You can add pins from outside the image to blur corners.
1. Select Filter > Blur Gallery > Field Blur
- A pinpoint blur area has been added to the image. Continue clicking on the image to add a blurring pin.
2. Click on the pin point to install and do one of the following:
- Pull the blur lever to increase or decrease the blur. You can use Blur Tools control panel to define blurring values.
- Drag the pin point to add a location.
- Press Del to delete.

A. The axis has not been installed B. The shaft has been installed
Iris blur
Use Iris blur to simulate the depth of field effect of the image on the image, regardless of the camera or lens used. You can define multiple focus points that the techniques of traditional cameras cannot be achieved.
1. Select Filter > Blur Gallery > Iris Blur.
- The default pin point of Iris blur is mounted on the image. Click on the image to add a pin point.
A. Sharp area B. Faded C. Blurred area
2. Drag the levers to move them from point to point.
3. Pull the blur lever to increase or decrease the blur. You can use the Blur Tools panel to determine the blurring value.
Tilt-Shift
Use this effect to simulate the image taken with Mr. Tilt-Shift. This special blurring effect determines the sharpness of the area, and then fades the blur at the corners. This effect can be used to simulate images of miniatures.
1. Select Filter > Blur Gallery > Tilt-shift .
Default pin point of Tilt-shift is placed on the picture. Click on the image to add a pin point.
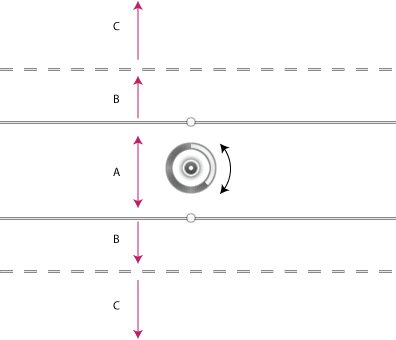
A. Sharp area B. Faded C. Blurred area
2. Drag the control to increase or decrease the blur. You can use the Blur Tool panel to determine the blur value.
3. Determine another area. Follow these steps:
- Drag the lines to move them.
- Drag the joystick and rotate.
Path blur
With this effect, you can blur along the lines. You can adjust the shape and amount of blurring. Photoshop automatically merges the effects of blurred lines on images.
Instructions:
1. Select Filter > Blur gallery > Path Blur.
2. In blur Path select Basic blur or Rear Sync Flash . Rear Sync Flash simulates the effect of the flash on the end point of the exposure.
3. Use adjustments with 4 to 8 steps of this method.
4. Install as follows:
- Customize Speed , Speed slider to determine the amount of blur lines you want to use for images. Speed settings apply to all fuzzy lines.
- In Taper , the slider to set the taper value, the value of large taper allows fading to the end.
5. If necessary, deselect Centered Blur . You can uncheck this option to apply a more direct blur.
Centered Blur helps create stable blur points by focusing the fuzzy point shape of any pixel.
6. Thanh Motion Blur Effects
- Strobe Flashes The exposure setting of the virtual flash light.
- Strobe Strength Determines the amount of fuzzy points displayed between flash exposure points. Customize the need between external lighting and virtual flash light. When adjusting Strobe Strength to 0%, no effect will appear except the continuous blur effect. On the other hand, setting to 100%, flash flashes will be set to full brightness but there is no continuous blur between flash exposure points. Moderately, Strobe Strength provides separate flashes along with continuous blurring.
7. If necessary, adjust the amount of blurring at the end.
8. Select Edit Blur Shapes to adjust the direction of the blur.
9. The blur tool's Options bar, select OK to confirm the Path Blur effect.
Your photo is more vivid with Photoshop's Path Blur Filter .
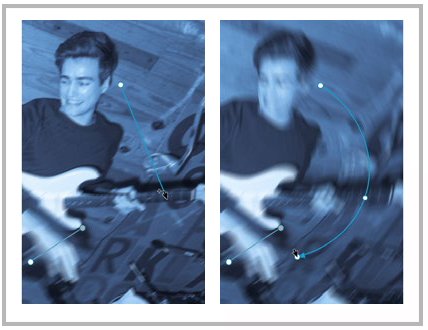
Adjustment tips on photos
You can use overlay adjustment to create an omen.
First, you define the blur line, and create the curvature. From there, create new curves in the blur line. At the same time, you can set the blur direction.
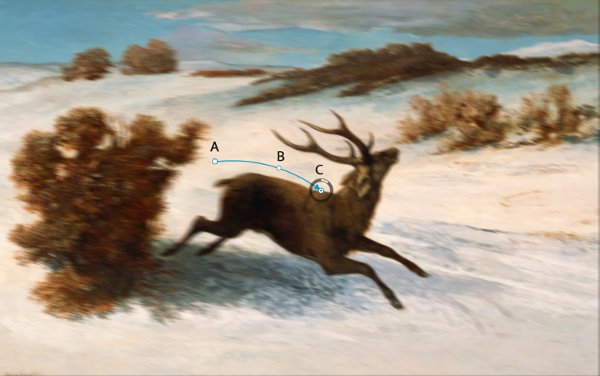
A. Starting point B. Curve point C. End point controls the amount of fuzzy control.

A. Dimensional direction
Manipulate fuzzy lines and fuzzy directions
- Select the end point.
- Double-click the end point to see the red blur point or select Edit Blur Shapes in the Blur Tools panel.
- Pull the end point to extend the blur line.
- Cmd / Ctrl and click on the end point to reduce the direction of blur to 0.
- Move the mouse pointer near the selected end to see the wheel controlling the amount of blur.
- Opt / Alt and curve point along the blur line to convert into corner points. Opt / Alt and click angle to switch back.
- Shift and drag the red blur image to move the watermarks simultaneously.
- Use Cmd / Ctrl and drag to move the blurry path.
- Use Opt / Alt + Cmd / Ctrl and drag to save the line blur.
- Delete the fuzzy point, with the end point selected, press the Delete key.
Blur the rotation
Using the rotation blur effect, you can delete and blur images around one or more points. Photoshop allows you to work with center points, blur dimensions, shapes and other settings, creating a feeling like the image is moving.

A. Original B. Rotate blur (Blur Angle: 15 ° Strobe Strength: 50%; Strobe Flashes: 2; Strobe Flash Duration: 10 °)
C. Blur the rotation (Blur Angle: 60 ° Strobe Strength: 100%; Strobe Flashes: 4; Strobe Flash Duration: 10 °)
Instructions:
1. Select Filter > Blur Gallery > Spin Blur .
2. In the Blur Tool panel, select Spin Blur , use Blur Angle to control the amount of blurring. You can enter the angle value (0 to 360 °) or adjust the slider. Also, they can determine the amount of blurring using overlay customizations.
3. In the Blur Effects panel, tab Motion Blur Effects has the following settings:
- External Strobe Strength, Strobe Flashes, Strobe Flash Duration Determine the length of flash contact flash point. Customize the length of blurring for each flash exposure point in the corner distance along the circumference.
4. On the Options tab, click OK.
Note: You can turn off the preview in the Options bar of the Blur tool. Photoshop automatically blends the effects of blurring on the image.
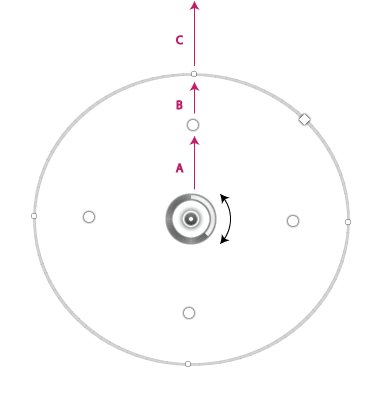
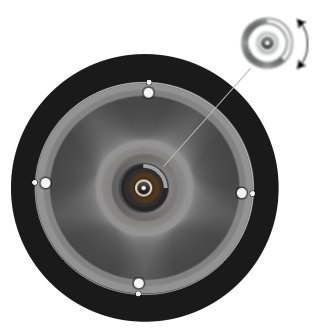
Tricks with Overlay adjustment
- Adjusting the overlay is described in the illustration below using the Spin Blur effect.
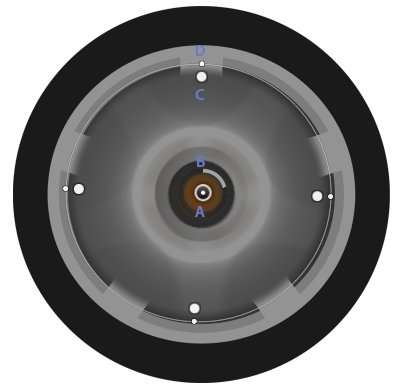
A. Rotating point B. Dimming ring C. Processing point D. Elliptical processing point
- Add blurring, click on the point you want to add to the image.
- Duplicate the blur point, use the following key combination:
- (Mac) Opt + Cmd + drag
- (Windows) Alt + Ctrl + drag
- Edit elliptical size just drag the ellipse.
- To delete the rotation blur, press the Delete button after selecting the point to delete.
- Move the center of rotation, use the following key combination:
- (Mac) Opt + pull
- (Windows) Alt + drag
Rotation repositioning is very useful when working with multiple objects in the corner.
- Hold the H button to temporarily hide the overlay panel.
The blur effect
You can enhance the overall image by controlling the appearance of negative or blurring parts. Determine parameters to ensure overall harmonic effect.
In the Blur Effects panel, define the values for each of the following customizations:
- Light Bokeh brightens the focus or blurs the areas in the image.
- Bokeh Color adds vivid colors to brighter areas without much white light.
- Light Range determines the tone of the effect settings.
Restore noise in the blur area
Sometimes, after using the Blur Gallery effect, the blur area will look unnatural and noisy. You can restore noise so that the blurred image area becomes more realistic.

Follow these steps to restore noise.
1. In the Effects panel, on the Noise tab, tick the checkbox to the upper right corner. You can uncheck the checkbox at any time to leave the noise before.
2. Select the noise type you want to apply to the blur area:
- Uniform: Filter > Noise > Add Noise > Uniform.
- Gaussians: Filter > Noise > Add Noise > Gaussians.
- Grain: Add Grain option in Camera Raw.
3. Determine the following settings:
- Amount : Connects the amount of noise with noise in a non-blurred area. Adjust the slider between 0-100%.
- Size : (Noise Grain only) Adjust the noise size.
- Roughness : (for Noise Grain) divided the particles evenly. Drag to the left (less than 50%) to create a more uniform grain. Drag to the right (over 50%) create fewer seeds.
- Color : For monochromatic noise generation, the corresponding effect is obtained by enabling the Monochromatic customization in the Add Noise box (Filter> Noise> Add Noise) to drag the slider to 0%.
- Highlight : Glossy / sharper, reducing noise in bright areas in images. Adjust the slider from 0 - 100%.
Note : When confirming the settings for the noise type, Photoshop will save it if you switch between noise types. For example, when you switch from Noise Grain to Gaussian and then back to Grain.
Apply Blur Gallery effect like Smart Filters
The blur effect in Blur Gallery supports Smart Objects and can be applied nondestructive like Smart Filter. This feature supports Smart Object video layers. To apply the Blur Gallery effect as a Smart Filter:
1. In the Layers panel, select the Smart Object layer .
2. Select Filter > Blur Gallery and select the equivalent effect.
Was this article helpful?
Your feedback helps us improve.
Related Articles
 How to mask your face in Photoshop2 minutes read
 How to create translucent text in Photoshop2 minutes read
 How to blur a photo in Photoshop2 minutes read
 How to blur the background in Photoshop7 minutes read
 How to blur photo background with Photoshop simply3 minutes read
 How to blur an image online with Photoshop Online2 minutes read
Reader Comments 0
Sign in with email or Google to join the discussion.