Table of Contents
This article explores instructions for recovering email sent on gmail iPhone / iPad with straightforward explanations and useful context. It also highlights common questions and important details to consider.
Probably many times you will accidentally write the wrong content to send messages on Gmail, or simply want to add some details before proceeding to send mail. So the undelete feature on Gmail Undo Send will become our savior in this case. The network administrator once instructed you to read how to enable Undo Send on Gmail online. So how do we want to recover the email sent on the Gmail iPhone / iPad application? Similar to the web browser Gmail version, we can also use this Undo Send feature on Gmail for iOS version. Join us to learn how to use the undelete feature on Gmail iPhone / iPad.
How to recover sent email on Gmail iPhone / iPad
Start by download the new version of the Gmail application under the link below to use the Undo Send feature.
- Download the Gmail app for iOS
Step 1
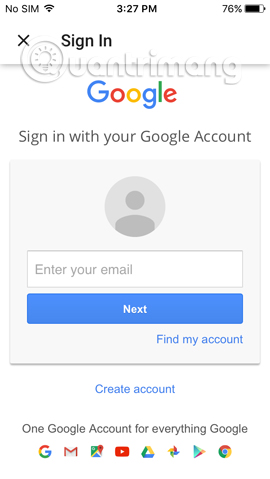
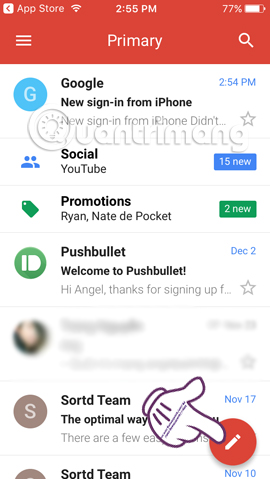
First of all we Log into Gmail personal account On the device. At the main interface of Gmail, you click The pen icon To then compose email as usual.
Step 2
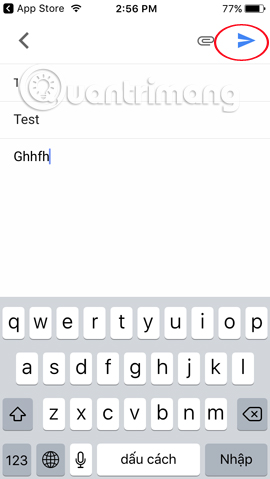
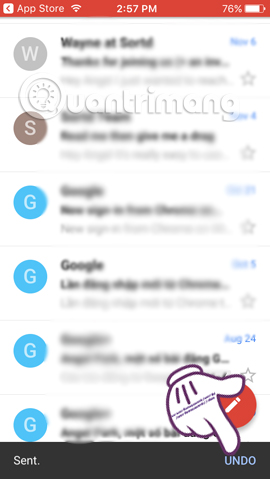
We then enter the recipient's name, the content of the message. After that, we also click The Send arrow icon In the right corner of the interface. Soon you will be taken back to the main interface on Gmail and a Gray notification bar Appears Below the interface , to the left is Sent and to the right is the Undo button.
Gmail will allow users Only 5 seconds to Undo the mailing operation on Gmail . So users need to do it quickly when Clicking the Undo button to The right of the notification bar as shown below.
Step 3
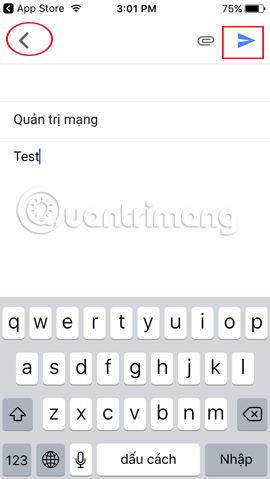
At that time, the notification bar will be changed to Undoing Mode and we will be taken to the compose interface with the content of the message written earlier. You can proceed To edit any content When needed and also press the arrow icon to proceed with sending mail.
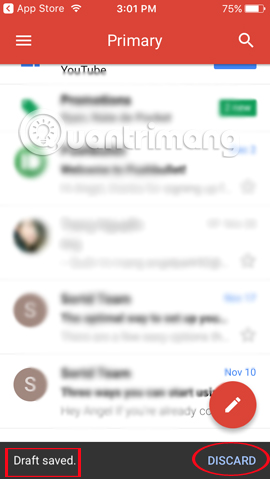
If users Does not want to edit the message content right now , click The left arrow on the same interface . The message will now be Transferred to the Draft folder (Draft saved) As a draft in Gmail.
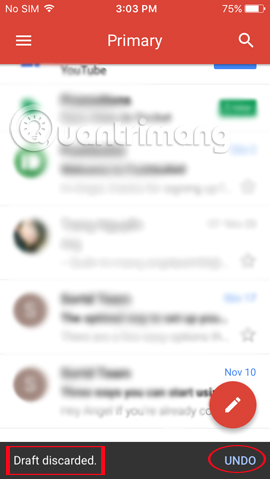
If you Do not want to save This Message In the Drafts section, click the Discard Button to the right of the gray notification bar. Now on the left side of the message bar below will switch to Draft Discarded. when needed to Restore the saved draft Press Undo On the right is done.
Above is how to use the undo send feature on Undo Send on Gmail iPhone / iPad. It is completely different from the Gmail version on the web when you have 5 to 30 seconds to retrieve sent messages and can customize the time, but the Gmail iOS version will show us exactly 5 seconds of sent emai only So users need to quickly manipulate when clicking the Undo button when the message has been sent. In addition, this Undo Send feature is always default on Gmail iOS, so even if you turn off this feature on Gmail web version, it will not affect.
Refer to the following articles
- Instructions to create Group, Email group in Gmail
- Contacts in Gmail, Android phones are deleted, this is how to recover
- Sync iPhone contacts with Gmail
I wish you all success!
FAQ
What is the main benefit of instructions for recovering email sent on gmail iPhone / iPad?
The main benefit is a clearer understanding of the topic and a practical way to apply the information covered in this guide.
What should I check before using instructions for recovering email sent on gmail iPhone / iPad?
Confirm compatibility, review the required settings, protect important data, and use the latest supported version whenever possible.
What should I do if the result is different?
Repeat the steps carefully, verify permissions and version differences, and consult the product's official support documentation for changes not shown in the article.
Related Articles
 Instructions for Adding Email Accounts to Gmail on iPhone, iPad5 minutes read
 How to Block Email Addresses on iPhone: Practical Guide9 minutes read
 How to Receive Email Notifications from Gmail on iPhone4 minutes read
 Instructions for Adding Recovery Email to Gmail3 minutes read
 How to Update the New Gmail Interface If Your Gmail Has Not Been4 minutes read
 How to Add a New Email Address to Your Gmail Contacts5 minutes read
Reader Comments 0
Sign in with email or Google to join the discussion.