Table of Contents
This guide provides a practical overview of instructions for adding email accounts to gmail on iPhone, iPad with clear explanations and useful details. It focuses on the information users are most likely to need.
When adding a third-party email account to the Gmail application, you can simultaneously manage iCloud, Outlook, Yahoo, IMAP and Gmail accounts. Besides, when you do not want to use any account, you can delete it from the app.
How Instructions for Adding Email Accounts to Gmail on iPhone, iPad Works
How to add a third-party email account to the Gmail app on iPhone
Before you get started, you need to download the latest version of Gmail for your iOS device. If you have installed the app, please update it to the latest version.
Step 1 . Open the Gmail Application on iOS devices.
Step 2. Sign in to your Gmail account (if you are not logged in).
Note: If you are using Google applications on iOS devices, Google accounts will be listed here. Just turn on the switch button next to your Google account. Select Add account / Add account. And move to step 7.
Step 3. Touch the menu in the top left corner.

Step 4. Next, click the down arrow next to your email address.

Step 5. Next, click Manage accounts Option.

Step 6 . On the Accounts / Accounts page, Click Add account / Add account .
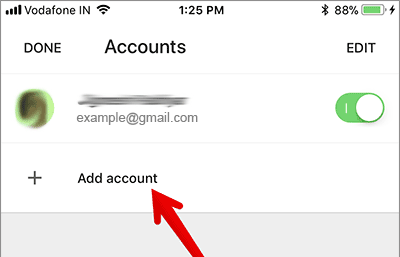
Step 7. Here, select the email service you want to add. Then sign in to your account.

If you select Other / Other, you will have to provide your username, email password, email server, port and security type, the setup steps will be a bit more complicated.
How to switch accounts in Gmail on iPhone and iPad
- Open the Gmail Application.
- Touch the Menu In the top left corner.
- To view other accounts, click the down arrow to the right of the username.
- Next, click the account you want to use.
How to delete a third-party email account into the Gmail app on iOS
- Open the Gmail Application, then open the Menu In the top left corner.
- Click the down arrow to the right of the username.
- Click Manage accounts .
- Here you can:
- Turn off the account with a switch next to the email address
- Delete an account by touching Edit , then click Remove .
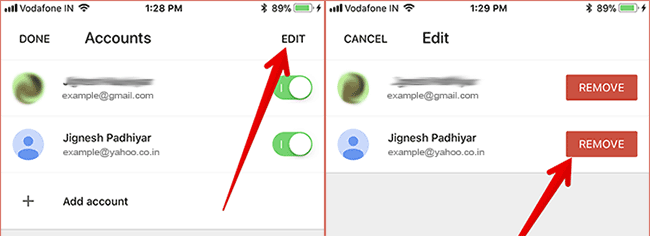
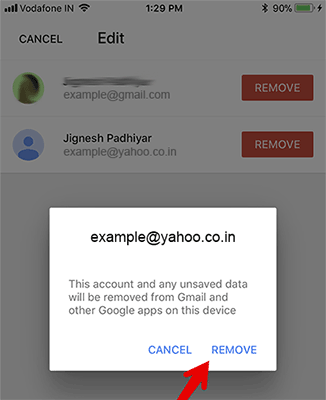
Finally, click Remove In the popup window to confirm.
So you already know how to add, use and delete other email accounts in Gmail on iPhone!
- Instructions for adding recovery email to Gmail
- Instructions for adding Gmail accounts to Outlook 2013 and 2016 using IMAP
FAQ
What is the main benefit of instructions for adding email accounts to gmail on iPhone, iPad?
The main benefit is a clearer understanding of the topic and a practical way to apply the information covered in this guide.
What should I check before using instructions for adding email accounts to gmail on iPhone, iPad?
Confirm compatibility, review the required settings, protect important data, and use the latest supported version whenever possible.
What should I do if the result is different?
Repeat the steps carefully, verify permissions and version differences, and consult the product's official support documentation for changes not shown in the article.
Related Articles
 Instructions for Adding Email Accounts to the Mail Application on4 minutes read
 Instructions for Recovering Email Sent on Gmail iPhone / iPad6 minutes read
 Instructions for Adding Recovery Email to Gmail3 minutes read
 How to Add and Delete Email Accounts on Mac, iPhone and iPad13 minutes read
 Instructions for Adding Gmail Accounts to Outlook 2013 and 20165 minutes read
 How to Block Email Addresses on iPhone: Practical Guide9 minutes read
Reader Comments 0
Sign in with email or Google to join the discussion.