Instructions for managing programs in Ubuntu via the command line
As we all know, Ubuntu has a lot of tools to support graphic delivery to install software and applications inside the system, but users have to search. However, for those who love and have spent a lot of time using this open source operating system, the process of handling and manipulating the command line simply through the keyboard will be much faster and save time. .
Table of Contents
As we all know, Ubuntu has a lot of tools to support graphic delivery to install software and applications inside the system, but users have to search. However, for those who love and have spent a lot of time using this open source operating system, the process of handling and manipulating the command line simply through the keyboard will be much faster and save time. .
APT:
In essence, Linux manages the software, applications in the system through packages - Package , and each individual part of the application contains a graphical interface, modules and a number of different support libraries. Besides, most of these programs connect several installation packages independently of each other, while others allow users to choose which packages to install or not. This information can cause confusion, confusing for users, so Linux has integrated an application package to manage them all.
Each Linux distribution version has a separate management system, for example Ubuntu is Advanced Packaging Tool . In addition, each system is supported with various features such as adding Repository , searching, installing and removing support packages by option, upgrading or updating . Basically, owls The method of using the command line is very simple, but in fact, not everyone can catch it.
APT requires a minimum level of Super - User for user accounts, as it will relate to each aspect of the system during the operation, so in Ubuntu , we will need to use the command sudo .
Search for Packages:
The basic syntax for searching software is:
apt-cache search [search term 1] [search term 2] . [search term n]
You only need to replace [search terms] with the software name, and not include the [] mark. Specific examples are as follows:

Besides, we can conduct a search by general descriptive information, or name. Some keywords will return a series of corresponding results, so use the following command to monitor:
apt-cache search [search terms] | less
You will notice the | In the middle (along with the key), this collapsed statement allows you to shorten the entire list of results displayed, then browse with the scroll keys up, down, left, right, Space, B and Enter . Press Q to exit and return to the command screen.
Assign more Repository:
On the other hand, we can find a lot of software based on online Repository . For example, Ubuntu Tweak - a utility that allows users to change 'hidden' settings in the system, stored on another repository. If you assign this repository instead of downloading and installing the file separately, the system will notify you of the changes and always update automatically. Or users can assign and change the list of repositories by editing the original file of APT:
sudo nano /etc/apt/sources.list
From Ubuntu 9.10 Karmic Koala onwards there have been many changes in this, much simpler than before:
sudo add-apt-repository [repository name]
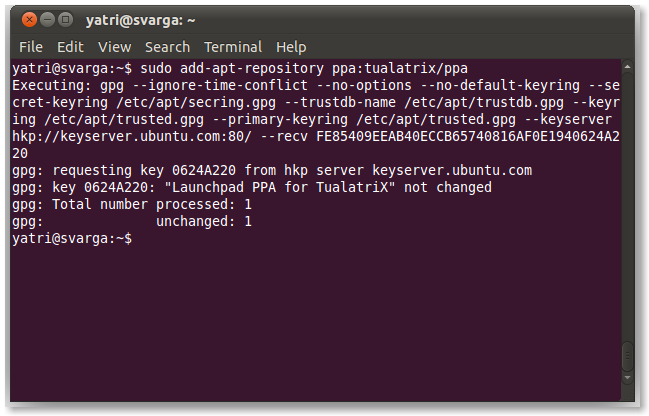
For example, when applying on Ubuntu Tweak repository, we will have to type the following command:
sudo add-apt ppa repository: tualatrix / ppa
Update source:
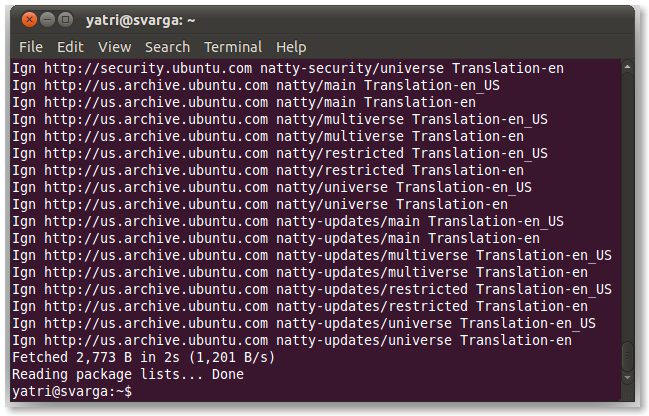
Basically, after completing the repository assignment, we must update the list of packages:
sudo apt-get update
The above command will perform the entire package update from all the repositories. And please note that it should only be applied after assigning the repository.
Setting:
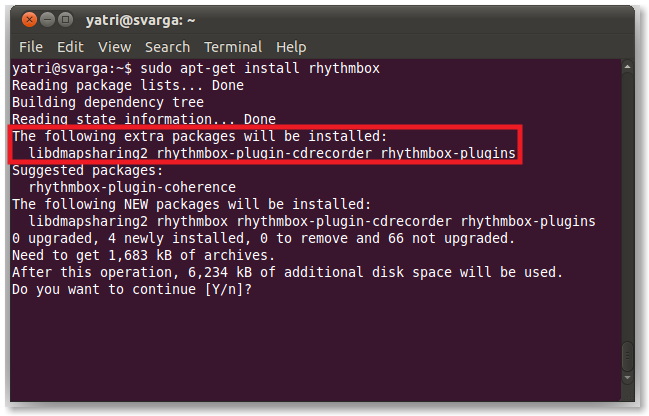
When you have finished the above basic steps, then you need to proceed with the installation based on the following command syntax:
sudo apt-get install [package name 1] [package name 2] . [package name n]
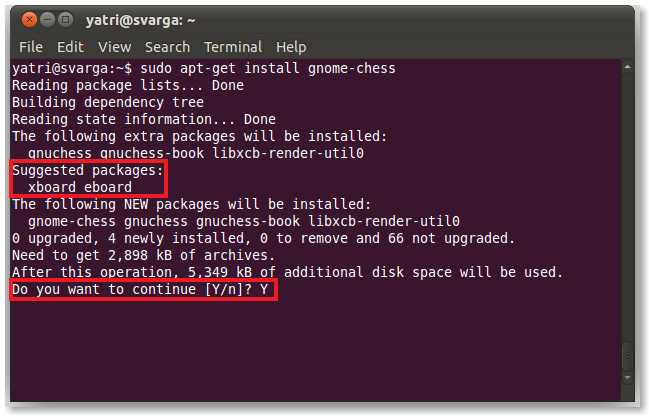
The above command will perform the download and installation of the listed packages. If this process requires additional support packages, they will also be completed. Sometimes, users will see the entire list of requests, and they just need to select the packages that are really needed. For the rest, you will see the main packages, and when installing this package, the included support components will also be installed according to:
Delete Package:
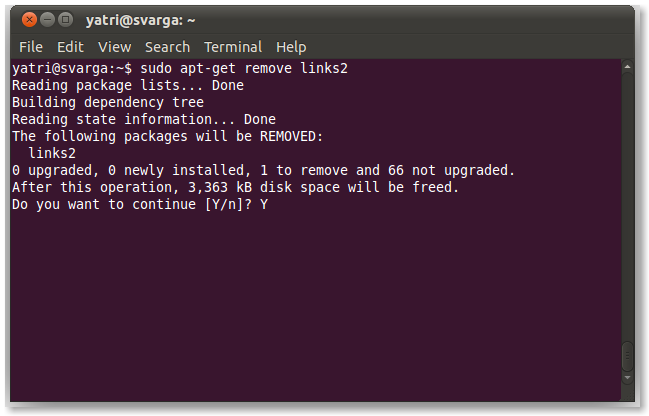
If you want to remove a certain program, please remove the installation package first:
sudo apt-get remove [package name 1] [package name 2] . [package name n]
If you want to remove the configuration, settings as well as the related directories, then add the purge option as follows:
sudo apt-get remove -purge [package name 1] [package name 2] . [package name n]
There are 2 dashes here, this parameter will be useful if the program to be removed does not work properly. This way, we will completely remove and no longer have any files of the program. Most of the time, users will have to choose between the main packages and the support included to remove them, but if you want to do it automatically, use the command:
sudo apt-get autoremove
Upgrade software:
Basically, open source software has relatively short updates and upgrades. If you want to do this, please use the following command:
sudo apt-get upgrade [package name 1] [package name 2] . [package name n]
Or apply to the entire software with the syntax:
sudo apt-get upgrade
The above command will notify you of the exact number and which package to update, then proceed with confirmation before applying. But one thing to note is that we must upgrade first, and the update process will replace the old version of the program with a newer version. The process is as follows: the same package name will be required, and simply the old version is completely replaced.
However, there are some cases that some software requires installation packages with slightly different names, so all old files are deleted and replaced with new data. And sometimes, the new version of any program requires additional support, so users should use dist-upgrade command:
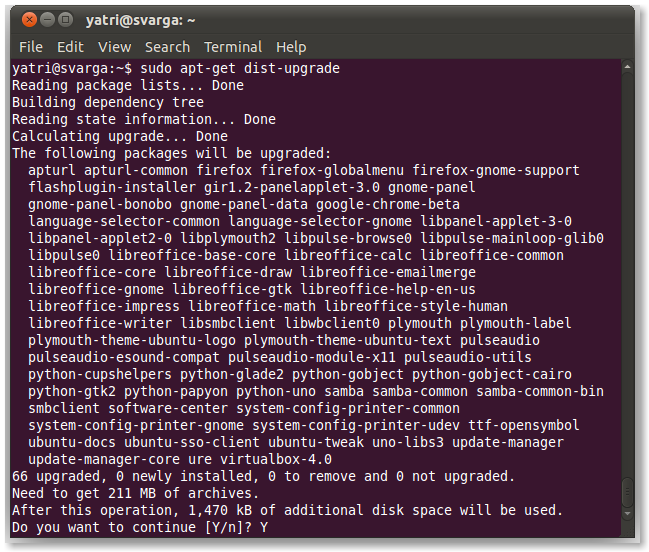
sudo apt-get dist-upgrade [package name 1] [package name 2] . [package name n]
sudo apt-get dist-upgrade
If you want to know which specific installation package details you need to upgrade, just add the -s option behind:
sudo apt-get -s upgrade
This command is really useful if you are not sure whether this update affects other components in the system.
'Clean up':
After downloading, Ubuntu will temporarily store these files in case of reuse. However, you can still remove this cache to save disk space with:
sudo apt-get clean
But if you just want to keep the latest version, use the following command:
sudo apt-get autoclean
Check which software has been installed:
If you want to check which applications are installed, we will use dpkg:
sudo dpkg -list
Browse the entire list with the command:
sudo dpkg –list | less
Search with the accompanying grep parameter:
dpkg –list | grep [search term]
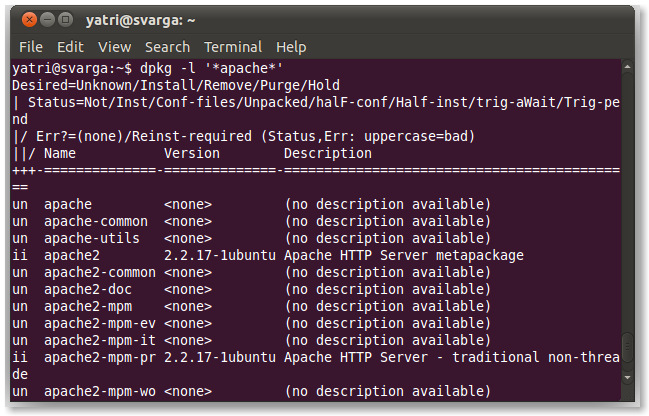
If you find any suitable results, the system will display full and clear information for users. Besides, we can use the shortened syntax below to search:
dpkg –l 'search term'
The search keyword must be enclosed in parentheses (''), can be used in lowercase or uppercase:
Here are some basic and detailed information about the process of finding, installing, upgrading or removing software in Ubuntu using the command line. We look forward to receiving your comments and sharing your experience through the comment section below. Good luck!
Was this article helpful?
Your feedback helps us improve.
Related Articles
 Forget the GUI, the Command Line is returning8 minutes read
 How to Launch Programs from Command Line on Linux8 minutes read
 How to upgrade Ubuntu from the command line6 minutes read
 How to download torrents from command line in Ubuntu7 minutes read
 Command line parameter in C4 minutes read
 How to check available memory in Ubuntu7 minutes read
Reader Comments 0
Sign in with email or Google to join the discussion.