Instructions for installing TMG 2010 RTM - Part 2
In this second part, we will show you the components in the installation process. More specifically, we will introduce the details of TMG 2010 RTM's Getting Started Wizard.
In this second part, I will show you the components of the installation process. More specifically, I will introduce the TMG 2010 RTM Getting Started Wizard details.
 Instructions for installing TMG 2010 RTM - Part 1
In Part 1 of this series, we began with the installation of TMG Enterprise Edition through a simple installation. Most of what you have seen so far is very similar to the installation experience you have with ISA Server for decades. In the second part of this series, we will show you some new components during the installation process, these are the differences, especially the new Getting Started Wizard .
Let's continue what is already in Part 1. Here, you will see the Getting Started Wizard page, the first part of this process is to configure the network settings. Click the Configure network settings link .
Notice at the bottom of the page, if you need to import your ISA 2006 configuration into TMG, then do so before running the Getting Started Wizard . We will talk about moving ISA to TMG firewall settings in another article, but in this article we will not cover this.
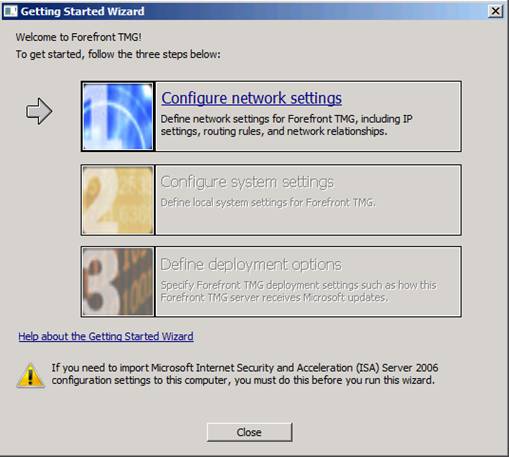
Figure 1
Also note that you can get help in the Getting Started Wizard by clicking the Help about the Getting Started Wizard link at the bottom of the page.
Click Next in the Welcome to the Network Setup Wizard page.
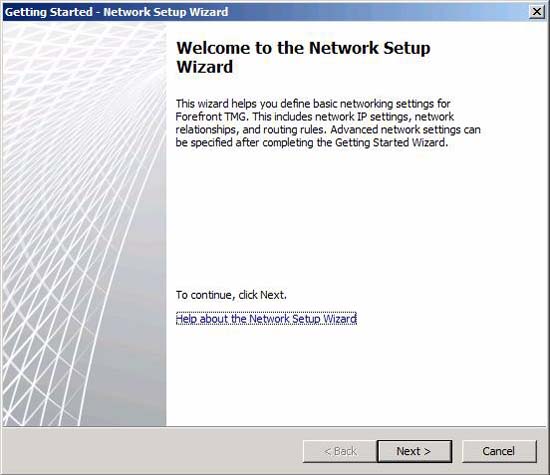
Figure 2
On the Network Template Selection page, you have four options to choose from:
- Edge Firewall - This is the default option and is used in most cases. This option will create an Internal Network and a default External Network.
- 3-Leg perimeter - This option allows you to configure a trihomed DMZ segment. The reason it doesn't appear as an option in the figure below is because it requires at least three NICs for this option to work. When selecting this option, TMG Firewall Network will be created by DMZ segment and rules for network (Network Rules) will be created automatically for you.
- Back firewall - This option is used when you have another firewall, such as another TMG firewall, another ISA firewall, or some third-party firewall. A perimeter TMG Firewall Network will be created automatically as well as a default Internal Network.
- Single network adapter - This option is used when you have a NIC installed on the TMG firewall. This is only used when the firewall is used as a Web proxy server. This configuration does not support any protocols other than HTTP, HTTPS and FTP. However, it supports remote access VPNs.
In this example, we select the Edge firewall option and click Next .

Figure 3
In the Local Area Network (LAN) Settings page , configure the IP address of the internal interface. If you have configured the interface, you will see the settings here and can change the settings on this page. In the Specify additional network topology routes section , you can click the Add button and add routing tables.
After configuring the internal interface settings, click Next .
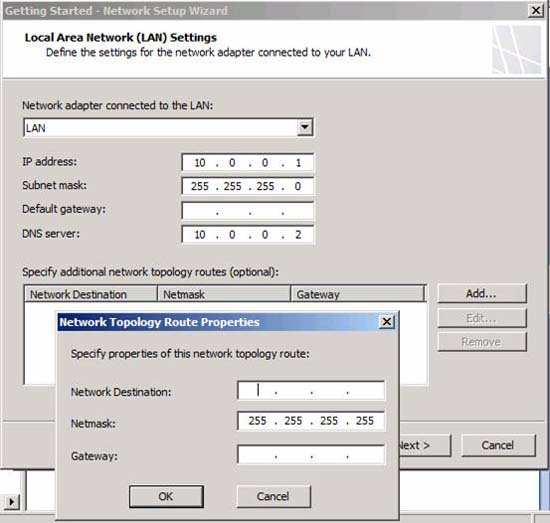
Figure 4
On the Internet Settings page, configure the IP address settings on the external interface. Note that you have the option to set static entries or use DHCP. Select the appropriate NIC and then select the settings to work. Click Next .
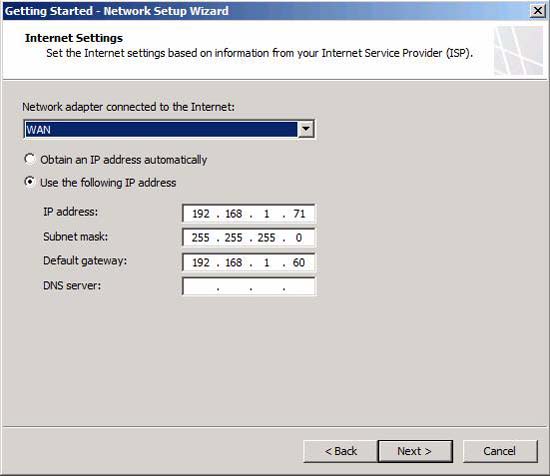
Figure 5
That's all in the Network Setup Wizard . Review your settings on the Completing the Network Setup Wizard page and click Finish .
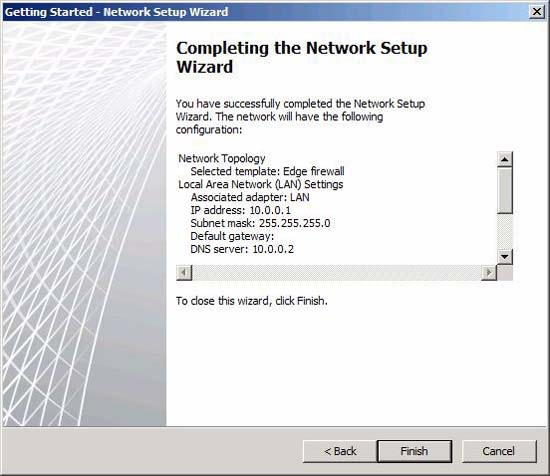
Figure 6
The next step is the Configure system settings wizard. Click the Configure system settings link to start executing.

Figure 7
Click Next on the Welcome to the System Configuration Wizard page.
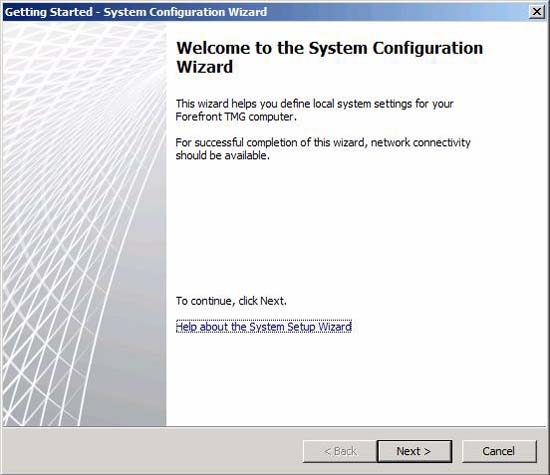
Figure 8
Some configuration options are available on the Host Identification page:
- Computer name - With this option, you can click the Change button to change the computer name. This operation will require restarting the computer.
- Member of - With this option, you can create a TMG firewall that is a member of Windows domain or Workgroup . In most cases, the TMG firewall needs to be created as a member of the domain so that you have the highest level of security for the firewall. Also need to restart the computer after changing domain members or workgroup.
- Primary DNS Suffix - With this option, you can change the primary DNS suffix used by the TMG firewall. This suffix is used by the firewall to append a suffix to the name tag queries that the firewall needs to execute. If the TMG firewall is a domain member, it will automatically select the Active Directory domain name as the primary DNS suffix.
At the bottom of the page, you will see the full hostname of the TMG firewall after making the changes here. In general, we should understand these configuration tasks before starting to install the TMG firewall. However, if you forget, you can still retake these tasks using the System Configuration Wizard.
Click Next .
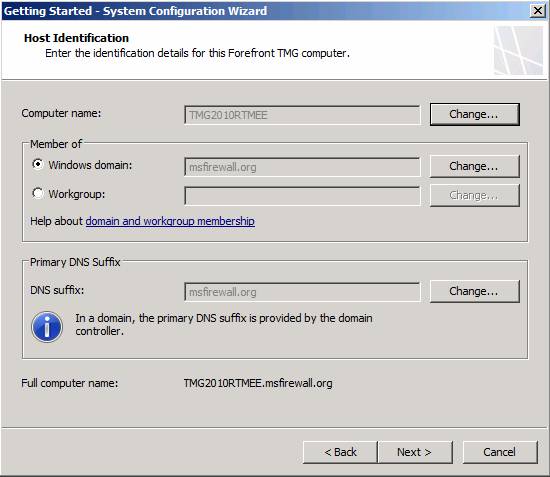
Figure 9
It was a fairly short wizard. Read the information on the Completing the System Configuration Wizard page to confirm that it is correct, then click Finish . Note that if you change the domain, workgroup or hostname, the computer will restart before you move on to the next steps.
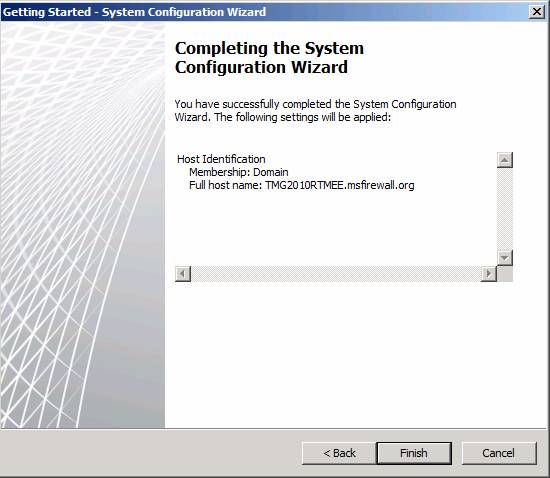
Figure 10
The third step of the Getting Started Wizard is to define deployment options. Click the link to Define deployment options.
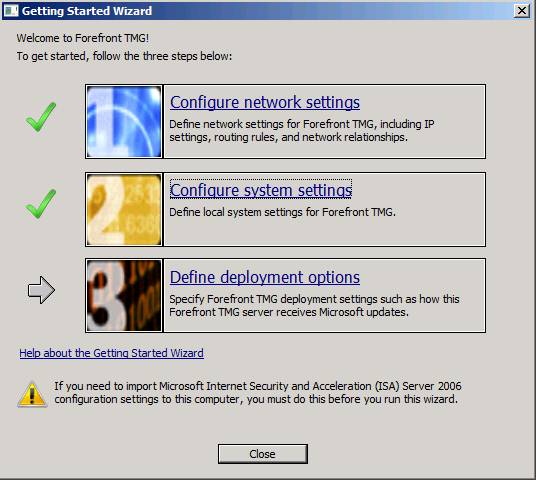
Figure 11
Click Next on the Welcome to the Deployment Wizard link.
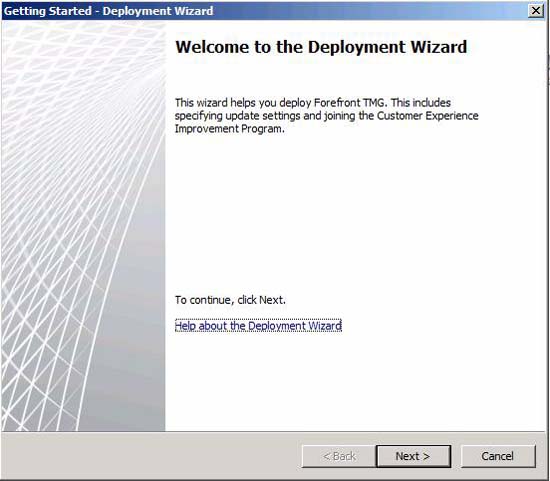
Figure 12
The first thing that the Deployment Wizard wants you to do is to select the Microsoft Update Setup options . Here you have three choices:
- Use the Microsoft Update service to check for updates (recommended) - This option is optional to use Microsoft's upgrade service on the Internet to perform a firewall upgrade as well as NIS signatures and anti-malware. This is the best option for most cases.
- I do not want to use the Microsoft Update service - Use this option if your company has the appropriate policy in place where you are not supposed to use Microsoft Update to automate the upgrade for the firewall. You can use this option if you are worried about installing updates and validating them before installing them on firewalls or tricking areas.
Note that if the computer is not connected to the Internet, this step may take longer, as the firewall will try many attempts to connect to the Internet Microsoft Update Services. This may sound redundant because your firewall can connect to the Internet, but if you don't configure the TMG firewall to use an external DNS server, the TMG firewall has no way of identifying the names of the Microsoft Update Internet server.
You can configure the internal interface to use the internal DNS server, but the TMG firewall will still be unable to use the DNS server because you do not have the appropriate Access Rule to allow access from DNS servers. inside to external DNS servers. You need to resolve the Internet host name, but you will still not be able to get the configuration interface to make those DNS servers available.
Maybe in the future, in an additional service pack, we will create a temporary DNS rule during the installation process to allow internal DNS servers to resolve the public host name problem. Until then, we'll just have to wait a bit at this stage of installation.
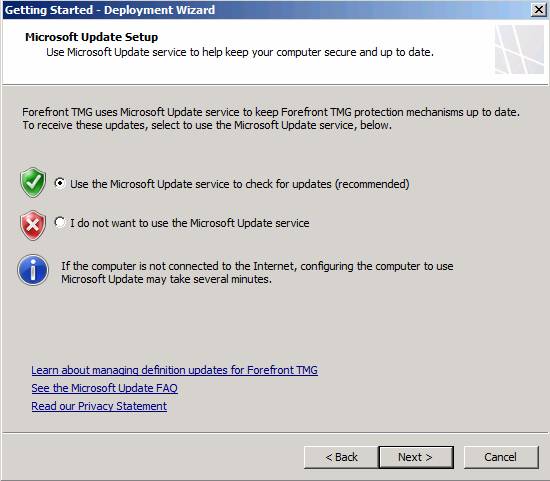
Figure 13
On the Forefront TMG Protection Features Settings page you have several options:
- Network Inspection System (NIS) - At this option, you can enable additional registration or not activate it. No need to register NIS signatures - all copies of the TMG firewall allow you to use NIS.
- Web Protection - In this option, you can activate the evaluation registration and enable web protection. You can also enter your registration details if you have already registered this feature. At this point, detailed information about how to register for web protection updates is still unclear.
- Enable Malware Inspection - If you enable this option, the TMG firewall will be able to check Web connections (HTTP / HTTPS) for malware issues. Note that only Web connections are inspected - this feature does not inspect other protocols such as NNTP, SSH, .
- Enable URL Filtering - This option will enable the TMG firewall's URL Filtering features and allow you to configure sites or site categories you want to block access, using Access Rules.
Notice how the URL Filtering service works. The TMG firewall does not download the entire database, but instead sends the URL string to the Microsoft Reputation Service via an SSL connection to receive the category results and uses that result to evaluate the connection request.
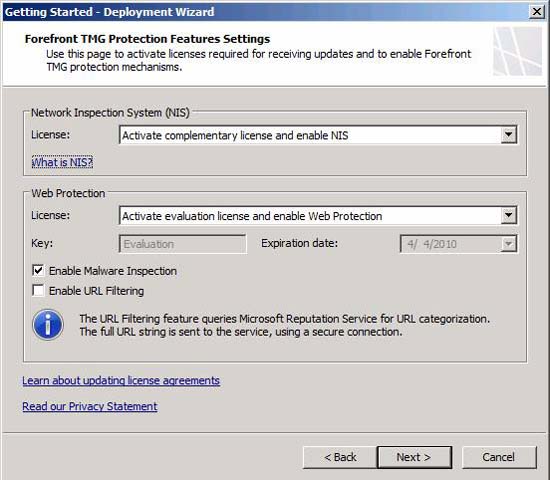
Figure 14
On the NIS Signature Update Settings page , you also have several options:
- Select automatic definition update action - You can check and install these options, either check and download, or not check. In most cases, you will prefer to automatically check for NIS signatures and install them automatically.
- Automatic polling frequency - Microsoft has some research to put signatures on your network. To take advantage of this problem, you can explore Microsoft servers regularly to get the latest protection. The default time interval is 15 minutes, but you can change this value if you want.
- Trigger an alert if không có cập nhật được cài đặt ở sau khi số ngày - This setting allows you to receive a warning if updates do not occur after a certain number of days.
- New Signature Set Configuration - This option allows you to set a default response policy for new signatures. The default setting is usually the best setting, which is Microsoft default policy (recommended) .
Click Next .
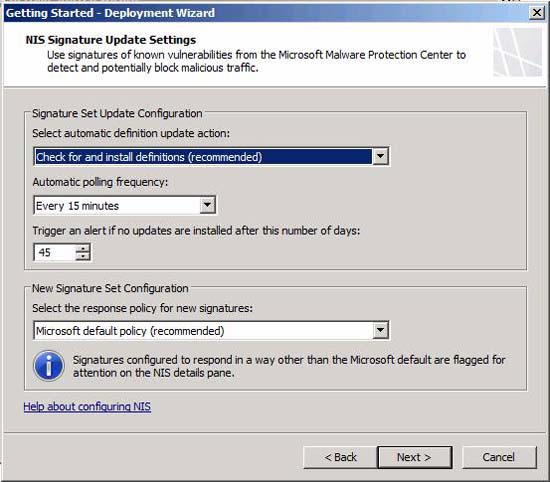
Figure 15
On the Customer Feedback page, you have an option to join the Microsoft Customer Experience Improvement Program. You should practice in this program. It allows Microsoft to find out how you use the TMG firewall and help them focus on making their products better based on how users use them. In this example, we select the option Yes, I am willing to participate in anonymously in the Customer Experience Improvement Program and click Next .
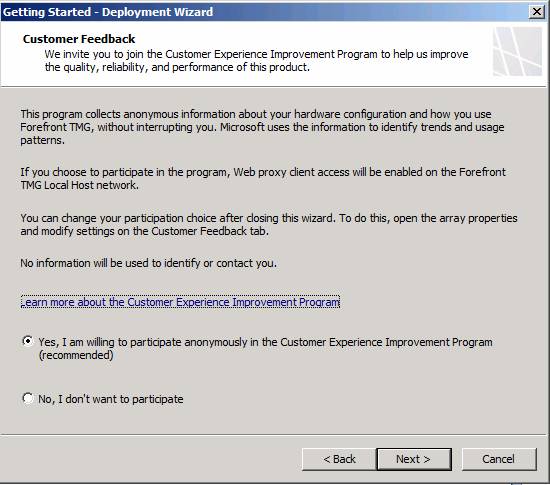
Figure 16
In the Microsoft Telemetry Reporting Service page , you can help Microsoft and other TMG firewall manufacturers by providing information about malware and other attacks on your network with Microsoft. Unless you have a reason for not doing this, you should choose the Advanced option. This will make the anti-malware component more effective and as a result, the network will be more secure. However, when selecting the advanced option, in addition to adding basic information being sent to Microsoft, information about malicious attacks will be sent in more detail, such as saved templates. full amount and string of URLs. This additional information can give Microsoft lots of help in analyzing and eliminating attacks.
In this example we will select the Advanced option and click Next .
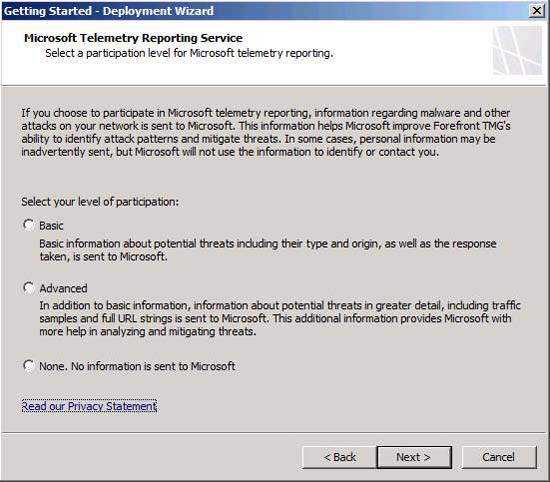
Figure 17
It is a fairly long wizard! On the Completing the Deployment Wizard page, read the information about the options that you made to confirm that they are correct, and then click Finish .

Figure 18
Here, everything seemed to end. As mentioned earlier, we suspect the problem is that the TMG firewall cannot resolve the host names it needs to download anti-malware and NIS services updates. This is a matter of fact that you do not want to address an external DNS server on any TMG firewall NIC - but during installation, this issue may be required. However, it can also cause problems with Active Directory communications. The problem can be solved later by creating an Access Rule to allow internal DNS servers to access the Internet, the type of access depends on how you configure the internal DNS servers to identify host names - yes can be through recursion or transducer.
Here we have done with the Getting Started Wizard . You will receive a message at the end of the page that You have successfully completed all the steps of the Getting Started Wizard. Bạn đang hiện thời để xác định Web Access policy cho bạn organization . For ISA firewall administrators, the Web Access Policy feature may be a bit confusing - because this policy creates Access Rules and groups them into a Web Access Policy.
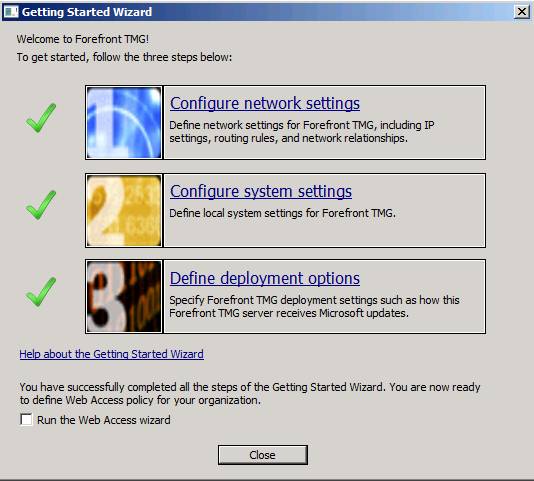
Figure 19
So how did we do it? We expect that after installing the firewall, the Alerts tab will notify us that the services have been started - there is plenty of time for us to do with the following configuration. What is the result?
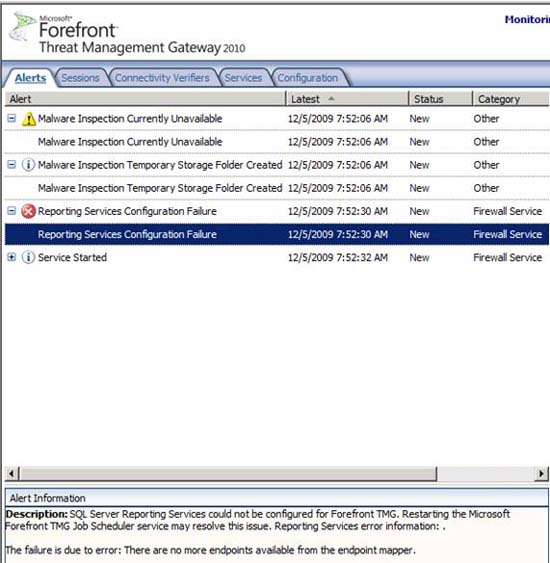
Figure 20
What shows up? There is no endpoint mapper, and we have not tried to map an endpoint and what will happen if we do, we will not know which endpoint will be delivered. I see things sometimes related to name resolution issues, so maybe the DNS release I mentioned above may be related to this. The malware inspection issue is mostly due to DNS issues, so don't worry about that. Let's restart the firewall and see if anything happens.
The results are a little better. The WFP Filter Conflict Detected warning is a 'normal' warning, which is a false warning that you can ignore. Not sure why the Malware Inspection Currently Unavailable alert is here, but it may be because the computer is not running long enough to download updates.
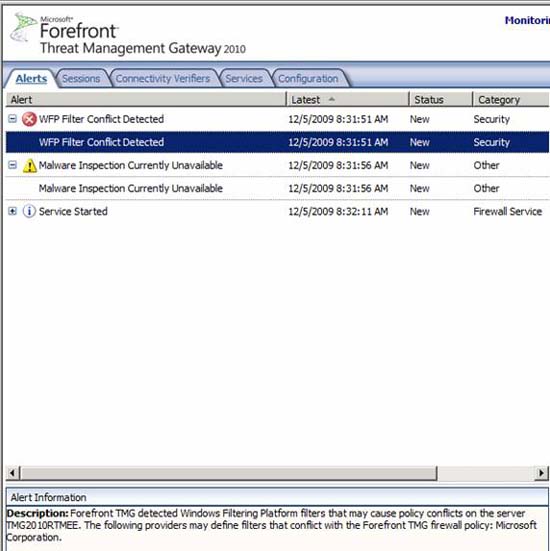
Figure 21
Conclude
In this series of two articles, I showed you the experience of installing the TMG firewall. In Part 1 we saw what appeared during the installation process that is very similar to the ISA firewall installation. However, in Part 2, I showed you the Getting Started Wizard , which is all new to the TMG firewall, which includes three small wizards inside the Getting Started Wizard. and successfully installed the TMG firewall.
Was this article helpful?
Your feedback helps us improve.
Related Articles
 Installing and configuring Exchange 2007 from the command line utility - Part 111 minutes read
 Instructions for checking and installing more RAM for laptops as quickly as possible10 minutes read
 Instructions for installing WordPress on localhost - Part 22 minutes read
 Installing Exchange 2007 (Part I)9 minutes read
 Instructions for registering and installing Dropbox3 minutes read
 Installing, configuring, and testing Exchange 2007 CCR on Mailbox Server (Part 2)8 minutes read
Reader Comments 0
Sign in with email or Google to join the discussion.