Install and configure Windows Server Backup for Hyper-V
In this article, I will show you how to configure WSB to help Hyper-V VSS writer.
In this article, I will show you how to configure WSB to help Hyper-V VSS writer.
Introduce
Windows Server 2008 introduces an included backup solution called Windows Server Backup (WSB). Server Backup uses Volume Shadow Copy Service (VSS) to backup and restore your server. WSB provides backup and restore features of a normal backup program: operating system, partition, folders and files. In addition, WSB also supports backup and restore at the application level if the application provides a 'writer' that is compatible with VSS. In this article, I will show you how to configure WSB to support Hyper-V VSS writer.
Windows Server Backup
Windows Server Backup is a 'feature' in Windows Server 2008, but it is not installed by default. To install WSB so you can configure it to support Hyper-V, follow the steps below:
- Launch Server Manager
- Select the Features button
- Click the Add Features option , the Add Features wizard will launch (Figure 1).

Figure 1
- Open the Windows Server Backup Features button (Figure 2) and select Windows Server Backup . Select Command-Line tools.
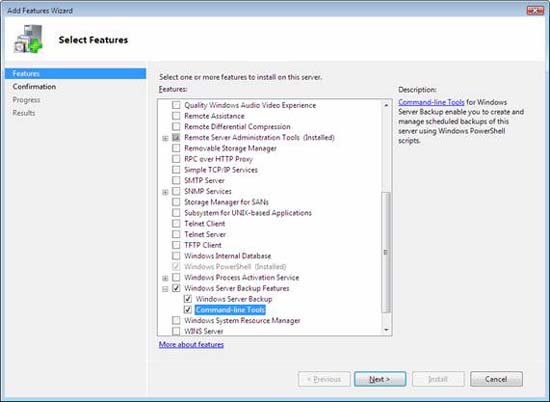
Figure 2
- Click Next
- Click Install to begin the installation process
Configuration for Hyper-V
Windows Server Backup can support extra VSS writers, but it doesn't have the ability to import or register the VSS writer, you have to do it manually. When installing Windows Server Backup, VSS writers will not be registered. To add support for the Hyper-V VSS writer, you must create the Windows Server Backup registry locations and register the GUID for the applications VSS writer. This can be done using REGEDIT or .REG file.
Search for the Hyper-V VSS Writer GUID
Before you can add the VSS writer to Windows Server Backup, you need to know about Writer ID GUID. You can use the VSSADMIN tool to list all the VSS writers currently installed on your computer and see their GUIDs. To use VSSADMIN to find a GUID, follow the steps below:
- Launch the command prompt as an administrator
- At the command prompt, type the following line of text: VSSADMIN List Writers> C: TEMPVSSWriters.txt
- After a few seconds, the list of all installed VSS writers and registered with the VSS service will be written to the file C: TEMPVSSWRITERS.TXT.
- Open the file C: TEMPVSSWRITERS.TXT with notepad and find the Microsoft Hyper-V VSS Writer section
- In the Writer name section, you will see the Writer ID GUID { 66841CD4-6DED-4F4B-8F17-FD23F8DDC3DE}
Create changes using REGEDIT
To make changes using REGEDIT, follow the steps below:
- Launch REGEDIT (Figure 3)
- Scroll to the key below
HKEY_LOCAL_MACHINESOFTWAREMicrosoftWindows NTCurrentVersionWindowsServerBackup - Create a key named WindowsServerBackup
HKEY_LOCAL_MACHINESOFTWAREMicrosoftWindows NTCurrentVersionWindowsServerBackup - Select the Windows ServerBackup key and create a key in it called Application Support
HKEY_LOCAL_MACHINESOFTWAREMicrosoftWindows NTCurrentVersionWindowsServerBackupApplication Support - Now create a key located in Application Support for GUID 66841CD4-6DED-4F4B-8F17-FD23F8DDC3DE
HKEY_LOCAL_MACHINESOFTWAREMicrosoftWindows NTCurrentVersionWindowsServerBackupApplication Support66841CD4-6DED-4F4B-8F17-FD23F8DDC3DE - In the Hyper-V VSS GUID lock, create a value of REG_SZ called 'Application Identifier' and set the value to 'Hyper-V VSS Writer'

Figure 3
Create changes with the .REG file
Using REGEDIT is also a fairly easy method, as if you need to make this change on multiple servers or want to minimize errors, create a .REG file to import. Creating a .REG file requires a standard ASCI text editor like Notepad. You can create it manually or you can make changes on a machine using REGEDIT then export the registry key and it will create a .REG file for you.
The .REG file should contain the registry changes that you need to create. These changes include both the key and the required value that has been created and changed. In this solution, you need to create three registry keys and one value. The following paragraph shows the required .REG file containing the changed configuration to support Hyper-V VSS writer.
Windows Registry Editor Version 5.00
[HKEY_LOCAL_MACHINESOFTWAREMicrosoftWindows NTCurrentVersionWindowsServerBackup]
[HKEY_LOCAL_MACHINESOFTWAREMicrosoftWindows NTCurrentVersionWindowsServerBackupApplication Support]
[HKEY_LOCAL_MACHINESOFTWAREMicrosoftWindows NTCurrentVersionWindowsServerBackupApplication Support {66841CD4-6DED-4F4B-8F17-FD23F8DDC3DE}] "Application Identifier" = "Hyper-V VSS Writer"
Copy these lines and paste them into Notepad, then save to a file called WSB-Hyper-V.REG .
Once you have the .REG file, you can copy this file to another Hyper-V server, install Windows Server Backup and then right-click the WSB-Hyper-V.REG file and select Merge (Figure 4).

Figure 4
Another method for creating a .REG file is to export information from a configured server. Create registry entries using the REGEDIT method, when you have created entries, right-click the WindowsServerBackup key and select Export (Figure 5).

Figure 5
Use the WSB-Hyper-V.REG name in the Export Registry File dialog box and click Save (Figure 6).
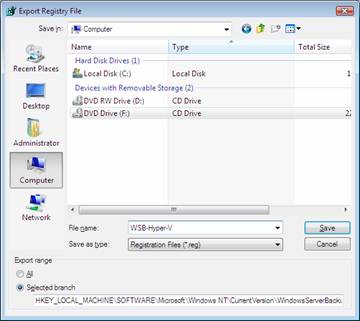
Figure 6
Notes about Hyper-V Backup
Now that you have configured Windows Server Backup to be able to support Hyper-V, there are a number of things you need to know when creating backups of Hyper-V hosts and virtual machines.
- When backing up the Host, you must backup your C: drive at least to get Hyper-V configuration information.
- You cannot backup specific virtual machines, you can only backup partitions.
- If you want to ensure that you have backed up certain virtual machines, then you must backup each partition including the pieces of virtual machines. If you keep the configuration files in the default location on C drive, but save the virtual machine files on another drive, then you must backup both partitions to be able to restore the virtual machines.
- When recovering, you must select Application based 'restore'.
- Restoring virtual machines is an 'all' or 'nothing' method. You cannot restore files inside a virtual machine but must restore the entire virtual machine. Once the virtual machine is restored, you can assign it and copy the files out.
Conclude
Windows Server Backup serves as a solution for backing up and restoring virtual machines and host Hyper-V hosts. Although it is not installed by default, installing this component is easy and does not need to restart the system. By default, Windows Server backup does not support Hyper-V VSS but can be configured to support Hyper-V by registering Hyper-V VSS writers in the registry. Registration can be done manually with the REGEDIT command or can be done automatically by importing a .REG file. Using the .REG file is the recommended solution to configure Hyper-V VSS writer's support to avoid errors and the process is done automatically.
Was this article helpful?
Your feedback helps us improve.
Related Articles
 Install and configure Hyper-V Tools for remote management16 minutes read
 How to install Hyper-V on Windows Server 20195 minutes read
 Install Hyper-V Virtualization on Windows Server 2008 R22 minutes read
 How to install Hyper-V in Windows Server 20122 minutes read
 How to install and configure backups in Windows Server 20123 minutes read
 Install Windows Hyper-V Server 200818 minutes read
Reader Comments 0
Sign in with email or Google to join the discussion.