Install Windows Hyper-V Server 2008
In this article, I will show you how to install Microsoft Hyper-V Server 2008 and use the HVConfig command-line tool.
Janique Carbone
In this article, I will show you how to install Microsoft Hyper-V Server 2008 and use the HVConfig command-line tool.
Install Microsoft Hyper-V Server 2008
Microsoft Hyper-V Server (HVS) 2008 is a hypervisor solution based on Windows Server 2008 and Hyper-V. Unlike Windows Server 2008, products that support the installation of various roles, Microsoft Hyper-V Server 2008 is a standalone virtualization software and does not support any additional roles.
Installing Microsoft Hyper-V Server 2008 is completely simple for you if you are the one who installed Windows Server 2008 because it also uses the same installation wizard. Here are the steps you need to follow to install Microsoft Hyper-V Server 2008.
- Insert the Microsoft Hyper-V Server 2008 installation CD into your server drive.
- Turn on the server to boot from CD
- Select the appropriate language in the main settings dialog (Figure 1).
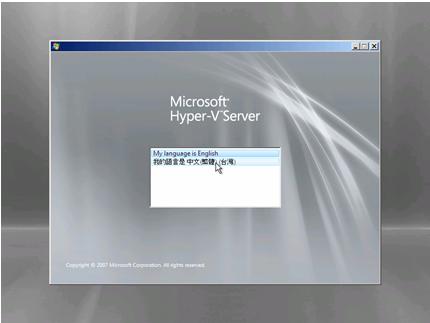
Figure 1: Microsoft Hyper-V Server 2008 main installation screen
- Select the installation language, the current time and format, the keyboard language and output, and then click Next (see Figure 2).

Figure 2: Microsoft Hyper-V Server 2008 installation dialog box
- To start the installation process, click Install Now (Figure 3).
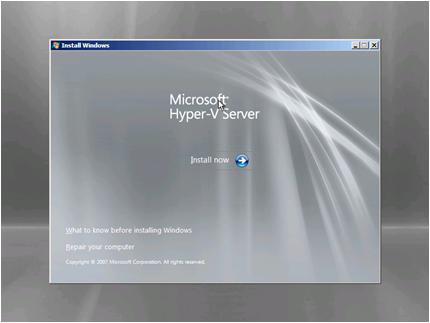
Figure 3: Microsoft Hyper-V Server 2008 installation option
- Review the registration items, select I accept the license terms if you agree with them, then click Next (Figure 4).
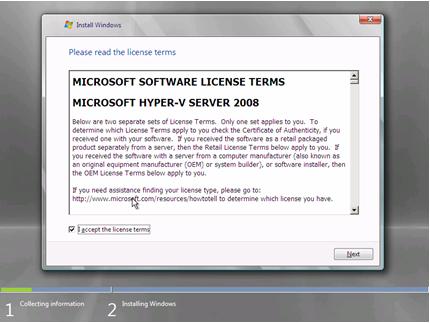
Figure 4: Microsoft Hyper-V Server 2008 subscription options
- Click the Custom installation button (Figure 5). The Upgrade option will be disabled because Microsoft Hyper-V Server 2008 does not support the upgrade from another Windows version.
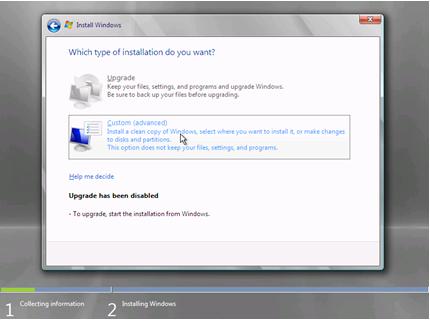
Figure 5: Select the installation type for Microsoft Hyper-V Server 2008
- Select the disk and partition to install Microsoft Hyper-V Server 2008, and then click Next to continue (Figure 6).
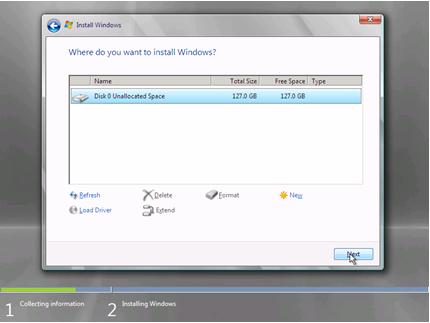
Figure 6: Select Microsoft Hyper-V Server 2008 hard drive
- The installation process is automatically started (Figure 7).

Figure 7: Initial installation screen of Microsoft Hyper-V Server 2008
- After the installation process is completed, a login screen will be displayed (Figure 8).
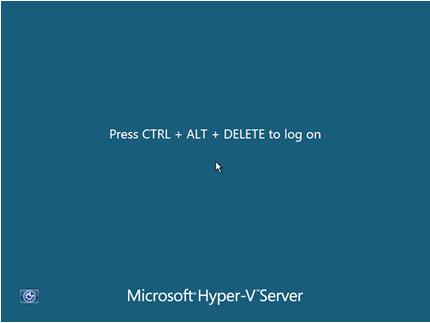
Figure 8: Microsoft Hyper-V Server 2008 login screen
When you log in for the first time, you may need to change the local administrator password. After logging in, a command-line configuration tool will automatically launch to allow you to change the default system settings.
Microsoft Hyper-V Server 2008 configuration
Microsoft Hyper-V Server has a command-line utility, this configuration tool called HVConfig.cmd is used to allow configuration of connections and basic features required when used in a managed environment. physical. HVConfig.cmd will run a file using Visual Basic Script called HVConfig.vbs to provide all the functions. HVConfig.cmd will launch each time you log in to the system to support the configuration of the following parameters:
- Domain or Workgroup Membership
- Computer name
- Network Settings
- Local Administrators
- Windows Update Settings
- Download and Install Windows updates
- Remote Desktop
- Regional and Language Options
- Date and Time
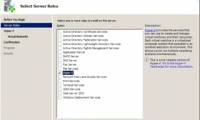
As shown in Figure 9, the HVConfig menu also allows you to perform the following actions:
- Log Off User
- Restart Server
- Shut Down Server
Exit the command line.
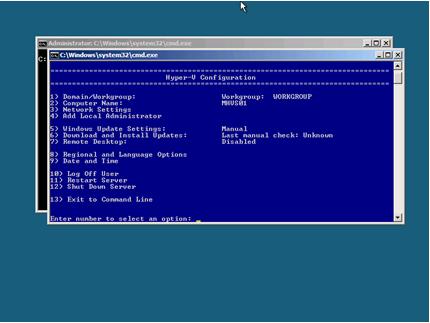
Figure 9: HVConfig's menu in Microsoft Hyper-V Server 2008
Domain or Workgroup configuration
The first option allows you to configure Microsoft Hyper-V Server 2008 to be in a domain or a workgroup. By default, the server will be located in the workgroup named WORKGROUP.
Follow the steps below to join the domain:
- At the Enter command number to Select an Option , type a value of 1 to select the domain or workgroup configuration option, then press Enter .
- Type D to select the domain member configuration option, then press Enter .
- Type in the domain first, then press Enter.
- Type in the domain account with the terms to add the computer to the domain, then press Enter.
- To join a domain, the configuration tool will launch the Netdom.exe utility in a new window, and you will be prompted for a password related to the user in the domain ( Type Mật khẩu này với Người dùng Domain ). Type in the password and press Enter .
- In the domain that you have successfully joined, you will be prompted to restart your computer so that the changes you have made are valid ( You must restart your computer to apply these changes, Restart now? ), Click Yes. to accept and restart the system.
Configure computer name
The second option allows you to change the Microsoft Hyper-V Server 2008 computer name. The current computer name will be displayed on the screen.
Follow the steps below to change the hostname:
- At the Enter Number to Select an Option prompt, type option 2 to change the hostname, then press Enter .
- Type in the host name you want to put, then press Enter .
- With a computer in workgroup, the new name of the machine will be applied and if successful, you will see a prompt called Computer to restart in order to complete the operation. The command completed successfully. Then click Ok to restart the computer.
- For a machine that has successfully entered a domain, you will see a prompt to enter the domain account permissions with internal access rights to change the computer name. Type in your domain account, then press Enter . When prompted, type your password, then press Enter .
- When asked You must restart your computer to apply these changes, Restart now? , click Yes to accept and restart the computer.
Configure network settings
The third option allows you to change network configuration settings. You can configure IP addresses for DHCP or static assignments, DNS servers for name issues, or wipe DNS server settings.
Follow the steps below to configure the network adapter IP address:
- At the Enter Number to Select an Option prompt, enter value 3 to select the option to change network settings and then press Enter .
- Select the network adapter from the list by typing the index number and then press Enter .
- Configure the current network adapter including the IP address, subnet mask, DHCP status, default gateway, as well as priority and secondary DNS servers. You can choose one of four options:
i. Configure the IP address
ii. Configure the DNS servers
iii. Xóa sạch giao dịch hiện thời DNS
iv. Hãy lại vào bảng đơn chính - Type 1 to configure the IP address for the network adapter, then press Enter .
- You will be prompted to specify a DHCP or static IP address. Type D to choose a DHCP address or S to specify a static IP address. If you select option D, the server receives an IP address, subnet mask, and gateway from the DHCP server. If you select the S option, then you will be prompted for a static address to assign to the network adapter. Type in the static IP address static address as a normal IP address, then press Enter . Next, type in the subnet mask then press Enter . Finally, type in the default gateway and press Enter .
Follow the steps below to configure IP addresses for DNS servers:
- Type in 2 to configure the IP addresses of the DNS server, then press Enter .
- Type in the IP address section of the preferred DNS server name, then press Enter .
- Click OK when the DNS server is configured and a dialog box starts with Preferred DNS server set .
- Type in the IP address section of the DNS server name, then press Enter .
- Click OK when the new DNS server is configured and the dialog box displays starting with Alternate DNS server set .
Follow the steps below to clear the current DNS server entries:
- Type 3 to delete the current DNS server entries, then press Enter .
- Click OK when the dialog box asks you with the following message: DNS servers removed. DNS servers sẽ được tự động được xóa từ mạng.
After all of the above changes are completed, you can return to the main menu by typing 4, then press Enter.
Configuring Local Administrator
Option 4 allows you to add another domain or internal user to the local admin group on the Hyper-V Server 2008 host. The Hyper-V Server 2008 host needs to have a domain member to add additional users to The domain is in the local administrative group, or is a domain with a trusted relationship with another domain that includes many users that you want to add to the local admin group.
Follow the steps below to add an internal administrator:
- At the Enter command number to Select an Option , type value 4 to select the option to add a local administrator, then press Enter .
- If you want to add domain members to the local admin group, type domainusername , then press Enter .
- If you want to add internal users to the local administrators group, type username and then press Enter .
- Click OK when you are prompted to User added to the local Administrators group, then the account you added has been successfully completed.
Configure upgrade settings
Option 5 lets you configure the Hyper-V Server 2008 host to manually or automatically receive Windows upgrades at a daily time.
Follow the steps below to configure upgrade settings for Windows:
- At the Enter Number to Select an Option prompt, type a value of 5 to enter the Windows Update Settings option, then press Enter .
- If Hyper-V host is configured to receive automatically, type M to configure the host to perform the upgrade by you, then press Enter .
- Click OK when you are prompted to Windows Update set to Manual . Hệ thống sẽ không kiểm tra cho cập nhật.
- If the Hyper-V host is manually configured to upgrade, enter A to configure the host to automatically update, then press Enter .
- Click OK when you are prompted with the Windows Update set to Automatic dialog box . Hệ thống sẽ kiểm tra cho cài đặt and cài đặt every day ở 3:00 AM
Configuration to download and install updates
Option 6 allows you to download interactive updates from the Windows Update site by acknowledging that Hyper-V Server 2008 has an Internet connection. When you select this option, a script will be launched to connect the Windows Update client internally to Windows Update servers and determine which updates are missing. If an upgrade is found, a list will be present along with the option to install all updates or cancel updates. If the upgrade is selected, they will be downloaded from the Windows Update page and then installed. If you need a reboot action, there will be a dialog box reminding you to do so.
Follow the steps below to download and install Windows Updates:
- At the Enter Number to Select an Option prompt , enter a value of 6 to select the Download and Install Updates option, then press Enter .
- This script will find the missing files on Windows Updates and provide a list of all the necessary standards and updates. You will be prompted Download and install updates now ?. If you type in Y, all updates in the list will be downloaded and installed.
- You can receive a prompt, restart is required to complete Windows Updates. Restart now? then click Yes to restart the computer.
Configure remote workstation
Option 7 allows you to enable or disable remote desktops on Hyper-V Server 2008 and support other remote clients. Clients using version 6.0 or newer support network level authentication and other advanced features. By default, Windows Vista and Windows Server 2008 use remote clients version 6.0. Windows XP SP2 and Windows Server 2003 SP1 or SP2 use older versions, but you can download and install the upgrade to version 6.0.
Follow the steps below to activate the remote workstation:
- At the Enter Number to Select an Option prompt, type 7 to select the Remote Desktop option, then press Enter .
- Type in the letter E, then press Enter .
- Choose one of the following two options:
a. Type value 1 to activate the remote workstation for clients running version 6.0 or higher using network level authentication, then press Enter .
b. Type in 2 to activate the remote workstation for clients with versions lower than 6.0, then press Enter . - Click OK when prompted with a dialog box that reflects your selection.
Follow the steps below to disable remote workstation:
- At the Enter Number to Select an Option prompt, enter value 7 to select the Remote Desktop option, then press Enter .
- Type in the letter, then press Enter .
- Click OK when prompted for Remote Desktop disabled .
Configure language and territory options
Option 8 allows you to configure the language and territory options for Hyper-V Server 2008. These options include the numeric data format, the location where the server resides, the keyboard and the display language, Administrative options for saving and querying language settings.
Follow these steps to configure language and territory options:
- At the Enter number to Select an Option prompt, type 8 to select this option, then press Enter .
- Configure your desired settings with the options available in the Regional and Language Options dialog box.
- At the end of this configuration process, click OK or Apply to submit your changes, otherwise click Cancel to cancel them.
Configure Date and Time
Option 9 allows you to configure date and time options on Hyper-V Server 2008. This option includes date, time, and region time, etc.
Follow these steps to configure this option:
- At the Enter Number to Select an Option prompt, enter the value 9 to select the Date and Time option and then press Enter .
- Configure the settings as desired by using the options available in the Date and Time Options checkbox .
- At the end of the process, click OK or Apply to submit the changes, or Cancel to cancel.
Log Off option
Option 10 allows you to end the configuration session, log off from the current user and return to the standard Windows login screen.
Follow the steps below to log off from the current user account:
- At the Enter command number to Select an Option , enter the value 10 to select the Log Off User option, then press Enter .
- Click Yes when prompted Are you sure you want to log off? .
Restart options
Option 11 allows you to restart the Microsoft Hyper-V Server 2008 host. If your virtual machines are running, they will be automatically saved before restarting.
Follow the steps below to restart the server:
- At the Enter command number to Select an Option , type in value 11 to select the Restart Server option and then press Enter .
- Click Yes when you get prompted Are you sure you want to restart? .
Option Shut Down
Option 12 allows you to shut down Microsoft Hyper-V Server 2008. If virtual machines are running, they will be saved automatically before shutdown.
Follow the steps below to shut down the server:
- At the Enter Number to Select an Option prompt, type 12 to select the Shut Down Server option, then press Enter .
- Click Yes when prompted with a dialog box Are you sure you want to shut down? .
Exit the command line option
Option 13 allows you to exit the Hyper-V configuration tool and return to the original command prompt. You can manually restart the Hyper-V tool by typing hvconfig.cmd, or it will restart automatically at the time you log into the server.
Follow these steps to exit the Hyper-V configuration tool:
- At the command prompt, type value 13 to select the option Exit to Command Line, then press Enter .
- Type hvconfig.cmd to restart the Hyper-V tool, then press Enter .
Conclude
In this article, I have shown you how to install Microsoft Hyper-V Server 2008 and use the HVConfig.cmd menu to configure basic server settings.
Was this article helpful?
Your feedback helps us improve.
Related Articles
 How to install Hyper-V on Windows Server 20195 minutes read
 Install Hyper-V Virtualization on Windows Server 2008 R22 minutes read
 How to install Hyper-V in Windows Server 20122 minutes read
 Install and configure Hyper-V Tools for remote management16 minutes read
 Instructions for installing Hyper-V2 minutes read
 How to install Hyper Terminal in Ubuntu 20.044 minutes read
Reader Comments 0
Sign in with email or Google to join the discussion.