How to use PuTTY on Windows
This article explains how to use the PuTTY terminal window on Windows, how to configure PuTTY, how to create and save the configuration, and the configuration options to change.
Table of Contents
This article explains how to use the PuTTY terminal window on Windows, how to configure PuTTY, how to create and save the configuration, and the configuration options to change. Advanced topics, such as configuring public key authentication, are also covered in this article.
Download and install
You can download the software for the Windows platform here. Refer to the installation instructions detailed in the article: How to install PuTTY on Windows.
Run PuTTY and connect to the server
If you choose to create a shortcut on the desktop during installation, you can simply open the software by clicking (double) on this shortcut. If not, open the software from the Windows Start menu.
When the software starts, a window titled PuTTY Configuration will open. This window has a configuration window on the left, a Host Name field (or IP address) and other options in the middle, and a window for saving sessions in the lower right.
For ease of use, all you need to do is enter the domain name or IP address of the host you want to connect to the Host Name field and click Open (or press Enter). Domain names will look like students.example.edu. The IP address will look like 78.99.129.32.
If you do not have a server
If you do not have a server to connect, you can try Tectia SSH on Windows or OpenSSH on Linux.
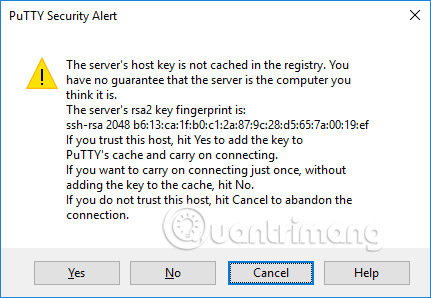
Security warning dialog box
When you connect to the server for the first time, you can see PuTTY's security warning dialog on the server's host key not stored in the registry. This is normal when you connect to the server for the first time. If you receive this message when connecting to a server, it may also mean that someone is trying to attack your connection and steal your password with a man-in-the-middle attack. .
But as mentioned, the first time you connect, this is normal and you just need to click on Yes. If not, you can check the key's fingerprint is displayed and make sure it is the same as the fingerprint used by the server. In fact, almost no one does this because it is still safer to use an appropriate SSH key management solution anyway.
Terminal window and login information
After the security warning, you will receive a terminal window. By default, this is a black and very tasteless window. First, it will ask for your username and password from you. After that, you will receive a command line on the server.
You can enter the terminal window. Now that you are connected to the server and everything you enter in the terminal window will be sent to the server. Server responses are also displayed in this window. You can run any text application on the server using the terminal window. The session ends when you exit the command line shell on the server (usually by typing exit at the command line or pressing Ctrl + D). Alternatively, you can force the session to terminate by closing the terminal window.
Configuration options and profiles are saved
The initial configuration window contains a lot of options. Most of them are not necessary if only for normal use.
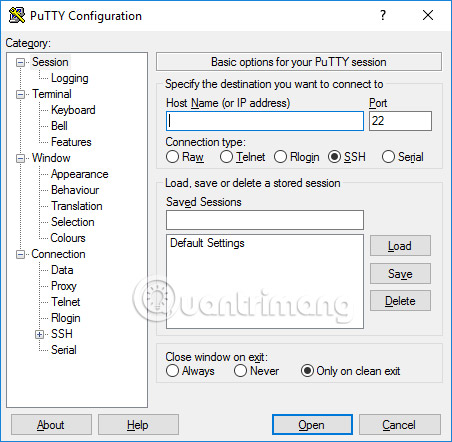
Port
The port field specifies the TCP / IP port to connect to. For SSH, this is the port that the SSH server runs. Normally, the value is 22. If for some reason you need to connect to some other port, just change this value. However, usually only developers change this value to another value, but some businesses also run SSH servers in non-standard ports or run multiple SSH servers on the same server at different ports. .
Connection type
Selecting the connection type almost never needs to change. Just leave it as SSH. SSH is a secure encrypted communication protocol and designed to ensure your passwords and data are fully protected.
Raw connections can be used by developers to connect the TCP / IP socket test (for example, when developing network applications listening on TCP / IP ports).
Telnet is an old protocol that is almost never used unless you are managing a device that has a lifespan of more than 10 years. Telnet is not secure. The password is sent unencrypted on the network. And of course, attackers can easily eavesdrop on information, steal usernames and passwords. Rlogin is an old protocol with similar inadequacies.
Serial port is another communication mechanism to connect computers to peripheral devices. Most personal computers today no longer have serial ports, but sometimes they are still used to control physical devices, measuring devices, machines or communication devices. Another use of serial ports is debugging the operating system or embedded software.
Load, save or delete a stored session
This section allows you to save your settings as a named profile. Just write your new profile name in the Saved Sessions box and click Save to create a new profile. Your server name and other settings are saved in the profile.
Saved profiles appear in the larger box below. Initially it will only contain default settings. The profile you save will be included there. Select a profile and click Load to use the previously saved profile. Select a profile and click Delete to delete the profile no longer needed.
Close the window with the exit command
Finally, closing the terminal window with the exit command indicates that the terminal window is automatically closed when the connection is terminated. There is little need to change it from the default value Only on clean exit.
Configuration options in the left window
You can find other options in the left pane with the Category title . Select a category from here and the right window will change to display configuration options corresponding to that category. The options displayed start to belong to the Session category .
Only relevant options are described here. There are many options, and most of them will never be used.
Terminal options
The options in this category affect terminal device emulation and keyboard mapping. They will largely explain themselves and are not mentioned here. Very few people need to touch these options. Some people may change how to handle bell characters or users of lesser known operating systems may change what is sent by the backspace key or delete characters.
Options in the terminal window
Options affect the appearance and behavior of the terminal window. It can also specify how characters are translated on output and select the font and color for the window.
Connection options
Among connection options, Data options may be useful. The user name that is automatically logged in will identify the user who is logged in, so the name will not have to be entered each time they log in. Proxy options are rarely useful for home users, but may be necessary in businesses that do not allow Internet connections out without using SOCKS proxies or other similar mechanisms. Don't worry if you don't know what a SOCKS proxy is, just exit this section.
Telnet, Rlogin and Serial entries only contain options for those protocols and very few people use them.
However, SSH options are very important and useful for some people. Ordinary users or students need not worry about them. But if you want to use public key authentication, they are necessary. Note that you need to open the SSH option by clicking on the small [+] icon. If not, you won't see all the options.
The option Key exchange, Host Keys and Cipher
You almost never want to touch the options Kex (key exchange), Host Keys or Cipher. All have reasonable default values and most people don't know enough about encryption enough to choose any better value. So just ignore these options, unless you really know what you're doing.
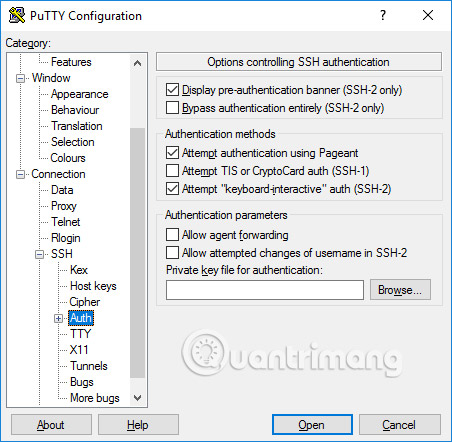
Authentication options - Public key authentication
Auth subtree (small branch authentication) contains some options that may be useful. When clicking Auth , it will display a window titled Options SSH authentication control. To enable public key authentication, simply create the SSH key and then click the Browse button in the authentication parameter box in the middle right of this configuration window. Advanced users may also want to select Allow agent forwarding checkbox to use a single login based on the key.
Most users do not need to create SSH keys and do not need to know what public key authentication is. However, system administrators should learn and should be familiar with managing SSH keys and making sure their organizations deploy provisioning and termination processes, as well as checking the appropriate SSH keys. .
Active directory authentication (GSSAPI / Kerberos)
One of PuTTY's interesting features is support for one-time login to the active directory. Technically, it uses the Kerberos protocol through a programming interface called GSSAPI. In the SSH protocol, this mechanism is called GSSAPI authentication. Business users use Kerberos authentication (for example, through Centrify or Quest Authentication Services aka Vintela) may want to take advantage of this one-time login capability. Other users do not need to care about this. You can find the settings for GSSAPI authentication in the SSH / Auth section. Note that you must expand the Auth section by clicking on the [+] icon to see the GSSAPI options.
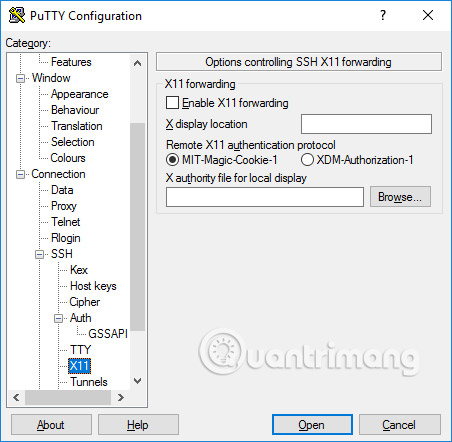
X11 forwarding options
X11 is a protocol and system for running graphical applications on Unix and Linux. It supports running graphics applications remotely via an external network.
PuTTY does not deploy the X11 server (the display side), but it may work with some other products that perform X server functionality on Windows. A popular free alternative is XMing.
To use an X11 server, you need to select Enable X11 password and enter localhost: 0.0 in the X display location box. You do not need to care about other settings.
The Tunneling option
The last list of configuration options that we will discuss is the Tunnel. They are used to configure SSH tunneling, also known as SSH port forwarding. This control panel can be used to determine forwarding for the connection. Transitions are stored in the profile.
To add a local forwarding (ie the TCP / IP port on the local machine is forwarded to the port on the remote machine or to a machine accessible from the remote machine), write the source port to the Source port, machine destination and port (eg, www.dest.com:80) in the Destination field and select Local. Click Add.
To add a remote forwarding port (ie the TCP / IP port on the remote machine is forwarded to the port on the local machine or to a machine accessible from the local machine), specify Source port (source port) on the destination machine and Destination (destination) can be accessed from the local machine (your computer).
Usually you do not need to check the Local ports that accept connections from other servers or for remote ports. However, if connecting to a port that is forwarded from a network, instead of from localhost (local server), then you need to check these ports. There is a small security risk, but usually it is not a problem in the case of using SSH tunneling. However, you should understand that anyone who can connect to the corresponding computer can also connect to the forwarding port. In some cases, port forwarding can be used to bypass firewalls.
See more:
- VPN and SSH: Which method is more secure?
- Install SSH on the Router for secure web access anywhere
- Protect VNC connection by SSH
Was this article helpful?
Your feedback helps us improve.
Related Articles
 How to use PuTTY on Cisco routers and switches2 minutes read
 How to install PuTTY on Windows6 minutes read
 How to install Putty SSH Client on Ubuntu 20.04 LTS4 minutes read
 5 ways to use SSH in Windows6 minutes read
 How to activate and use SSH commands on Windows 104 minutes read
 How to create SSH key on Windows9 minutes read
Reader Comments 0
Sign in with email or Google to join the discussion.