Instructions to encrypt and 'hide' BitTorrent traffic data
TipsMake.com - In the following article, we will introduce and guide you some essential factors to apply in 'hiding' and encrypting traffic through BitTorrent.
What are these essentials?
Through the previous analysis articles on TipsMake.com , we understand the basics of BitTorrent as a form of storing and sharing files and data online. Besides, the transmission and sharing of unallocated files and data is a contradictory form, for example when we use and download files from a certain fixed source, upgrade or update. Update the new version of the application . or simply understand that the developer software is transmitted directly to the user.
The method of peer-to-peer data file transfer was born and replaced the concept. When you use BitTorrent , in essence we don't have to download files from a single source, but from many different sources. However, when you directly participate in this download process, the privacy of personal information is not guaranteed, and this is one of the risks users must accept when using BitTorrent .
To protect yourself against the risks that may occur at any time in this BitTorrent world, many people have chosen and used a solution to encrypt and hide BitTorrent traffic . However, this approach also has certain advantages and disadvantages. For example:
- Your Traffic BitTorrent will be temporarily hidden, and the IP address that others see is not the user's real IP address. If you have applied the following encryption method, even the provider - ISP will not know what you have been doing, and from this point, users can freely download via BitTorrent without have to worry about anything.
- However, your download speed will be significantly limited when applying this method.
To do this, you need to prepare some of the following requirements:
- A BitTorrent client, most typically uTorrent
- A proxy / SSH protocol, in this test we use BTGuard
- To encrypt the data downloaded via BitTorrent, you will need to apply an extra layer of security through the proxy server when connecting to the tunnel after encryption. We recommend using BTGuard and the free PuTTY program.
In the lower part of the article, we will cover some basic steps to configure and set up any SOCKS proxy to work with uTorrent (or other client applications).
Set up uTorrent:

First, start uTorrent, open Options> Preferences (or press CTRL + P ) to open the Preferences control window and open the Connection section. Here, you fill in the required information into the corresponding fields:
- Select Type as SOCKS5
- Proxy: proxy.btguard.com
- Port: 1025
Check the box for Authentication and continue to fill in BTGuard account in the Username and Password section (if you use other services, just change the same parameters). Next, check all the boxes under Authentication section including Use proxy for hostname lookups and Use proxy for peer-to-peer connections , as well as boxes in Proxy Privacy section: Disable all local DNS lookups, Disable features không tìm thấy thông tin thông tin , và gỡ bỏ không được hỗ trợ các kết nối Then restart uTorrent to apply these changes.
Encryption process:
In fact, the process of encrypting data via BitTorrent can still be detected by Internet service provider - ISP , besides the download speed is also affected quite a lot as we mentioned above. . BTGuard has provided users with a built-in proxy encryption tool, and if you want to use this utility, download it here. Install this program in folder C: BTGUARD (this step is extremely important, because if you change the directory structure, the service will not work properly). Then, launch the application, re-open uTorrent and the Preferences panel, replace proxy.btguard.com with 127.0.0.1 (your computer's local IP address), keep the other settings and restart uTorrent one Again. And then, we have completed the process of connecting to the BTGuard server, but the entire data traffic between uTorrent and other shared servers will be encrypted.
On the other hand, if you want to use the SSH service to connect to the server and encrypt it separately, you will need to use PuTTY to connect to SSH and create a local proxy for uTorrent traffic. Note that if you have BTGuard as well as the above support tool, you should skip this step, in case of using other services, continue to refer to the lower part of the article.
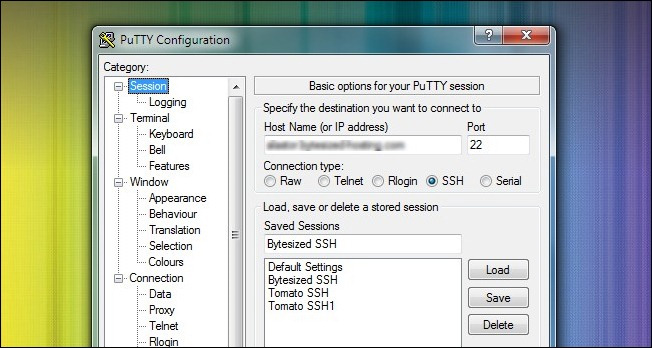
PuTTY is a Telnet / SSH client application for Windows and Linux that allows users to easily identify traffic data through encrypted tunnels. After downloading and installing PuTTY on your computer, starting the program, the first screen displayed is Session. Here, you enter the information and address of the service provided SSH, the default SSH port is 22 , check the SSH box, continue and name the session to use in the next time:

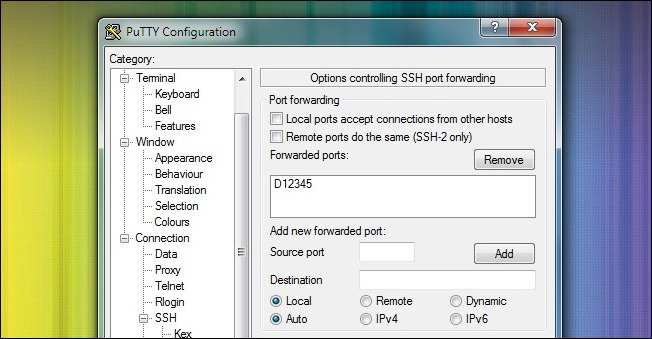
Then, go to Connections> SSH , where we will need to create a separate port value. Enter the value in the Source box (you can fill in any number as long as it is not allowed to coincide with the existing ports on the system, in this test it is 12345 ), select 2 Dynamic and Auto boxes, then press Add :

Save the changes of this Session section by pressing the Save button outside. Next, select Open to open SSH tunnel to SSH host and log in with the above information. Once logged in via PuTTY with the above credentials, we were able to use PuTTY as a SOCKS server. Open uTorrent and Preferences , set the specifications here like BTGuard except for the IP address part 127.0.0.1 (proxy server on the system), change the Port number to 12345 , and leave the Authentication section blank.
Check:

When you set up a web browser with a proxy server, access and check the IP address you are using through some online support services like WhatIsMyIP. What about BitTorrent ? The same test process with BitTorrent is not so simple.
In fact, after setting up the uTorrent activity feature through some of the above, visit this address. Here, you open Generate Torrent card, then save this torrent result file to your computer, then open it with uTorrent , similar to the image below:

Click on the torrent section and check the information in the display section at the bottom of the window. Click the Trackers tab, the information here is the signal returned from the tracker (this test is tracker CheckMyTorrentIP ):

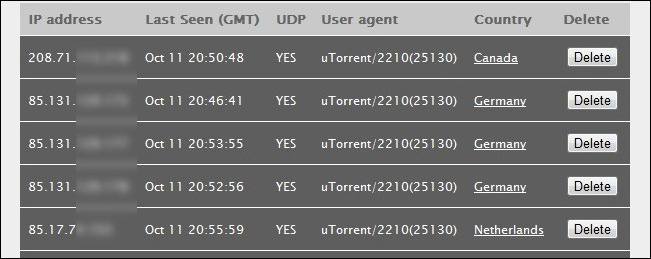
The IP address listed here is the IP address of the new proxy service. If these IP addresses do not match the above setup steps, please check again. Besides, while accessing CheckMyTorrentIP and selecting the Check IP tab, we will see all the IP addresses that your torrent file has connected to:

Good luck!